As the leaves turn brilliant shades of orange and gold, and the crisp autumn air makes its presence felt, the culinary world begins to embrace the rich, warm flavors of the season. One of the most beloved ingredients that embodies the essence of fall is pumpkin. This No-Bake Mini Pumpkin Cheesecake recipe not only captures the vibrant taste of pumpkin but also incorporates a delightful blend of spices that evoke cozy memories of autumn gatherings and festive celebrations. With its creamy texture and rich flavor profile, this dessert is sure to become a favorite at your next gathering.
The appeal of this no-bake pumpkin cheesecake is twofold—its delicious taste and the convenience it offers for home bakers. Unlike traditional cheesecakes that require baking and careful monitoring of oven temperatures, this no-bake version is simple and straightforward. It allows you to create an impressive dessert without the time-consuming process of baking. This makes it an ideal choice for those who may be intimidated by the idea of baking a cheesecake or for anyone looking to save time in the kitchen.
Mini desserts have gained popularity in recent years for their versatility and presentation. These petite cheesecakes are perfect for various occasions, from cozy family dinners to larger Thanksgiving gatherings and festive dessert parties. Their individual servings make them easy to serve and enjoy, allowing guests to indulge in a sweet treat without the guilt of a large slice. Furthermore, they can be made ahead of time, giving you more freedom to relax and enjoy your company.
Understanding the Ingredients
To create the perfect No-Bake Mini Pumpkin Cheesecakes, it’s essential to understand the role of each ingredient in this delightful recipe. Here’s a detailed breakdown of what you’ll need and how each component contributes to the overall flavor and texture.
Graham Cracker Crumbs
The foundation of any cheesecake is its crust, and for our mini pumpkin cheesecakes, we use graham cracker crumbs. These add a subtle sweetness and a slightly sandy texture that provides a wonderful contrast to the creamy cheesecake filling. The crumbly nature of graham crackers absorbs some moisture and helps to create a stable base that holds the cheesecake together.
When selecting graham crackers, opt for plain varieties without additional flavors to ensure that the pumpkin and spice flavors shine through. You can either purchase pre-made graham cracker crumbs or crush whole graham crackers in a food processor for a fresher taste.
Unsalted Butter
Unsalted butter plays a crucial role in binding the crust together while adding richness to the flavor. Using unsalted butter allows you to have better control over the overall salt levels in the dessert, ensuring that the sweetness of the cheesecake is balanced perfectly with the crust. It’s important to melt the butter before mixing it with the graham cracker crumbs, as this will help achieve a cohesive mixture that can be easily pressed into the liners.
Granulated Sugar
Granulated sugar is essential for sweetening both the crust and the filling. While the graham crackers provide a natural sweetness, the added sugar enhances the flavor of the dessert and balances the richness of the cream cheese. In this recipe, a moderate amount of sugar helps to ensure that the cheesecakes are pleasantly sweet without being overly sugary.
Cream Cheese
The star ingredient of any cheesecake is cream cheese, and for this recipe, it’s vital to use softened cream cheese. Softened cream cheese ensures a smooth, creamy filling that is free of lumps. This is particularly important in a no-bake cheesecake, as the filling relies on the cream cheese to achieve its thick, velvety texture. Always allow the cream cheese to come to room temperature before mixing to make it easier to blend with the other ingredients.
Pumpkin Puree
Pumpkin puree is the primary flavor agent in this recipe, bringing that signature autumn taste to the cheesecakes. It’s crucial to use pure pumpkin puree rather than pumpkin pie filling, which often contains added spices and sugar. Pure pumpkin puree is nutrient-dense, rich in vitamins A and C, and adds moisture to the filling without overpowering it. When selecting pumpkin puree, look for canned varieties or, if you’re feeling adventurous, roast and puree your own pumpkin for a fresher flavor.
Powdered Sugar
Powdered sugar, also known as confectioners’ sugar, is used in the filling to achieve a smooth consistency. Unlike granulated sugar, powdered sugar dissolves quickly and easily into the cream cheese, preventing any grittiness in the final product. It also adds a touch of sweetness that complements the pumpkin and spices perfectly.
Vanilla Extract & Spices
A hint of vanilla extract enhances the overall flavor of the cheesecake, providing a warm, aromatic backdrop to the pumpkin. Additionally, spices such as cinnamon, nutmeg, and ginger are essential for creating that classic pumpkin pie flavor. These spices not only elevate the taste of the cheesecakes but also evoke the comforting aromas associated with fall baking.
Whipped Cream
Whipped cream is the perfect finishing touch for these mini cheesecakes, adding a light, airy texture that balances the richness of the filling. You can use store-bought whipped cream for convenience, or make your own by whipping heavy cream with a bit of powdered sugar and vanilla extract until soft peaks form. The whipped cream not only enhances the visual appeal of the cheesecakes but also adds a luscious creaminess that elevates the dessert experience.
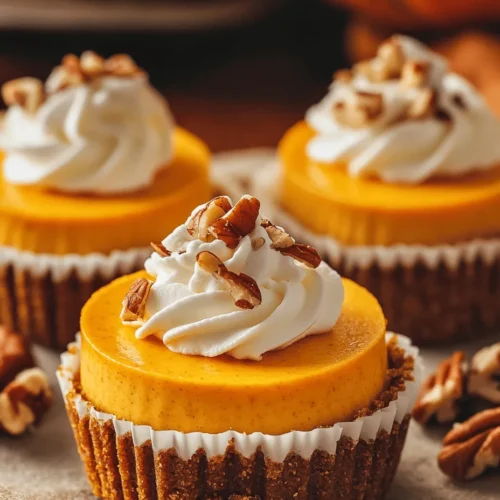
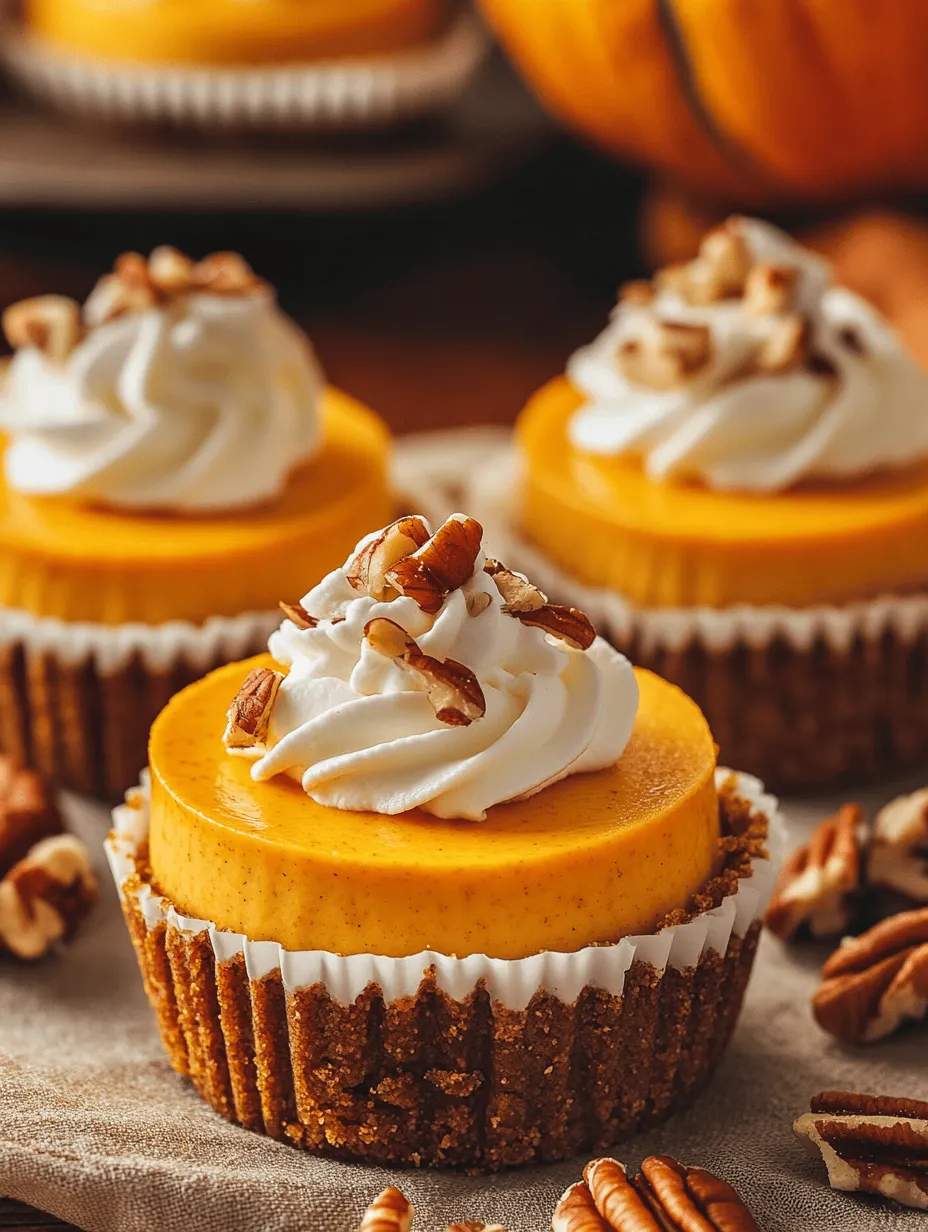
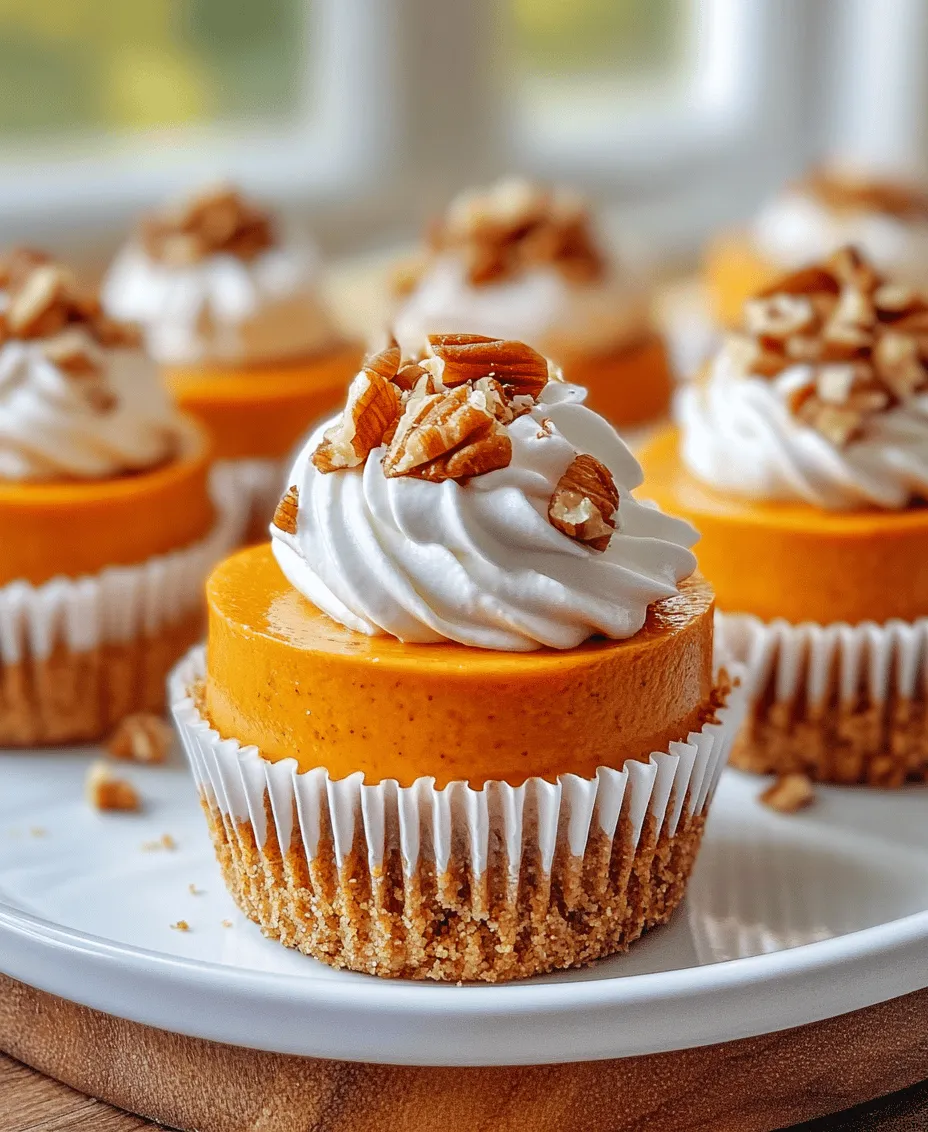
Crushed Pecans
For those looking to add an extra layer of flavor and texture, crushed pecans make an excellent optional garnish. Their nutty crunch complements the creamy cheesecakes and adds a delightful contrast to the smooth filling. Simply sprinkle a few crushed pecans on top of each cheesecake before serving for an elegant touch.
Step-by-Step Instructions for No-Bake Mini Pumpkin Cheesecakes
Now that you have a thorough understanding of the ingredients and their roles, let’s dive into the step-by-step instructions for creating your No-Bake Mini Pumpkin Cheesecakes.
Preparing the Crust
1. Gather Your Ingredients: Start by gathering your graham cracker crumbs, melted unsalted butter, and granulated sugar in a mixing bowl.
2. Mix the Ingredients: In a medium bowl, combine 1 cup of graham cracker crumbs, 1/4 cup of granulated sugar, and 1/2 cup of melted unsalted butter.
3. Achieve the Right Consistency: Use a fork or a spatula to mix the ingredients until they are well combined. The mixture should resemble wet sand and hold together when squeezed. If it appears too dry, you can add a little more melted butter, one tablespoon at a time, until the desired consistency is achieved.
Pressing the Crust
1. Prepare the Cupcake Liners: Line a muffin tin with cupcake liners. This will make it easy to remove the cheesecakes later and provide a clean presentation.
2. Distribute the Crust Mixture: Using a tablespoon or a small ice cream scoop, portion out the crust mixture into each cupcake liner.
3. Firmly Press the Crust Mixture: Use the back of a small measuring cup or your fingers to firmly press the crust mixture into the bottom of each liner. Ensure that it is evenly distributed and compacted to create a solid base for the cheesecake filling.
4. Chill the Crust: Once all the crusts are pressed, place the muffin tin in the refrigerator for about 15-20 minutes to set while you prepare the cheesecake filling. This chilling time allows the butter to firm up, ensuring that the crust holds its shape when the filling is added.
Making the Cheesecake Filling
1. Mix the Cream Cheese: In a large mixing bowl, add 16 ounces of softened cream cheese. Using an electric mixer, beat the cream cheese on medium speed until it is smooth and creamy with no lumps.
2. Incorporate the Pumpkin Puree: Add 1 cup of pumpkin puree to the cream cheese and mix until well blended.
3. Add the Sugars and Spices: Gradually mix in 1 cup of powdered sugar, 1 teaspoon of vanilla extract, and your choice of spices—typically, 1 teaspoon of ground cinnamon, 1/2 teaspoon of ground nutmeg, and 1/4 teaspoon of ground ginger. Continue to mix until everything is fully incorporated and the mixture is smooth.
4. Finish the Filling: Fold in 1 cup of whipped cream to the pumpkin mixture gently until combined. This step adds airiness to the filling, ensuring that it’s light and fluffy.
With these initial steps completed, you are one step closer to enjoying your No-Bake Mini Pumpkin Cheesecakes. By understanding the ingredients and following these detailed instructions, you will set the stage for a deliciously satisfying dessert that embodies the flavors of fall. Stay tuned for the final steps to assemble and serve your delightful mini cheesecakes!
Instructions for Beating Cream Cheese
To achieve that luscious, creamy texture that is the hallmark of a great cheesecake, start by ensuring your cream cheese is at room temperature. Cold cream cheese can lead to lumps in your filling, so remove it from the fridge about 30 minutes before you begin.
1. Beat the Cream Cheese: Place the softened cream cheese in a mixing bowl. Using an electric mixer on medium speed, beat the cream cheese for about 2-3 minutes until it’s smooth and creamy. Scrape down the sides of the bowl frequently to ensure all the cream cheese is evenly mixed.
2. Incorporate Sugar: Gradually add granulated sugar to the cream cheese while mixing. This step is crucial as it helps to further smooth out the cream cheese and sweeten your filling. Continue to beat the mixture until the sugar is fully integrated and the mixture is fluffy.
3. Add Sour Cream and Vanilla: Next, add the sour cream and vanilla extract. Beat on medium speed for another minute until everything is well combined. The sour cream adds a nice tang and creaminess to the cheesecake filling.
Tips for Incorporating Pumpkin and Spices Without Overmixing
When it comes time to add the pumpkin puree and spices, it’s essential to do this gently to maintain the airy texture of your filling.
– Fold in Pumpkin: Carefully add the pumpkin puree to your cream cheese mixture. Using a rubber spatula, fold the pumpkin into the mixture rather than beating it. This method helps maintain that light texture while ensuring the pumpkin is evenly distributed.
– Spice It Up: Sprinkle in your pumpkin pie spice (or the cinnamon, nutmeg, and ginger if using separately). Just as with the pumpkin, gently fold in the spices until they are fully incorporated. Overmixing at this stage can lead to a denser cheesecake, which we want to avoid.
Filling the Cups
Once your mixture is well combined, it’s time to fill your prepared cups.
1. Portioning the Filling: Using a small cookie scoop or a spoon, carefully portion the pumpkin cheesecake filling into each mini graham cracker crust. Aim for an even amount in each cup to ensure uniformity in serving sizes. Generally, each cup should be filled about ¾ full.
2. Smoothing the Surface: After portioning, use the back of a spoon or a small offset spatula to smooth out the tops of the cheesecakes. This not only makes them look more appealing but also helps create a nice surface for any garnishes you plan to add.
Suggestions for Presentation Aesthetics
Presentation plays a vital role in the enjoyment of food. Here are a few tips to make your mini pumpkin cheesecakes visually stunning:
– Garnishes: Consider garnishing each cheesecake with a dollop of whipped cream right before serving. You can also sprinkle a pinch of pumpkin pie spice on top, or even a few pecans for added texture and flavor.
– Serving Containers: Use clear dessert cups to showcase the beautiful layers of your cheesecake. If you want a rustic look, small mason jars can add charm and make for easy transport to parties or gatherings.
Chilling and Serving
Chilling your mini pumpkin cheesecakes is critical for setting the filling and melding the flavors.
1. Chilling Time: After filling the cups, place them in the refrigerator to chill for at least 4 hours, or ideally overnight. This time allows the flavors to marry and the cheesecake to firm up beautifully.
2. Garnishing Before Serving: When you’re ready to serve, remove the cheesecakes from the fridge. Top each one with freshly whipped cream and a sprinkle of crushed pecans or a drizzle of caramel sauce for an extra touch of indulgence.
Nutritional Information and Benefits
These no-bake mini pumpkin cheesecakes not only satisfy your sweet tooth but also provide some nutritional benefits thanks to their key ingredients.
– Nutritional Profile: Each mini cheesecake is relatively low in calories compared to traditional desserts, especially when portion-controlled. They offer a delightful balance of carbohydrates, fats, and proteins, making them a satisfying treat.
– Health Benefits of Pumpkin: Pumpkin is a powerhouse of nutrients. It’s high in beta-carotene, which converts to vitamin A, and is rich in dietary fiber, vitamins C and E, and antioxidants. The spices used in the recipe, such as cinnamon and ginger, also boast anti-inflammatory properties and may help boost the immune system.
Occasions for Serving Mini Pumpkin Cheesecakes
These delightful mini cheesecakes are perfect for various occasions, making them a versatile addition to your dessert repertoire.
– Fall Festivals and Thanksgiving Dinners: Their seasonal flavors make them a natural fit for fall celebrations. They are easy to transport and serve, making them an excellent choice for potlucks and gatherings.
– Holiday Parties: Their bite-sized nature allows guests to indulge without overdoing it, which is often appreciated during festive occasions filled with rich foods.
– Beverage Pairings: These mini cheesecakes pair beautifully with warm beverages like coffee or spiced chai tea. For a more festive twist, consider serving them alongside fall-themed cocktails, such as a pumpkin spice martini or apple cider mimosa.
Variations and Customizations
This recipe can easily be adapted to suit different dietary needs or personal preferences.
– Gluten-Free Option: For a gluten-free version, use gluten-free graham crackers or almond flour to create the crust.
– Vegan Version: Substitute the cream cheese with a vegan cream cheese alternative and use coconut cream instead of sour cream. Ensure that the graham crackers are also vegan.
– Flavor Variations: If you’re feeling adventurous, try adding a swirl of melted chocolate or caramel into the cheesecake filling before chilling. You can also experiment with different spices, such as cardamom or allspice, to create your unique flavor profile.
– Creative Presentations: Instead of cups, consider making a layered parfait with pumpkin cheesecake filling, whipped cream, and crushed graham crackers. This can be served in a larger glass dish for family-style sharing.
Conclusion: Embracing the Joy of No-Bake Mini Pumpkin Cheesecakes
In summary, these no-bake mini pumpkin cheesecakes offer a delightful balance of flavor and texture, making them a perfect seasonal treat. Their simplicity in preparation, combined with the rich flavors of pumpkin and warm spices, creates a dessert that not only satisfies but also brings joy to any gathering.
We encourage you to experiment with this recipe and make it your own. Share it with loved ones, create memorable moments around the table, and embrace the joy of seasonal cooking. After all, recipes like these not only nourish but also foster connection and create lasting memories in our culinary journeys.