Introduction
Khameer Bread, a traditional staple in Middle Eastern cuisine, has captured the hearts (and stomachs) of food lovers around the globe. Renowned for its delightful texture and rich flavor, this bread serves as a versatile companion to a variety of dishes, making it a beloved choice in many households. From being a fundamental part of a hearty meal to a delightful snack on its own, Khameer Bread encompasses the essence of comfort food.
The beauty of Khameer Bread lies in its simplicity. With just a few basic ingredients, you can create a loaf that is both aromatic and satisfying. Its soft, fluffy texture and slightly chewy crust make it perfect for dipping into sauces, wrapping around savory fillings, or simply slathering with butter. This bread not only satisfies hunger but also evokes the warmth of home-cooked meals—a true culinary treasure.
In this article, we aim to guide you through the process of making Khameer Bread, providing you with step-by-step instructions and tips to ensure your baking experience is as enjoyable as the end result. Whether you’re a seasoned baker or a novice looking to explore new flavors, this recipe will empower you to create your own delightful bread right in your kitchen.
Understanding Khameer Bread
Khameer Bread is characterized by its light and airy texture, with a subtle flavor that enhances any meal it accompanies. Traditionally, it is made using all-purpose flour, water, yeast, and a touch of salt, resulting in a bread that is both soft and slightly chewy. The dough is typically allowed to rise, creating a fluffy interior that is perfect for holding onto dips or fillings.
The origins of Khameer Bread can be traced back to the Middle East, where it has been a staple for centuries. It is often enjoyed during communal meals, celebrations, and gatherings, symbolizing hospitality and togetherness. In various cultures, Khameer Bread is served alongside dishes such as stews, grilled meats, and salads, making it a versatile addition to any menu.
From a nutritional standpoint, Khameer Bread is a wholesome choice. Made primarily from all-purpose flour, it provides carbohydrates that are essential for energy. The inclusion of olive oil not only enhances the flavor but also adds healthy fats, while optional ingredients like sesame seeds offer additional nutrients and a delightful crunch. Overall, Khameer Bread is not just a delicious treat; it also contributes beneficial elements to your diet.
Ingredients Breakdown
To embark on your Khameer Bread journey, it’s essential to understand the role of each ingredient in the recipe. Here’s a breakdown of what you will need and why these components are crucial to achieving the perfect loaf:
– All-Purpose Flour: The backbone of our bread, all-purpose flour provides structure and texture. It contains a moderate amount of protein, which is vital for gluten development. If you’re looking for alternatives, bread flour can be used for a chewier texture, while whole wheat flour can offer a nuttier flavor and more nutrients.
– Salt: More than just a seasoning, salt plays a critical role in flavor enhancement and yeast activation. It helps to control fermentation, ensuring that the yeast works efficiently without overpowering the dough. A pinch of salt enhances the overall taste of the bread.
– Sugar: Sugar is not only a sweetener but also acts as food for the yeast during fermentation. It helps to create a golden-brown crust by promoting browning through the Maillard reaction. A small amount goes a long way in contributing to the flavor and appearance of the finished loaf.
– Instant Yeast: This ingredient is a baker’s best friend. Instant yeast is convenient and reliable, allowing for quicker rising times compared to active dry yeast. It doesn’t require proofing, making the bread-making process smoother and more efficient.
– Warm Water: Water is essential for activating the yeast and hydrating the flour. The ideal temperature for activating yeast is between 100°F to 110°F (37°C to 43°C), which helps to create the perfect environment for fermentation. Too hot, and you risk killing the yeast; too cold, and it won’t activate properly.
– Olive Oil: This flavorful oil not only enriches the dough but also contributes to its tenderness. The fat in olive oil helps to keep the bread moist and adds a distinct flavor that enhances the overall taste of Khameer Bread.
– Ground Cumin (Optional): Ground cumin adds a warm, earthy flavor to the bread that many find irresistible. While it’s not a traditional ingredient in all recipes, it can elevate your Khameer Bread to new heights. Cumin pairs well with savory dishes, making it a fantastic addition if you plan to serve the bread with a hearty meal.
– Sesame Seeds (Optional): Sprinkling sesame seeds on top of your bread before baking not only adds a delightful crunch but also boosts the nutritional profile. These tiny seeds are rich in healthy fats, protein, and essential minerals, making them a great garnish for your Khameer Bread.
Step-by-Step Instructions
Activating the Yeast
The first step in making Khameer Bread is to activate the yeast. Begin by measuring out the warm water into a mixing bowl. Add the sugar and sprinkle the instant yeast over the surface of the water. Allow it to sit for about 5-10 minutes until it becomes frothy and bubbly. This bubbling action indicates that the yeast is active and ready to work its magic in your dough. If you don’t see any bubbles, it’s best to start over with fresh yeast, as this can affect the rise of your bread.
Mixing Dry Ingredients
While the yeast is activating, you can prepare your dry ingredients. In a separate large mixing bowl, combine the all-purpose flour, salt, and—if using—ground cumin. Whisk the ingredients together thoroughly to ensure even distribution. This step is crucial, as it helps to avoid clumps of salt or cumin in your dough, which can lead to uneven flavor and texture.
Combining Ingredients
Once your yeast mixture is frothy, it’s time to bring everything together. Create a well in the center of your dry ingredients and pour in the activated yeast mixture along with the olive oil. Using a wooden spoon or spatula, gently stir the mixture until it starts to form a shaggy dough. The dough should be slightly sticky but should come together in a cohesive mass. Avoid overmixing at this stage, as you want to create the initial structure without fully developing the gluten just yet.
Kneading the Dough
Now comes the fun part: kneading the dough. Transfer your shaggy dough onto a lightly floured surface. Using the heel of your hand, push the dough away from you, then fold it back over itself. Rotate the dough a quarter turn and repeat this process. Kneading is essential for developing the gluten, which gives the bread its structure and chewiness. Continue kneading for about 8-10 minutes until the dough becomes smooth and elastic. You should be able to stretch it without it tearing easily, a sign that the gluten has developed well.
As you knead, feel free to sprinkle a little more flour on the surface if the dough becomes too sticky, but be cautious not to add too much flour, as this can lead to a dense bread. The goal is to achieve a soft, pliable dough that feels slightly tacky but not overly sticky.
These initial steps are just the beginning of your Khameer Bread-making adventure. Once you’ve successfully kneaded your dough, the next phase will involve letting it rise, shaping, and finally baking your delightful bread. But for now, take a moment to appreciate the transformation your ingredients have undergone, bringing you closer to a delicious homemade loaf.
Signs of Well-Kneaded Dough
When making Khameer Bread, one of the first indicators that you’ve successfully kneaded your dough is its texture. Well-kneaded dough should feel smooth, elastic, and slightly tacky to the touch, but not sticky. To test for proper kneading, perform the “windowpane test.” Take a small piece of dough and gently stretch it between your fingers. If it stretches into a thin, translucent membrane without tearing, your dough is ready. If it breaks easily, continue kneading for a few more minutes until you achieve the desired consistency.
First Rise
Once your dough is kneaded to perfection, it’s time for the first rise, also known as bulk fermentation. Transfer your dough into a lightly greased bowl, covering it with a damp cloth or plastic wrap. This prevents the dough from drying out while it rises. Allow it to rise in a warm, draft-free area until it has doubled in size. This can take anywhere from 1 to 2 hours, depending on the room temperature and the yeast’s activity level.
Ideal Conditions for Dough Rising and How to Check Dough Readiness
For the best results, aim for a warm environment with a temperature between 75°F and 85°F (24°C to 29°C). If your kitchen is too cool, you can create a warm spot by preheating your oven for a few minutes, then turning it off and placing your dough inside. To check if the dough is ready, gently poke it with your finger. If the indentation springs back slowly, it’s ready for shaping. If it springs back immediately, it needs more time to rise.
Shaping the Bread
After the first rise, it’s time to shape your dough. Start by gently deflating the dough on a floured surface, being careful not to overwork it. Divide the dough into equal pieces, typically around 8 to 10, depending on your desired size. Use a bench scraper for clean cuts and to keep the pieces uniform.
Gently shape each piece into a round ball by tucking the edges under, creating surface tension. This technique helps maintain the air pockets inside the dough, resulting in a light and airy bread. Avoid pushing out too much air; the gentle handling will ensure your Khameer Bread has the perfect texture.
Second Rise
Once shaped, place the dough balls on a baking sheet lined with parchment paper, spacing them adequately to allow for expansion. Cover them with a clean kitchen towel and let them rise again until they’ve doubled in size, usually about 30 to 45 minutes. This second rise is crucial as it enhances the bread’s flavor and texture, allowing the yeast to develop further. You’ll notice the dough becoming puffy and airy, indicating that it’s ready for baking.
Preheating the Oven
While the dough undergoes its second rise, preheat your oven to 425°F (220°C). A properly preheated oven is essential for baking bread, as it helps to create a good oven spring, which is the initial rise of the bread when it first hits the heat. Make sure your oven is at the correct temperature before placing the bread inside, as this will significantly impact the final texture and crust.
Baking the Bread
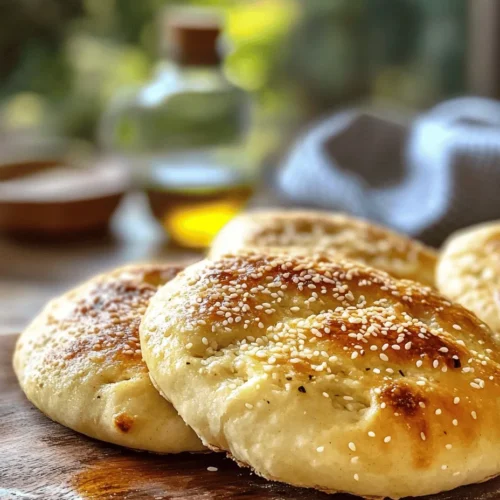
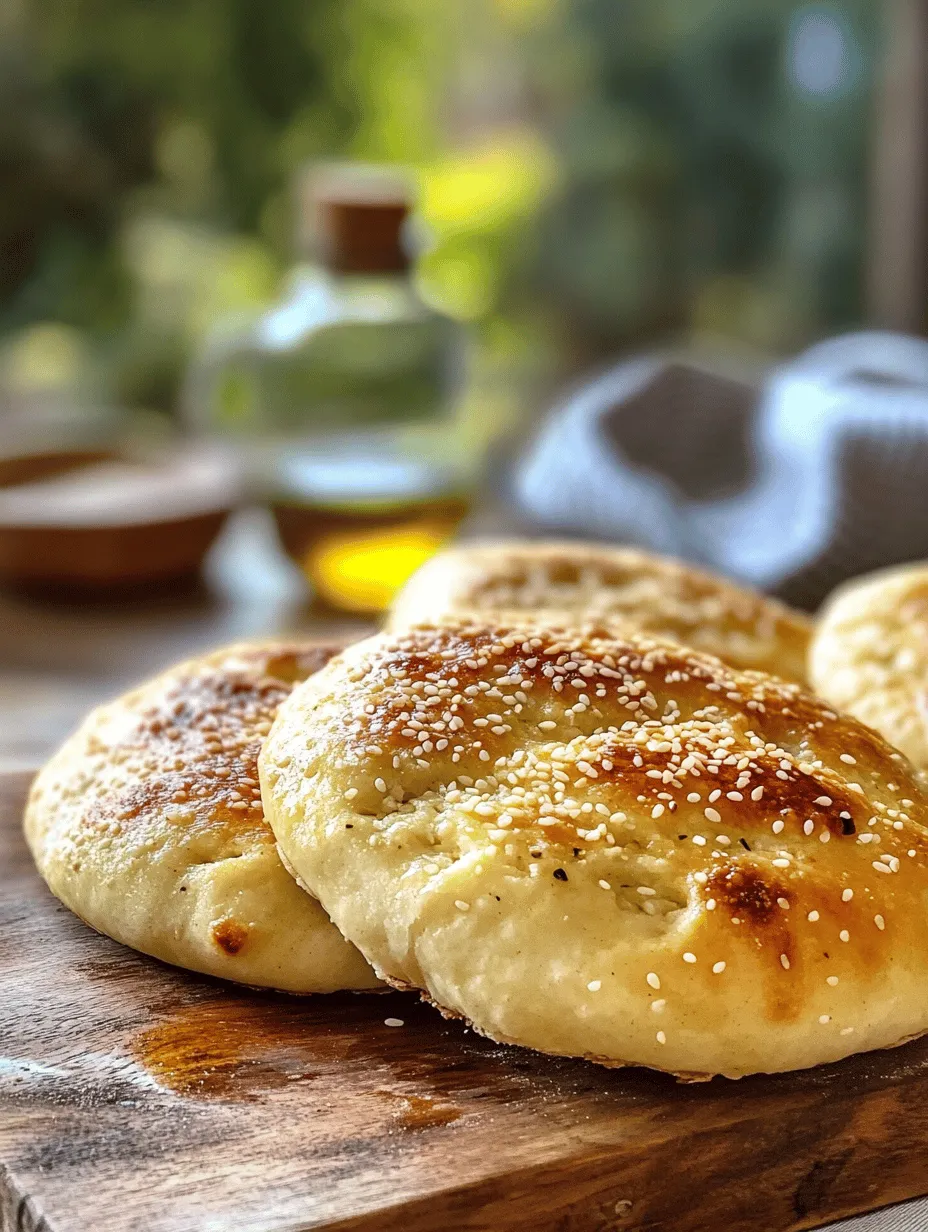
When your dough has risen perfectly, it’s time to bake your Khameer Bread. Before placing the bread in the oven, you may choose to sprinkle sesame seeds on top for added flavor and crunch. Bake the bread for 15 to 20 minutes, or until golden brown. The ideal internal temperature for baked bread should reach around 190°F (88°C).
To check for doneness, tap the bottom of the loaf; it should sound hollow. Additionally, a beautifully golden crust will form on the outside, indicating that your bread is not only cooked through but also perfectly baked.
Cooling and Serving
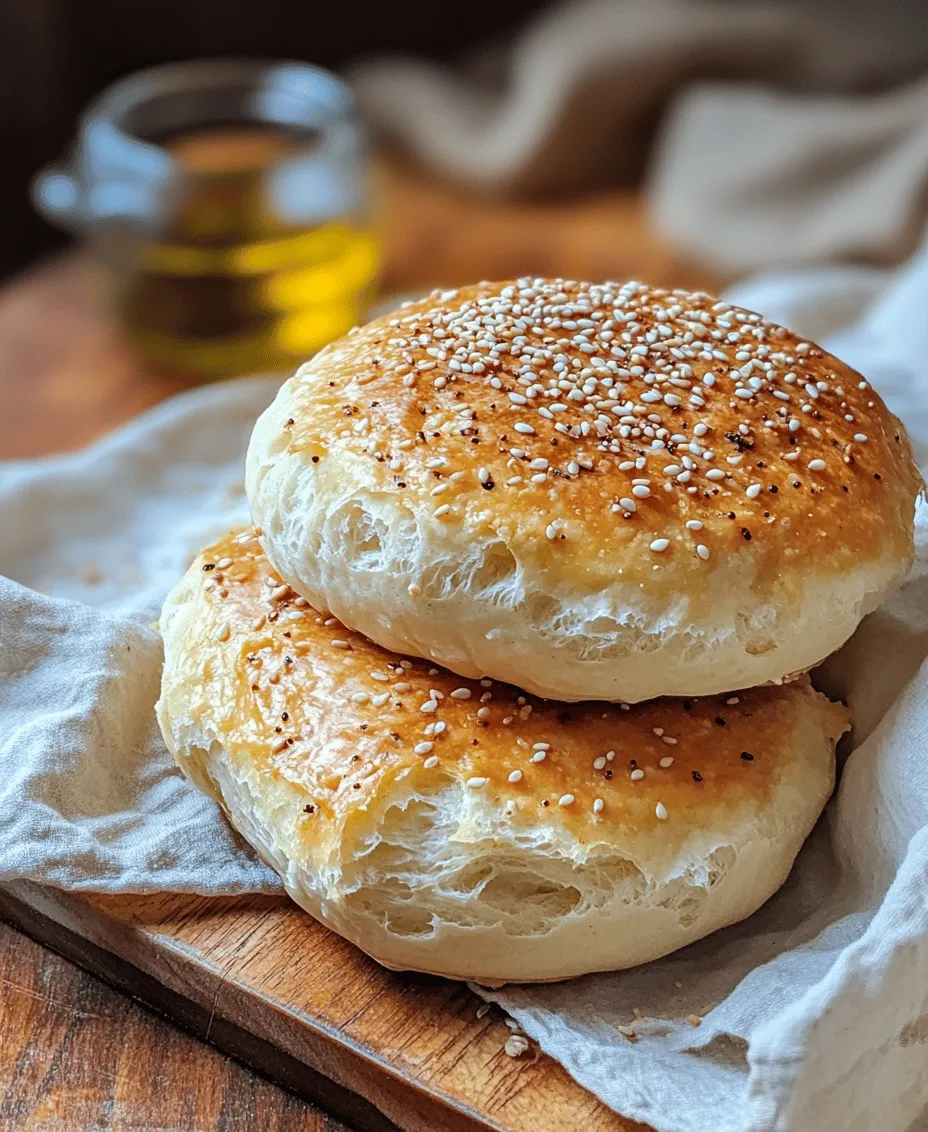
Once baked, remove your Khameer Bread from the oven and let it cool on a wire rack. Cooling is essential as it allows the steam to escape, preventing the bread from becoming soggy. Serve warm or at room temperature as an accompaniment to your favorite dishes.
Khameer Bread pairs beautifully with a variety of dips, such as hummus, tzatziki, or a rich olive oil with herbs for dipping. Its soft texture makes it ideal for scooping up stews or soups, enhancing your dining experience.
Flavor Variations and Customizations
While the basic Khameer Bread recipe is delightful on its own, feel free to get creative with flavors. Consider adding spices such as ground cumin, coriander, or even za’atar into the dough for an aromatic twist. Fresh herbs like rosemary or thyme can also be kneaded into the dough for a fragrant experience.
If you’re looking for a more indulgent version, mix grated cheese or minced garlic into the dough before shaping. Toppings can go beyond sesame seeds; consider poppy seeds, flaxseeds, or even a sprinkle of coarse sea salt for added flavor and texture.
Storing and Reheating Khameer Bread
To maintain the freshness of your Khameer Bread, store it in a paper bag at room temperature for up to two days. For longer storage, wrap the bread tightly in plastic wrap or aluminum foil and place it in an airtight container. This will keep it fresh for up to a week in the refrigerator or up to three months in the freezer.
When reheating, preheat your oven to 350°F (175°C) and wrap the bread in aluminum foil to retain moisture. Heat for about 10 to 15 minutes, or until warmed through. Alternatively, you can slice the bread and toast it lightly in a skillet for a crisp texture.
If you find yourself with leftover Khameer Bread, consider using it in various meals. It can be transformed into a delicious bread pudding, used for sandwiches, or even turned into croutons for salads.
Conclusion
Making Khameer Bread is not just about following a recipe; it’s an experience that connects you to culinary traditions and brings a sense of accomplishment. The delightful aroma of freshly baked bread wafting through your kitchen is just the beginning of the joy this simple yet versatile dish brings.
Whether enjoyed with a meal, as a stand-alone snack, or as part of a cultural celebration, Khameer Bread offers a warm, comforting touch to any table. Embrace the process of bread-making, experiment with flavors, and savor the rich history that comes with each loaf. Let this beautiful bread be a staple in your kitchen, celebrating its versatility and cultural significance in diverse culinary traditions.