Introduction
Granola has become a staple in the repertoire of healthy breakfasts and snacks, cherished by health enthusiasts and busy individuals alike. Its versatility allows it to be enjoyed in various ways—whether sprinkled over yogurt, blended into smoothies, or simply eaten by the handful. However, while store-bought granola can often be laden with added sugars and preservatives, preparing granola at home offers a healthier alternative that can be tailored to your taste preferences and dietary needs.
Enter the Crunchy Nourishing Granola recipe—a delightful combination of wholesome ingredients designed to provide a satisfying crunch while delivering essential nutrients. This recipe not only offers a deliciously nutty flavor but also ensures that every bite is packed with fiber, healthy fats, and vitamins. Whether you are looking for a quick breakfast option, a midday snack, or a topping for your favorite dessert, this granola is sure to become a staple in your kitchen.
In this article, we will explore the history of granola, its nutritional benefits, and the detailed steps to create your very own batch of Crunchy Nourishing Granola.
Understanding Granola
Definition and History of Granola
Granola is a breakfast and snack food that consists primarily of rolled oats, nuts, and sweeteners. It is often baked until crispy, resulting in a crunchy texture that many enjoy. The origins of granola can be traced back to the late 19th century, where it was initially developed as a health food. The term “granola” itself is believed to have originated from the name “Granula,” a product created by Dr. James Caleb Jackson, who aimed to provide a wholesome, nourishing food for his patients at a health spa in New York.
As time went on, granola evolved, with various iterations emerging across the United States. By the 1960s, it gained popularity among health-conscious individuals, especially as the natural foods movement took hold. Today, granola is widely available in grocery stores and health food shops, with countless variations catering to different tastes and dietary restrictions.
Nutritional Benefits of Granola
Granola is often hailed for its health benefits, making it an appealing option for those looking to enhance their diet. Here are some of the key nutritional advantages:
– Fiber: The primary ingredient, rolled oats, is rich in dietary fiber, which supports digestive health and promotes a feeling of fullness. This can help manage weight and reduce cravings.
– Healthy Fats: The inclusion of nuts and seeds provides essential fatty acids, which are beneficial for heart health. These healthy fats can also aid in the absorption of fat-soluble vitamins.
– Vitamins and Minerals: Granola is a source of several essential nutrients, including magnesium, iron, and various B vitamins. These nutrients play a crucial role in energy production and overall well-being.
– Customizable Nutrition: When you make granola at home, you can tailor the ingredients to suit your nutritional needs, whether you want to increase protein, reduce sugar, or boost fiber.
Homemade vs. Store-Bought Granola
While store-bought granola can be convenient, it often comes with hidden additives and sugars that can detract from its health benefits. Here’s a breakdown of the differences:
– Additives: Many commercial granola brands use preservatives and artificial flavors to prolong shelf life. Homemade granola is free from these additives, allowing you to enjoy pure, wholesome ingredients.
– Sugar Content: Store-bought granola often contains an excessive amount of added sugars, which can lead to spikes in blood sugar levels. When making granola at home, you can control the amount and type of sweetener you use, opting for healthier alternatives like honey or maple syrup.
– Cost: While purchasing granola may seem economical at first glance, the cost can add up over time. Making your own granola is generally more cost-effective, allowing you to buy ingredients in bulk and customize your recipe.
Ingredients Breakdown
Creating the perfect granola requires a careful selection of ingredients. Here’s a detailed breakdown of each component in our Crunchy Nourishing Granola recipe:
Rolled Oats
Rolled oats are the foundation of granola, providing structure and texture. They are packed with soluble fiber, which not only aids digestion but also helps lower cholesterol levels. Oats are also a good source of antioxidants, which can protect against various diseases. When selecting oats, look for certified gluten-free options if necessary, ensuring that your granola remains suitable for those with gluten sensitivities.
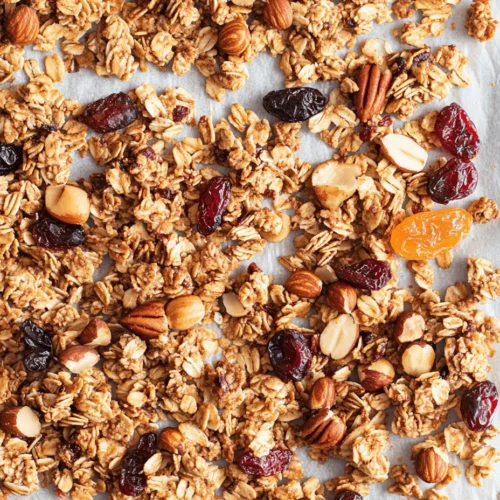
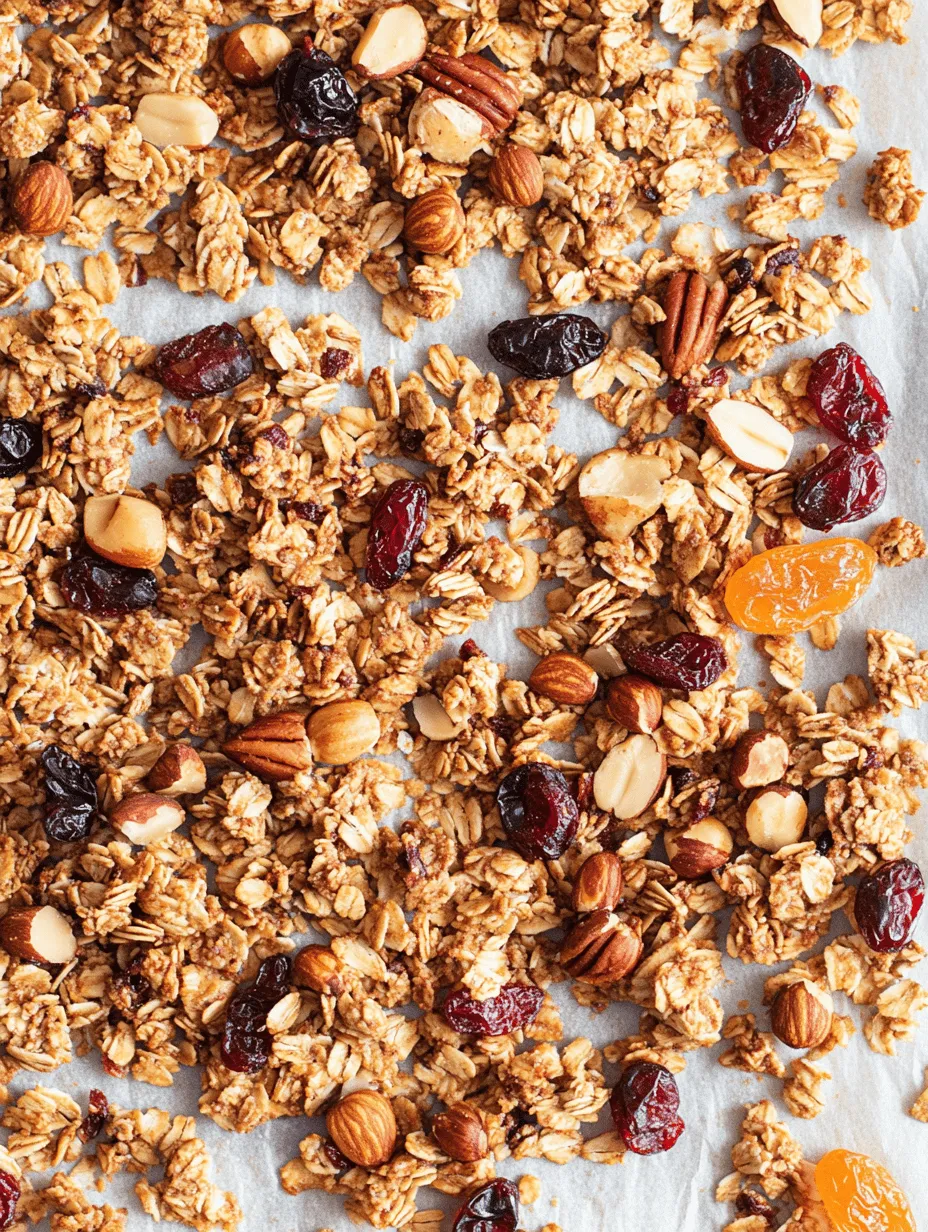
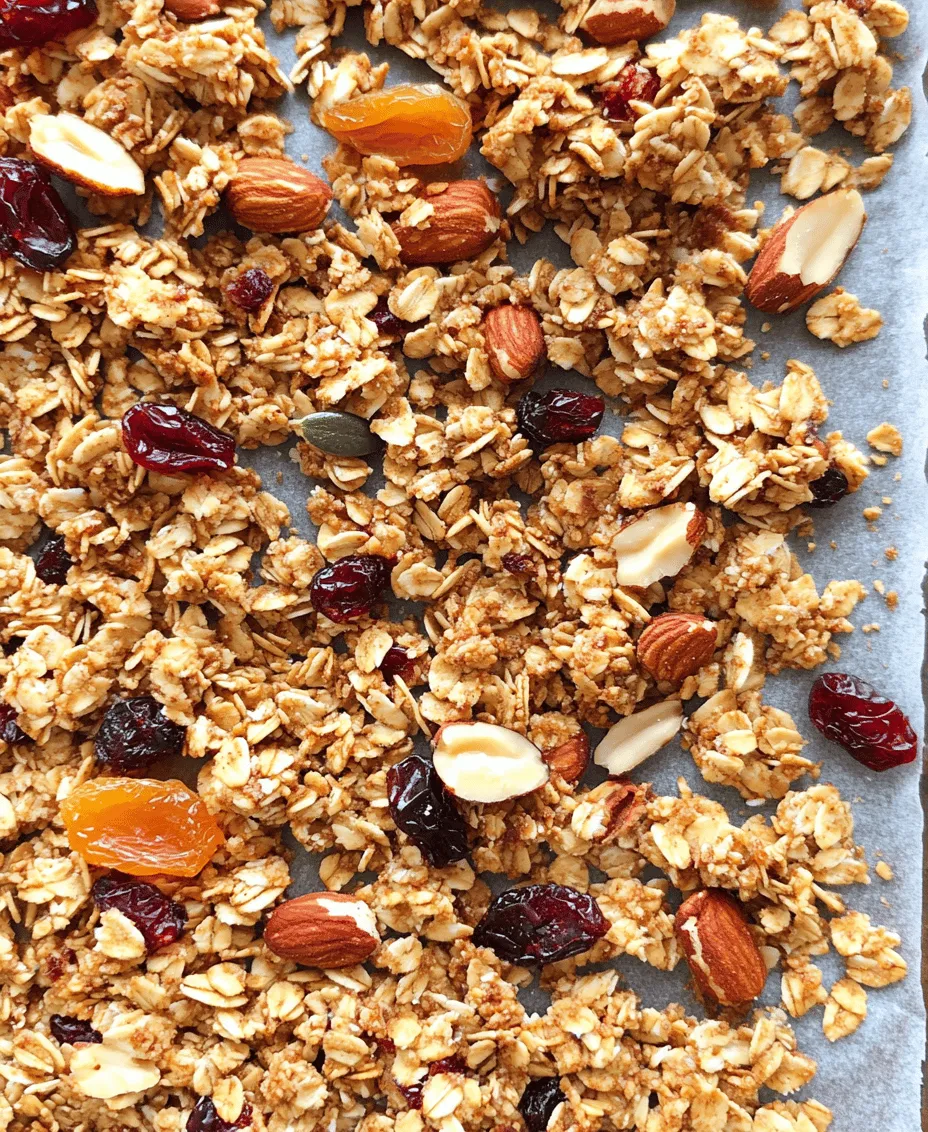
Mixed Nuts
Nuts add a delightful crunch and a wealth of nutrients to your granola. They are rich in protein, healthy fats, and various vitamins and minerals. Common options include almonds, walnuts, and pecans, each contributing unique flavors and textures. Including a variety of nuts not only enhances the taste but also boosts the overall nutritional profile of your granola.
Seeds
Incorporating seeds, such as pumpkin and sunflower seeds, increases the nutritional value of your granola. These seeds are excellent sources of healthy fats, protein, and essential minerals like magnesium and zinc. Pumpkin seeds, in particular, are known for their high iron content, while sunflower seeds add a nutty flavor and a dose of vitamin E, which is beneficial for skin health.
Shredded Coconut
Shredded coconut lends a tropical flair to your granola while providing healthy fats and fiber. It enhances the flavor profile, making each bite more enjoyable. Coconut is also known for its medium-chain triglycerides (MCTs), which can provide a quick source of energy. When using shredded coconut, opt for unsweetened varieties to keep your granola healthy.
Sweeteners
Sweeteners play a crucial role in balancing the flavors of your granola. Honey and maple syrup are two popular choices that not only add sweetness but also bring their own health benefits. Honey contains antioxidants and has antibacterial properties, while maple syrup is a natural source of minerals like manganese and zinc. When choosing a sweetener, consider its flavor profile and how it complements the other ingredients.
Oils
The oil used in granola is essential for achieving a crispy texture. Coconut oil and olive oil are two excellent options. Coconut oil imparts a slight coconut flavor and is rich in saturated fats that may support heart health. Olive oil, on the other hand, is a staple of the Mediterranean diet and is known for its anti-inflammatory properties. Both oils help bind the ingredients together, ensuring an even coating.
Flavorings
Flavorings are crucial for elevating the overall taste of your granola. Vanilla extract adds a warm, inviting aroma, while ground cinnamon introduces a subtle sweetness and warmth. Cinnamon also has health benefits, including anti-inflammatory properties and the potential to help regulate blood sugar levels. These flavorings not only enhance taste but also make your granola more aromatic and enjoyable.
Dried Fruits
While optional, dried fruits add a burst of flavor and sweetness to your granola. Options like raisins, cranberries, or dried apricots provide additional fiber and antioxidants. However, it’s essential to be mindful of the sugar content in dried fruits; opt for varieties that do not contain added sugars to keep your granola healthy.
Preparation Steps in Detail
Now that we’ve covered the essential ingredients, let’s move on to the preparation steps involved in making your Crunchy Nourishing Granola.
Preheating the Oven
The first step in making granola is preheating your oven to the right temperature, usually around 350°F (175°C). Preheating ensures that your granola bakes evenly, allowing for that perfect crunchy texture. An adequately heated oven is crucial for achieving the desired golden-brown color while preventing uneven baking.
Mixing Dry Ingredients
Once your oven is preheated, it’s time to mix the dry ingredients. In a large mixing bowl, combine rolled oats, mixed nuts, seeds, shredded coconut, and any spices you wish to use, such as cinnamon. Using a large spoon or spatula, mix these ingredients thoroughly to ensure even distribution. This step is essential to prevent clumping and ensure that every bite of granola is flavorful and nutritious.
Combining Wet Ingredients
In a separate bowl, combine your wet ingredients, including your chosen sweetener and oil. If using honey, consider warming it slightly to make it easier to mix. This warming process helps create a smoother consistency, allowing for better incorporation with the dry ingredients. Adding vanilla extract at this stage will also infuse your granola with a delightful aroma.
Mixing Wet and Dry
Next, pour your wet mixture over the dry ingredients. Using a spatula, gently fold the wet and dry ingredients together until everything is evenly coated. This step is crucial for achieving that perfect granola texture—too little mixing can lead to clumps, while over-mixing can break down the oats and nuts. Aim for a well-coated mixture where every piece of oat and nut is touched by the sweet, sticky blend.
Spreading on Baking Sheet
Finally, spread the granola mixture evenly onto a baking sheet lined with parchment paper. This step is vital for ensuring consistent baking results. An even layer allows the granola to bake uniformly, preventing some pieces from becoming overly toasted while others remain soft. Use a spatula to gently press down the mixture; this will help the granola clump together during baking, resulting in delightful clusters.
With these initial steps completed, your Crunchy Nourishing Granola is on its way to becoming a delicious and nutritious addition to your breakfast table or snack stash. Stay tuned for the next part of this article, where we will explore the baking process, cooling methods, and tips for storing your homemade granola.
Baking Process
Once your granola mixture is ready, it’s time for the baking process, which is crucial for achieving that delightful crunch. Preheat your oven to 325°F (160°C). Spread the granola mixture evenly on a parchment-lined baking sheet, ensuring there are no clumps that could lead to uneven baking.
Baking Time: Bake the granola for about 20 to 25 minutes. Halfway through the baking time, around the 10 to 15-minute mark, it’s essential to stir the granola. This not only promotes even cooking but also ensures that each piece gets that perfect golden brown color. When you stir, be gentle to avoid breaking up the clusters you’ve created.
Recognizing Doneness: The granola will be done when it turns a beautiful golden brown and has a fragrant aroma wafting from the oven. Keep a close eye on it during the last few minutes to prevent burning, as granola can quickly go from perfectly toasted to charred. After removing the granola from the oven, it may appear soft, but don’t panic; it will harden as it cools.
Adding Dried Fruit
The timing of adding dried fruit to your granola is key to achieving the ideal texture and flavor balance. For the best results, incorporate dried fruits such as raisins, cranberries, or apricots during the last 5 to 10 minutes of baking. This timing allows the fruit to warm and slightly rehydrate without becoming overly tough or burnt. If you add dried fruit too early, it can harden and lose its chewiness, defeating the purpose of adding that sweet, chewy component.
Cooling Process
Cooling your granola correctly is essential for achieving that coveted crunchy texture. After you take the granola out of the oven, let it cool on the baking sheet for at least 30 minutes. As it cools, the granola will continue to harden and form those delightful clusters that make it so enjoyable to eat. Avoid stirring it during this cooling phase; letting it rest undisturbed will promote clumping. Once completely cooled, break any larger clusters into smaller pieces as desired.
Storage and Shelf Life
To keep your homemade granola fresh and crunchy, proper storage is key. Once the granola is completely cooled, transfer it to an airtight container. Glass jars, plastic containers with tight-fitting lids, or resealable bags work well.
Best Practices for Storage: Ensure that the container is dry before adding your granola to prevent moisture from causing it to become soggy. Store the granola in a cool, dry place, ideally in a pantry or cupboard that is away from direct sunlight.
Shelf Life: Homemade granola can last for up to 2 weeks when stored properly. However, it’s best to check for signs of spoilage. If you notice any off smells, changes in texture, or visible mold, it’s time to discard it.
Serving Suggestions
Granola is incredibly versatile and can be enjoyed in a variety of ways. Here are some creative serving suggestions to elevate your crunchy granola experience:
– As a Breakfast Cereal: Enjoy your granola with milk or a non-dairy alternative for a nutritious breakfast. You can also add fresh fruits like bananas or berries for an extra boost of flavor and nutrition.
– Topping for Smoothie Bowls: Sprinkle granola over smoothie bowls for added texture and crunch. It not only enhances the presentation but also makes your smoothie more satisfying.
– In Baked Goods: Use granola as an ingredient in baked goods like muffins or bars. It adds a delightful crunch and can replace traditional breadcrumbs in crusts for desserts like cheesecakes or fruit tarts.
– Healthy Snack: Granola makes for a perfect on-the-go snack. Pack it in small bags for a quick energy boost during hikes, road trips, or busy workdays.
Health Considerations
When making granola, it’s essential to consider dietary needs. The beauty of homemade granola is that you can customize it according to personal preferences or restrictions.
– Customizing for Dietary Needs: For those who are gluten-sensitive, use certified gluten-free oats. Nut-free versions can be made by simply omitting nuts and adding seeds like sunflower or pumpkin seeds for a nutritious crunch.
– Understanding Portion Sizes: While granola is healthy, it’s also calorie-dense. Be mindful of portion sizes; a serving is typically about 1/4 to 1/2 cup, depending on your dietary needs and daily activity levels.
– Addressing Common Allergens: If you or someone in your household has allergies, consider substituting common allergens with safe alternatives. For instance, use coconut flakes in place of nuts or sunflower seed butter instead of nut butter.
The Versatility of Granola
Granola isn’t just a one-flavor wonder. Its versatility allows for endless possibilities, making it a fun and creative recipe to adapt.
– Exploring Different Flavor Profiles: Experiment with various spices like cinnamon, nutmeg, or ginger for a warm flavor profile. You can also incorporate chocolate chips or cacao nibs for a sweet treat.
– Seasonal Adaptations: Take advantage of seasonal ingredients. In the fall, add pumpkin puree and spices for a pumpkin spice granola. In the summer, consider using fresh herbs or citrus zest for a refreshing twist.
– Granola as a Gift: Homemade granola makes an excellent gift! Package it in mason jars, tie it with a ribbon, and attach a handwritten label for a personal touch. It’s a thoughtful and healthy gift idea for holidays or special occasions.
Conclusion
Making your own crunchy granola at home is not only a rewarding process but also offers numerous benefits. You gain complete control over the ingredients, allowing you to tailor the recipe to your taste preferences and dietary needs. Plus, the satisfaction of enjoying a wholesome snack that you created from scratch is unmatched.
We encourage you to experiment with various ingredients, flavors, and textures. Whether you’re adding dried fruits, nuts, or spices, the opportunities are limitless. Incorporating homemade granola into your daily routine can lead to healthier eating habits and more enjoyable snacking. So, gather your ingredients and start crafting your own delicious batch of granola today—your taste buds will thank you!