Crispy Chicken Chimichangas are a beloved dish that perfectly encapsulates the vibrant flavors and textures of Mexican cuisine. These golden, deep-fried burritos, filled with tender shredded chicken and savory refried beans, are a delightful combination that has won the hearts of many. The allure of chimichangas lies not only in their irresistible crunch but also in their versatility and ease of preparation, making them a staple for both family dinners and festive gatherings.
As comfort food goes, few dishes rival the satisfaction of biting into a crispy chimichanga, where the exterior crackles and the warm, flavorful filling oozes out. The recipe typically calls for shredded chicken, which can be conveniently prepared using leftovers or store-bought rotisserie chicken, and refried beans, which add creaminess and richness to the dish. With just a handful of ingredients and straightforward steps, making homemade crispy chimichangas is not only feasible but also incredibly rewarding.
The Allure of Crispy Chicken Chimichangas
Chimichangas are believed to have originated in the southwestern United States, particularly in Arizona, where they have become a quintessential dish in Tex-Mex cuisine. Their cultural significance cannot be overstated; these deep-fried burritos symbolize comfort and indulgence, often enjoyed during celebrations, family gatherings, and casual weeknight dinners. The crunchy exterior paired with the flavorful filling makes them a favorite among both adults and children alike.
Variations of chimichangas abound across regions and households. Some may include additional ingredients such as rice, corn, or different types of meats. Others may be topped with salsa, guacamole, or sour cream, enhancing the flavor complexity and presentation. Whether you enjoy them plain or loaded with toppings, the versatile nature of chimichangas allows for endless possibilities, making them a dish that can cater to various tastes and preferences.
In addition to their rich history and cultural significance, crispy chicken chimichangas represent a fusion of flavors that is both comforting and satisfying. The combination of seasoned chicken, creamy refried beans, and gooey cheese enveloped in a crispy tortilla creates a culinary experience that is hard to resist.
Ingredients Overview
To create delightful crispy chicken chimichangas, you will need the following ingredients. Each component plays a crucial role in delivering the rich flavors and textures that make this dish so enjoyable.
Comprehensive Ingredient List:
1. Cooked Shredded Chicken: About 2 cups
2. Refried Beans: 1 cup (homemade or canned)
3. Cheese: 1 to 1.5 cups (Mexican blend, Monterey Jack, or Cheddar)
4. Tortillas: 4 large flour tortillas
5. Vegetables: 1 medium onion and 1 bell pepper (diced)
6. Taco Seasoning: 1 tablespoon (homemade or store-bought)
7. Oil: For frying (vegetable or canola oil)
8. Sour Cream and Salsa: For serving (optional)
Key Ingredients
Cooked Shredded Chicken
The foundation of any great chimichanga is its filling, and for crispy chicken chimichangas, the star ingredient is the cooked shredded chicken. You can prepare this chicken in several ways:
– Leftovers: If you have leftover rotisserie chicken or roasted chicken, this is an excellent way to use it up, providing both flavor and convenience.
– Boiled Chicken: For a more controlled approach, you can boil chicken breasts until cooked through, then shred them with two forks.
– Slow Cooker: Cooking chicken in a slow cooker with taco seasoning for several hours produces tender, flavorful meat that shreds easily.
Refried Beans
Refried beans add a creamy texture and earthy flavor that complements the chicken beautifully. You have two options to consider:
– Homemade Refried Beans: If you have the time, making refried beans from scratch allows you to control the seasoning and texture. Use soaked pinto or black beans, cooked until tender, then mashed with spices.
– Canned Refried Beans: For convenience, canned refried beans are an excellent choice. Look for organic varieties with minimal added ingredients for the best flavor and nutritional value.
Cheese Varieties
Cheese is an essential component that brings everything together. The choice of cheese can significantly impact the flavor of your chimichangas:
– Mexican Blend: This cheese typically includes a mix of Monterey Jack, Cheddar, and Asadero, providing a rich and melty texture.
– Monterey Jack: Known for its mild flavor and excellent melting properties, Monterey Jack is a versatile option.
– Cheddar: For a sharper flavor, you can use medium or sharp Cheddar cheese, which contrasts nicely with the other ingredients.
Vegetables
Onions and bell peppers not only enhance the flavor of your chimichangas but also add nutritional value:
– Onions: Diced onions provide sweetness and depth to the filling. You can sauté them until translucent before adding them to the chicken mixture.
– Bell Peppers: These colorful vegetables add a slight crunch and sweetness. Choose red, green, or yellow bell peppers based on your preference.
Taco Seasoning
The seasoning blend is crucial for infusing your chimichangas with flavor. You have the option of using:
– Homemade Taco Seasoning: This allows you to customize the spice level and avoid preservatives. A simple mix of chili powder, cumin, garlic powder, onion powder, and paprika works wonders.
– Store-Bought Taco Seasoning: For convenience, pre-packaged seasoning can save time. Just check the ingredients to ensure it aligns with your dietary preferences.
Preparation Steps
Now that you have gathered all your ingredients, it’s time to dive into the preparation of your crispy chicken chimichangas. The process is straightforward, but taking the time to prep each component will ensure the best results.
1. Prepare the Filling: In a large skillet over medium heat, add a tablespoon of oil and sauté the diced onions and bell peppers until they are soft and translucent. This should take about 5 minutes. Next, add the cooked shredded chicken, refried beans, and taco seasoning, stirring until the mixture is well combined and heated through. Remove from heat and set aside.
2. Assemble the Chimichangas: Take a large flour tortilla and place a generous amount of the chicken and bean mixture in the center. Sprinkle cheese on top of the filling for added flavor. Fold in the sides of the tortilla and then roll it up from the bottom, securing the filling inside. Repeat this process for the remaining tortillas.
3. Heat the Oil: In a deep skillet or frying pan, heat about 2 inches of oil over medium-high heat. You can test the oil temperature by dropping in a small piece of tortilla; it should sizzle immediately when the oil is ready.
4. Fry the Chimichangas: Carefully place the chimichangas seam-side down into the hot oil, frying them in batches to avoid overcrowding. Fry each side for about 3-4 minutes or until golden brown and crispy. Use tongs to turn them gently. Once cooked, transfer the chimichangas to a paper towel-lined plate to drain excess oil.
This marks the initial stages of preparing your Crispy Chicken Chimichangas. By focusing on fresh ingredients and thoughtful preparation, you’re already on your way to creating a dish that will impress family and friends alike. Stay tuned for the next part where we will delve into additional tips for achieving the perfect chimichanga, as well as answering some common questions about this delicious recipe.
Sautéing the Vegetables
Sautéing the vegetables is a crucial step in creating the flavor base for your Crispy Chicken Chimichangas. Onions and bell peppers not only add sweetness and a burst of color but also enhance the overall texture of the filling. Begin by heating a tablespoon of olive oil in a large skillet over medium heat. Once the oil is shimmering, add finely chopped onions. Sauté them for about 3-5 minutes until they become translucent. This process releases their natural sugars, contributing to a deep, rich flavor.
Next, add diced bell peppers—red, yellow, or green work beautifully. Sauté the mixture for an additional 3-4 minutes until the peppers are tender but still slightly crisp. The goal is to achieve a balance where the vegetables retain their vibrant colors and crunch while absorbing the warmth of the spices you will add later. Don’t forget to season with a pinch of salt and pepper during this step to enhance the flavors. Once perfectly sautéed, transfer the mixture to a bowl and set it aside to cool slightly.
Creating the Filling
With your vegetables sautéed, it’s time to create the filling. In a large mixing bowl, combine shredded cooked chicken, the sautéed vegetable mixture, and a can of drained black beans for a hearty texture. The black beans not only add protein but also a creamy element that complements the chicken beautifully.
Now, season the mixture with a teaspoon of cumin, a teaspoon of chili powder, and a dash of paprika. These spices will infuse the filling with warmth and depth. For a touch of freshness, add some chopped fresh cilantro and a squeeze of lime juice. This acidity will brighten the flavors and balance out the richness of the chicken and beans. Mix everything thoroughly until all ingredients are well combined. The filling should be hearty, with a good balance of protein, fiber, and vibrant flavors, ensuring each bite of your chimichangas is satisfying.
Assembling the Chimichangas
Assembling the chimichangas correctly is key to ensuring that your filling stays intact during frying. Start by laying out a large tortilla on a clean surface. Depending on the size of your tortillas, you may want to use 8-inch or 10-inch ones for optimal filling capacity. Spoon about a quarter cup of the chicken filling onto the center of the tortilla, spreading it out slightly but leaving enough space at the edges to fold.
Next, fold the sides of the tortilla over the filling, then roll it up tightly from the bottom. The goal is to create a secure package that will keep the filling enclosed while frying. Make sure to tuck in the sides as you roll to prevent any spillage. If necessary, you can use a toothpick to secure the edges, although this is often not required if rolled tightly enough. Repeat this process for the remaining tortillas and filling, placing each assembled chimichanga seam-side down on a plate or cutting board to keep them from unrolling.
Frying Techniques
Frying the chimichangas is where they get their delightful crispy exterior. In a deep skillet or frying pan, pour in enough oil to submerge the chimichangas halfway, about 1-2 inches deep. Heat the oil over medium-high heat until it reaches about 350°F (175°C). To test if the oil is ready, drop a small piece of tortilla into the oil; if it sizzles immediately, it’s time to fry.
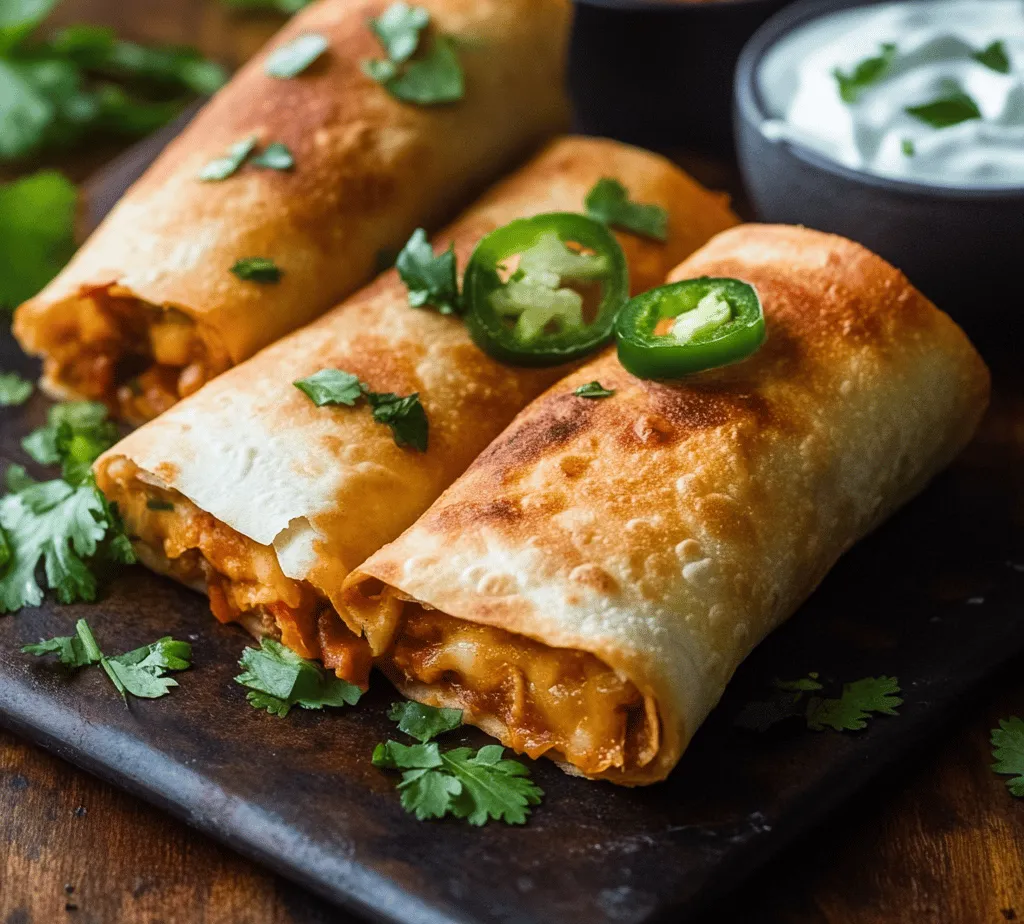
Carefully lower the chimichangas into the hot oil, seam-side down, working in batches if necessary to avoid overcrowding the pan. Fry them for about 3-4 minutes on each side, or until they are golden brown and crispy. Using tongs, carefully turn them to ensure even cooking. Once done, transfer the chimichangas to a plate lined with paper towels to drain excess oil. This step is crucial to achieving that perfect crispy texture without being greasy.
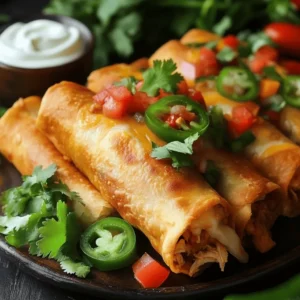
Serving Suggestions
Serving your Crispy Chicken Chimichangas can be as creative as you like. For a beautiful presentation, arrange them on a large platter. You can garnish with a dollop of sour cream on the side and a sprinkle of fresh cilantro for a pop of color. Serve alongside a bowl of fresh salsa for dipping, or drizzle some over the top for an extra burst of flavor.
Consider adding sliced jalapeños for those who enjoy a spicy kick, or some guacamole for a creamy counterpart. The vibrant colors of the garnishes combined with the golden brown chimichangas will make for an eye-catching dish that is sure to impress your guests.
Nutritional Information
Crispy Chicken Chimichangas offer a balanced meal with a variety of nutritional benefits. Each chimichanga is packed with protein from the chicken and fiber from the black beans, making them a hearty option. The addition of vegetables not only enhances the flavor but also boosts the overall nutrient content.
For those mindful of dietary restrictions, you can easily make this recipe gluten-free by using corn tortillas instead of traditional flour ones. Additionally, if you’re looking to reduce calories or fat, consider baking the chimichangas instead of frying them. Simply brush them with a little oil and bake at 400°F (200°C) until golden and crispy for a healthier alternative.
Conclusion
Making Crispy Chicken Chimichangas at home is a rewarding and delightful experience. With a few simple steps, you can create a dish that is not only packed with flavor but also visually stunning. The combination of tender chicken, hearty beans, and vibrant vegetables wrapped in a crispy tortilla is sure to become a favorite in your culinary repertoire.
Whether you’re serving them for a weeknight dinner or as a show-stopping dish at your next gathering, these chimichangas are versatile enough to please any palate. Embrace this recipe and enjoy the satisfaction of creating something delicious from scratch. Your family and friends will be clamoring for seconds, and you’ll love how easy they are to prepare!