Introduction
As the festive season approaches, homes are filled with the comforting scents of cinnamon, nutmeg, and vanilla, and the spirit of sharing treats becomes all the more pronounced. Along with the joy of decorating trees and wrapping gifts, what truly brings people together during this magical time is the act of sharing delicious homemade sweets. Among the plethora of holiday treats, few desserts capture the essence of the holiday spirit quite like Peppermint Oreo Truffles. These delightful bites are not only visually appealing but also offer a burst of flavor and texture that makes them irresistibly delicious.
One of the greatest conveniences of the holiday season is the availability of no-bake desserts. For those who may be short on time or prefer to keep their kitchen cool during the warmer winter months, no-bake treats are a fantastic option. They require minimal effort and equipment while delivering maximum satisfaction. Peppermint Oreo Truffles epitomize this ease of preparation. Made from just a handful of ingredients, these truffles are a fantastic way to indulge in holiday cheer without the stress of baking.
The combination of flavors and textures in these truffles is what truly sets them apart. The rich, chocolatey goodness of Oreo cookies forms a delectable base, complemented by the creamy tang of cream cheese. A hint of peppermint extract and the crunch of crushed candy canes provide a festive twist that elevates these truffles to a level of indulgence that is perfect for holiday gatherings. Whether you are hosting a festive party, attending a potluck, or simply looking for a sweet treat to enjoy with family, Peppermint Oreo Truffles are sure to impress.
Understanding the Ingredients
To create these delightful Peppermint Oreo Truffles, it is crucial to understand the role of each ingredient in the recipe. The beauty of this no-bake dessert lies in its simplicity, and each ingredient serves a specific purpose.
Oreo Cookies
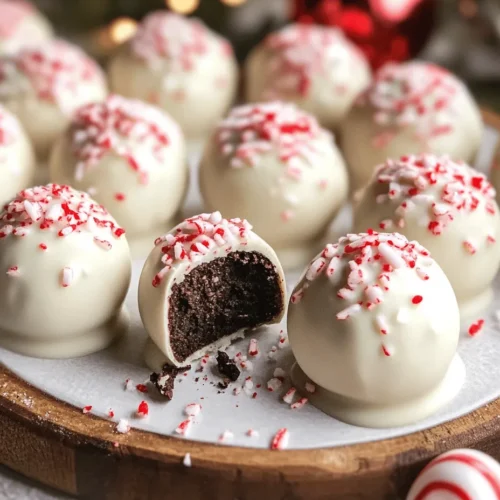
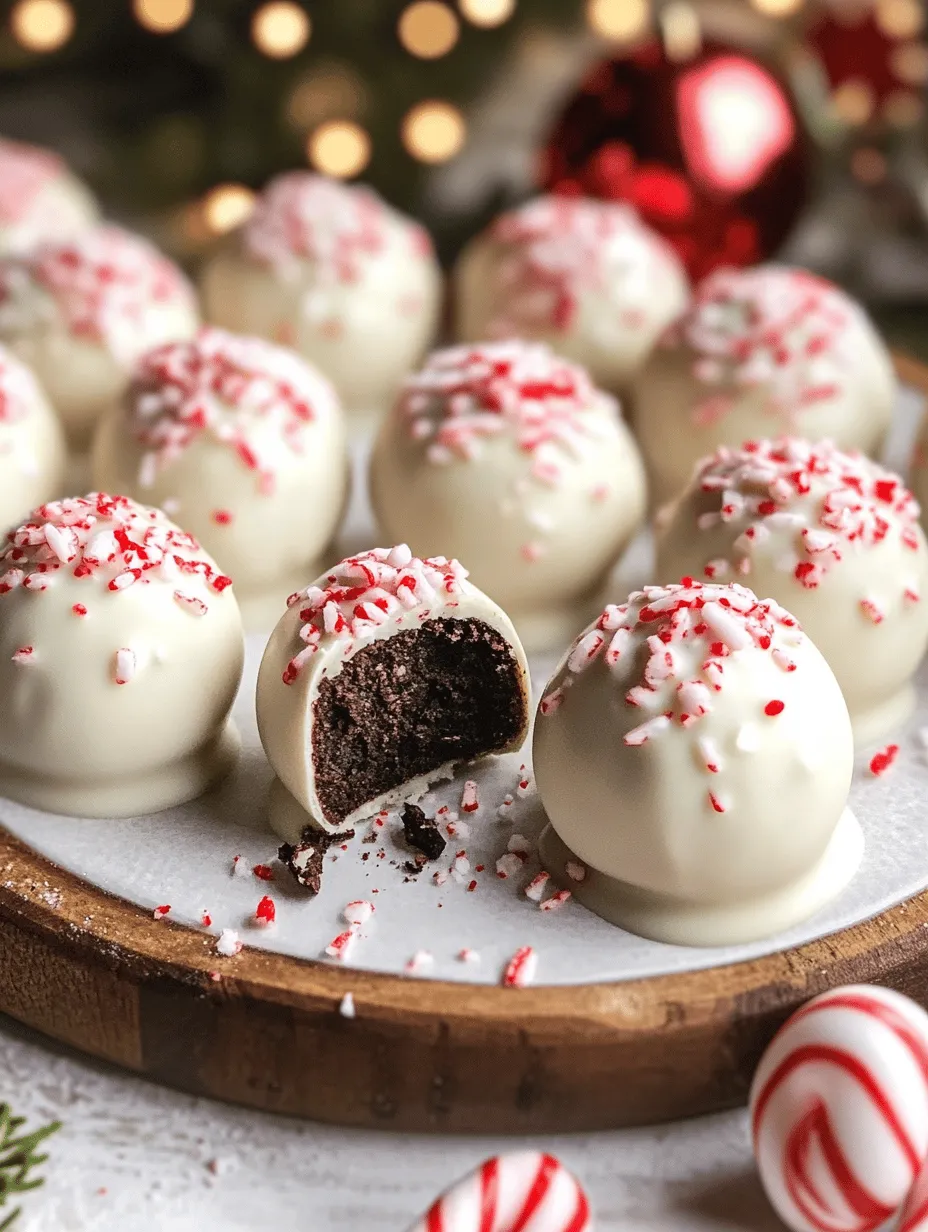
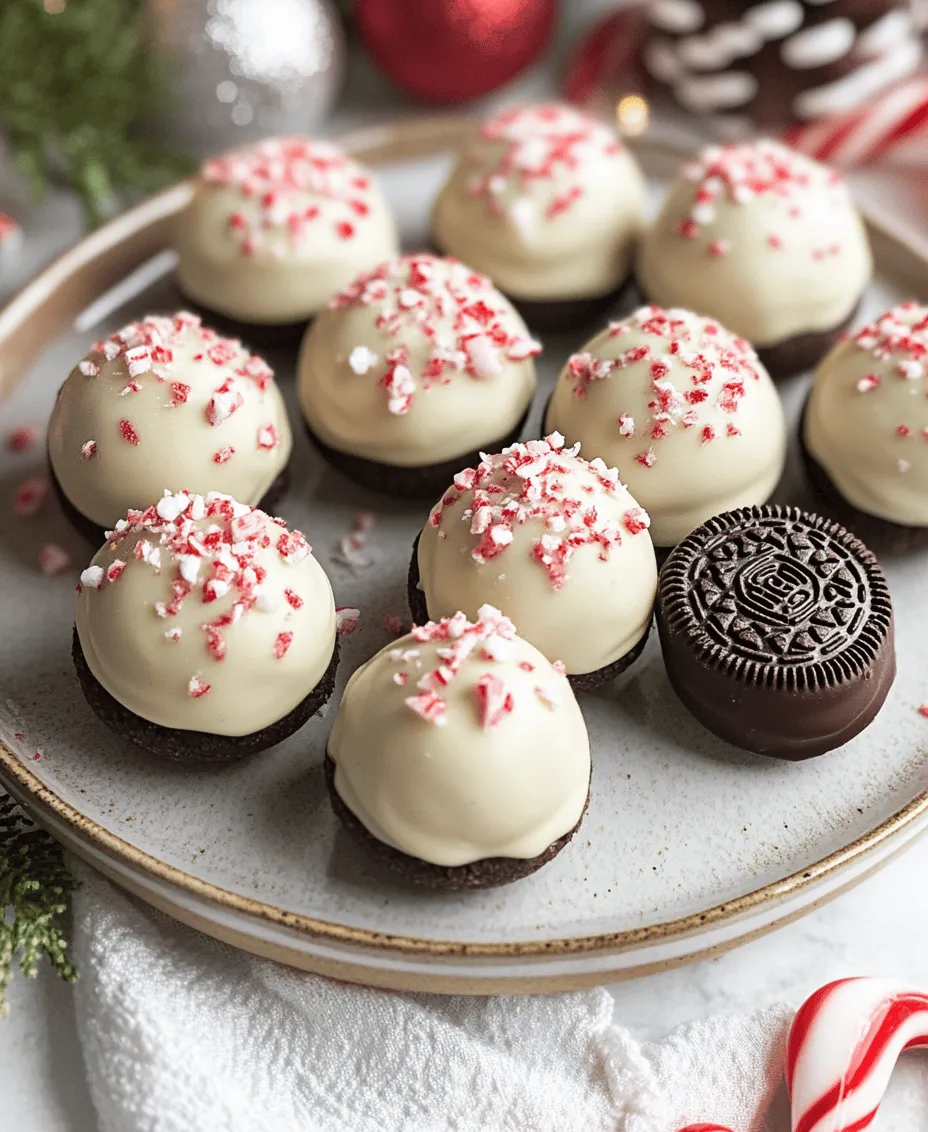
The foundation of our truffles is, undoubtedly, the beloved Oreo cookie. These iconic cookies are known for their rich chocolate flavor and creamy filling, which provide a perfect balance of sweetness and depth. When crushed into fine crumbs, Oreo cookies create a sturdy base for the truffles while imparting their signature flavor. The cookies’ structure allows them to bind together with the cream cheese, resulting in a cohesive mixture that can be easily shaped into truffle balls. Opting for regular Oreos is the most common choice, but feel free to experiment with flavored varieties, such as mint or peppermint Oreos, for an extra festive twist.
Cream Cheese
Cream cheese plays a pivotal role in ensuring the truffles are not only delicious but also possess the right texture. Its creamy consistency provides moisture to the mixture, making it easy to mold into truffles. The tangy flavor of cream cheese also complements the sweetness of the Oreos, creating a well-balanced treat. It is essential to use softened cream cheese to facilitate easy mixing; if it is too cold, it will not blend well with the cookie crumbs, resulting in a lumpy mixture.
White Chocolate
The next crucial ingredient is white chocolate, which serves as the outer coating for the truffles. Its creamy and sweet flavor pairs beautifully with the rich chocolatey center. White chocolate melts easily, allowing it to coat the truffles evenly and create a smooth, glossy finish. When melted properly, white chocolate provides a delightful contrast to the crunchy Oreo base, adding an extra layer of indulgence. It is important to choose high-quality white chocolate for the best results, as it will melt more smoothly and taste better than cheaper alternatives.
Peppermint Extract and Crushed Candy Canes
To achieve that quintessential festive flavor, peppermint extract is essential. This concentrated flavoring adds a refreshing and aromatic note that is synonymous with the holiday season. When combined with the richness of the Oreo and the creaminess of the chocolate, peppermint extract creates a delightful balance that truly captures the essence of winter.
Crushed candy canes serve as both a flavor enhancer and a decorative garnish. Their crunchy texture adds a delightful contrast to the smooth truffles, while their vibrant red and white colors make these truffles visually appealing. The candy canes’ minty flavor further elevates the peppermint experience, making each bite a celebration of holiday cheer.
Step-by-Step Guide to Making Peppermint Oreo Truffles
Now that we have a thorough understanding of the ingredients, let’s delve into the step-by-step process of creating these delicious Peppermint Oreo Truffles.
Step 1: Crushing the Cookies
The first step in making Peppermint Oreo Truffles is to crush the Oreo cookies into fine crumbs. There are several techniques to achieve the perfect cookie crumb texture:
– Food Processor: The easiest and most efficient method is using a food processor. Simply break the cookies into smaller pieces, then pulse until you achieve fine crumbs. This method ensures that the crumbs are uniform in size, which is essential for the truffles’ consistency.
– Zip-top Bag and Rolling Pin: If you don’t have a food processor, you can place the Oreos in a zip-top bag, seal it, and crush them using a rolling pin. This method requires a bit more effort but can be a fun way to engage kids or guests in the process.
– Mortar and Pestle: For a more traditional approach, you can also use a mortar and pestle to crush the cookies manually. This method may take longer, but it allows for better control over the crumb size.
Regardless of the method chosen, aim for a consistency similar to that of sand. This will ensure that the crumbs bind well with the cream cheese.
Step 2: Combining Ingredients
Once you have your Oreo crumbs ready, it’s time to combine them with the cream cheese. In a large mixing bowl, add the crushed Oreo cookies and softened cream cheese. Using a spatula or a hand mixer, mix the ingredients together until they are fully combined and no streaks of cream cheese remain.
For the best results, make sure the cream cheese is at room temperature. This will allow it to blend seamlessly with the cookie crumbs, creating a smooth and cohesive mixture. If you find the mixture is too dry or crumbly, you can add a little more cream cheese to achieve the desired consistency.
Step 3: Rolling the Truffles
With the mixture ready, it’s time to shape it into truffle balls. Scoop out a tablespoon of the mixture and roll it between your palms to form a smooth ball. The size of the truffles is entirely up to you, but aiming for about one inch in diameter is ideal for bite-sized treats.
Be sure to work quickly, as the mixture can become sticky if left at room temperature for too long. If you find that the mixture is too sticky to handle, you can refrigerate it for a few minutes to firm it up before rolling.
Step 4: Chilling Process
Once all the truffles are rolled, place them on a parchment-lined baking sheet. The next step is to chill them in the refrigerator for at least 30 minutes. This chilling period is crucial, as it helps the truffles firm up and makes them easier to coat in white chocolate later on.
While the truffles chill, you can prepare the white chocolate coating.
Step 5: Melting White Chocolate
To create a smooth coating for the truffles, melt the white chocolate using a double boiler or in the microwave. If using a double boiler, fill the bottom pot with water and bring it to a gentle simmer. Place the white chocolate in the top pot, stirring occasionally until completely melted and smooth.
If using a microwave, place the white chocolate in a microwave-safe bowl and heat it in short intervals, stirring after each interval. Be careful not to overheat the chocolate, as it can seize up and become unusable.
Once melted, allow the white chocolate to cool slightly before proceeding to the next step.
Step 6: Coating the Truffles
Now that your truffles are chilled and the white chocolate is melted, it’s time to coat the truffles. Using a fork or a dipping tool, dip each truffle into the melted white chocolate, ensuring it is fully coated. Gently tap off any excess chocolate and return the truffle to the parchment-lined baking sheet.
This step requires a bit of finesse to ensure even coverage. If you find that the white chocolate is too thick, you can add a small amount of coconut oil or vegetable shortening to thin it out, making it easier to work with.
Step 7: Adding Candy Cane Garnish
Before the white chocolate coating sets, sprinkle crushed candy canes over the truffles. This not only adds a festive touch but also enhances the peppermint flavor. For best results, sprinkle the candy canes immediately after coating the truffles, as the chocolate should still be wet enough for the candy to adhere.
The Science Behind No-Bake Desserts
Understanding the science behind no-bake desserts can enhance your culinary skills and appreciation for these treats. No-bake recipes, like our Peppermint Oreo Truffles, rely primarily on the ingredients’ properties rather than the application of heat.
In this recipe, the cream cheese acts as a binding agent, thanks to its fat content and moisture. It combines with the crushed Oreos to create a cohesive mixture that holds its shape. The chilling process is crucial for firming up the truffles, as cold temperatures help solidify the fat in the cream cheese, allowing for a better texture.
The white chocolate coating provides not only a delicious outer layer but also serves as a barrier that helps maintain the truffles’ shape. The melting properties of white chocolate allow it to become fluid when heated, and as it cools, it solidifies to create a firm shell.
By understanding these principles, you can experiment with various ingredients and techniques to create your own no-bake desserts, adjusting ratios and flavors to suit your tastes and preferences.
Stay tuned for the next part of this article, where we will dive deeper into the tips for achieving the best results with your Peppermint Oreo Truffles and address some common questions about this delightful holiday treat.
Benefits of No-Bake Desserts
No-bake desserts like Peppermint Oreo Truffles are a holiday favorite for several compelling reasons. First and foremost, they save time. The busy holiday season often leaves little room for extensive baking sessions, and no-bake options allow you to whip up delicious treats quickly. You can have these truffles prepped in under 30 minutes, making them perfect for those last-minute gatherings or surprise guests.
Simplicity is another major benefit. No-bake recipes typically require fewer steps and less equipment compared to traditional baking, which can be intimidating for novice cooks. With just a few ingredients and minimal effort, you can create a show-stopping dessert that looks and tastes like it took hours to prepare. Additionally, no-bake desserts often require minimal cleanup, allowing you to spend more time enjoying the festivities instead of washing dishes.
Moreover, the refrigeration process in no-bake recipes plays a crucial role in setting and flavor development. As the truffles chill, the flavors meld beautifully, resulting in a rich, creamy texture that is hard to resist. This period not only helps the truffles firm up but allows the peppermint and chocolate flavors to intensify, making each bite a delightful experience.
Creative Variations on the Classic Recipe
While the classic Peppermint Oreo Truffles are undeniably delicious, there are countless ways to put a creative twist on this recipe. For instance, consider using dark chocolate instead of milk chocolate for a richer, more sophisticated flavor profile. Dark chocolate pairs beautifully with the sweetness of the Oreos and the brightness of the peppermint, creating a well-balanced treat.
You can also experiment with different extracts or flavorings. If you want to add an extra layer of flavor, try incorporating a splash of vanilla or almond extract into the cream cheese mixture. This addition can enhance the overall taste and make your truffles even more unique.
Seasonal adaptations can elevate your truffles to new heights. During the holidays, consider incorporating festive candies such as crushed candy canes, holiday-themed sprinkles, or even white chocolate drizzles. These additions not only enhance the flavor but also make your truffles visually stunning and perfect for holiday gatherings.
For added texture and visual appeal, consider varying the toppings. Instead of rolling your truffles solely in crushed Oreos, try using finely chopped nuts, shredded coconut, or even a dusting of cocoa powder. Each alternative adds a delightful crunch and aesthetic that enhances the overall experience.
Presentation Ideas for Festive Occasions
Presentation is key when it comes to serving your Peppermint Oreo Truffles at holiday gatherings. A beautifully arranged platter can make your truffles the star of the dessert table. Start by arranging the truffles in neat rows or in a circular pattern, and consider garnishing the platter with fresh mint leaves or edible flowers for a touch of elegance.
If you plan to gift the truffles, festive packaging can add a special touch. Consider using clear cellophane bags tied with colorful ribbons or placing the truffles in decorative tins. Adding a personalized tag with a sweet message or a simple “Happy Holidays” can make your gift even more memorable.
Pairing your truffles with holiday drinks can elevate the experience even further. These truffles complement a variety of beverages, from hot cocoa and peppermint mochas to spiced cider and eggnog. Serve them alongside these drinks for a delightful treat that captures the spirit of the season.
Storing and Serving Suggestions
Proper storage is essential to maintain the freshness and flavor of your Peppermint Oreo Truffles. Store the truffles in an airtight container in the refrigerator, where they can last for up to two weeks. If you want to keep them longer, consider freezing them. Just make sure to let them thaw in the refrigerator before serving to preserve their creamy texture.
When it comes to serving, these truffles are best enjoyed chilled. Allow them to sit at room temperature for about 10-15 minutes before serving to enhance the flavors and soften the texture slightly. This is particularly important if they have been frozen, as they may become too firm if served straight from the freezer.
These truffles make an excellent addition to any holiday celebration. Whether you’re hosting a party or attending a potluck, they are sure to impress guests of all ages. Consider incorporating them into dessert platters, alongside other festive treats, or serving them individually wrapped as party favors.
Nutritional Information
Understanding the nutritional aspects of your Peppermint Oreo Truffles can help you enjoy them mindfully during the festive season. Each truffle is indulgent, rich in flavor, and full of the classic taste of Oreos and cream cheese. While they do contain sugar and fat, they can also be made with healthier alternatives if desired.
For those looking to adjust the recipe for dietary preferences, there are options available. For a gluten-free version, simply use gluten-free Oreos. If you’re aiming for a vegan alternative, substitute the cream cheese with a plant-based cream cheese alternative and ensure the chocolate used is dairy-free. These adjustments allow more people to enjoy the festive treat without compromising on taste.
Portion control is important during the holiday season, especially when indulging in rich desserts. Consider serving smaller truffles or even making mini versions to help satisfy sweet cravings without overindulging. This way, everyone can enjoy a taste of the festive dessert without feeling guilty.
Conclusion
In conclusion, Peppermint Oreo Truffles bring a delightful touch to any holiday gathering. They encapsulate the essence of the season with their rich flavors and festive appearance. The ease of preparation makes them a go-to dessert for any occasion, allowing you to focus on the joy of sharing these treats with loved ones.
The process of making these no-bake truffles is as enjoyable as indulging in them. From the simple steps to the creative variations you can explore, these truffles offer endless possibilities for festive fun. So gather your ingredients, get creative, and enjoy the experience of crafting and sharing these delightful desserts.
Remember, food has a unique power to create connections and foster memories during the holidays. As you share your Peppermint Oreo Truffles, you’re not just offering a treat; you’re sharing a moment of joy that can be cherished for years to come. Embrace the spirit of the season and savor each bite of these delectable no-bake delights. Happy holidays!