
Delight your taste buds with the creamy and indulgent Peanut Butter Bliss Fudge, a no-bake treat that combines the rich flavors of peanut butter and chocolate. With its smooth texture and irresistible sweetness, this fudge is the perfect dessert for any occasion. Whether you’re celebrating a special event, hosting a gathering, or simply craving a sweet snack, this recipe is designed to satisfy your sweet tooth while providing the satisfying crunch of graham crackers and optional peanuts. Easy to prepare and guaranteed to impress, Peanut Butter Bliss Fudge is a must-try for any dessert lover.
The Allure of Peanut Butter Bliss Fudge
Peanut butter has long been a beloved ingredient in desserts, loved for its creamy consistency and nutty flavor. When combined with chocolate, it creates a timeless pairing that evokes feelings of comfort and nostalgia. Among the myriad of peanut butter desserts, fudge stands out for its rich, melt-in-your-mouth texture and ease of preparation. Unlike traditional fudge recipes that require extensive cooking and temperature control, this no-bake version simplifies the process, allowing you to enjoy the deliciousness without the fuss.
This Peanut Butter Bliss Fudge recipe is not only quick to make but also incredibly versatile. You can customize it to suit your taste by adding different mix-ins, such as chopped nuts or even a sprinkle of sea salt for an unexpected twist. The combination of creamy peanut butter and silky chocolate, along with the crunch of graham cracker crumbs, makes each bite an experience to savor. Whether you’re serving it at a party or indulging in a piece after a long day, this fudge is sure to bring joy.
Understanding the Ingredients
To create the perfect Peanut Butter Bliss Fudge, it’s essential to understand the role of each ingredient. Let’s dive into the core components that make this dessert so delightful:
– Creamy Peanut Butter: As the heart of the recipe, creamy peanut butter offers richness and flavor. Choose a high-quality peanut butter without added sugars or preservatives for the best taste.
– Unsalted Butter: This ingredient adds creaminess and helps bind the ingredients together. Using unsalted butter allows you to control the saltiness of your fudge.
– Powdered Sugar: The sweetener of choice for this recipe, powdered sugar gives the fudge its sweetness while contributing to its smooth texture. It dissolves easily into the mixture, ensuring a creamy finish.
– Vanilla Extract: A staple in many dessert recipes, vanilla extract enhances the overall flavor profile of the fudge, adding depth and warmth to the sweetness.
– Graham Cracker Crumbs: These crumbs provide a unique texture and a hint of sweetness. They also help to stabilize the fudge, preventing it from becoming too soft.
– Chocolate Chips: The perfect topping, chocolate chips add a layer of chocolatey goodness. You can choose semi-sweet, dark, or even milk chocolate chips based on your preference.
– Chopped Peanuts: While optional, chopped peanuts can add a delightful crunch and nuttiness to the fudge, enhancing its overall flavor and texture.
Step-by-Step Instructions for Making Peanut Butter Bliss Fudge
Now that you understand the ingredients, it’s time to dive into the step-by-step process of creating this delectable treat. Follow these instructions closely for a successful batch of Peanut Butter Bliss Fudge.
Preparation of Ingredients
Before you start making the fudge, it’s essential to gather and measure all the necessary components. This ensures a smooth cooking process and helps you avoid any last-minute scrambles. Here’s what you’ll need:
– 1 cup of creamy peanut butter
– 1/2 cup of unsalted butter (softened)
– 4 cups of powdered sugar
– 1 teaspoon of vanilla extract
– 1 ½ cups of graham cracker crumbs
– 1 cup of chocolate chips (for topping)
– 1/2 cup of chopped peanuts (optional)
Once you have everything ready, you’ll want to prep your baking dish as well. Line an 8-inch square baking pan with parchment paper or aluminum foil, leaving an overhang on the sides. This will make it easier to lift the fudge out once it’s set.
Mixing the Base
With your ingredients prepped, it’s time to create the base of the fudge. In a large mixing bowl, combine the softened unsalted butter and creamy peanut butter. Using an electric mixer or a sturdy spatula, blend the two together until smooth and well combined. This will create a creamy mixture that serves as the foundation for your fudge.
Incorporating Sweetness
Next, add the powdered sugar and vanilla extract to the peanut butter and butter mixture. Begin mixing at a low speed to prevent the powdered sugar from flying everywhere. Gradually increase the speed as the ingredients combine. You should aim for a smooth and creamy consistency, where the powdered sugar is fully incorporated, and the mixture is thick but manageable.
Folding in Graham Crackers
Once the base is ready, it’s time to fold in the graham cracker crumbs. This step is crucial for achieving the perfect texture and consistency in your fudge. Gently add the graham cracker crumbs to the peanut butter mixture and use a spatula to fold them in. Be careful not to overmix; you want to maintain the integrity of the crumbs for added texture.
Preparing the Baking Dish
Before you spread the fudge mixture into the dish, ensure that your prepared baking pan is ready. If you haven’t done so already, line the pan with parchment paper or aluminum foil, leaving an overhang on the sides for easy removal later. This step is essential, as it prevents the fudge from sticking to the pan and makes serving a breeze.
Spreading the Fudge Mixture
Now it’s time to transfer the fudge mixture into your prepared baking dish. Use a spatula to scoop the mixture into the pan, spreading it evenly across the bottom. Press down gently to create a smooth surface. Make sure to distribute the mixture evenly to ensure that every piece of fudge has the same delicious texture and flavor.
Melting the Chocolate
For the final touch, you’ll need to prepare the chocolate topping. In a microwave-safe bowl, add the chocolate chips. Microwave them in 30-second intervals, stirring after each interval until the chocolate is fully melted and smooth. Be careful not to overheat; chocolate can easily seize up if it gets too hot.
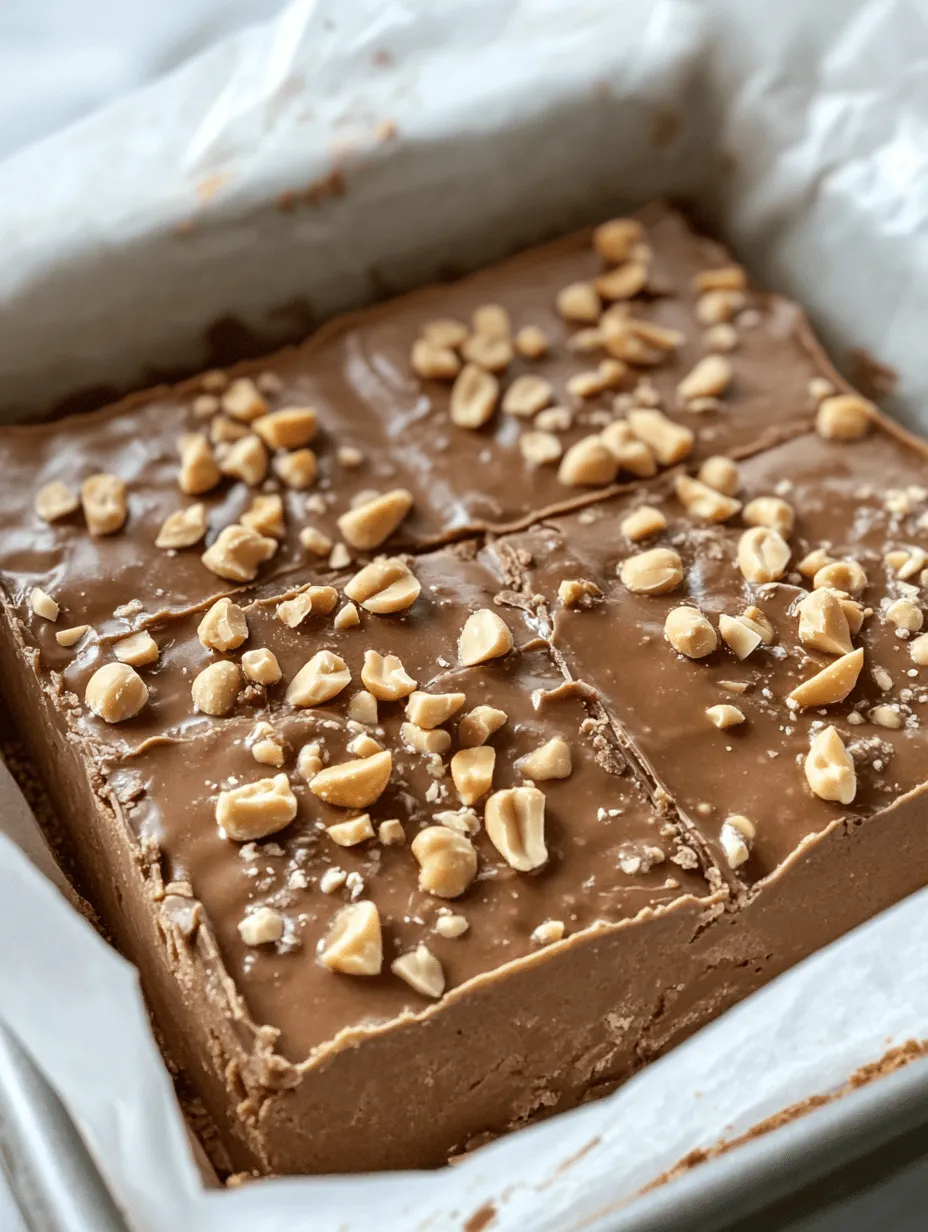
Once melted, pour the chocolate over the fudge mixture in the baking dish. Use a spatula to spread the chocolate evenly across the top. If you’re using chopped peanuts, sprinkle them over the melted chocolate for an added crunch and visual appeal. This step not only enhances the flavor but also adds texture to the fudge.
With all the components in place, your Peanut Butter Bliss Fudge is ready to chill in the refrigerator. Allow it to set for at least two hours, or until firm. Once set, you can lift the fudge out of the pan using the overhang and cut it into squares. Enjoy the rich, creamy flavors and indulge in this delectable no-bake treat, perfect for sharing—or keeping all to yourself!
Topping with Peanuts
To elevate the texture and flavor profile of your Peanut Butter Bliss Fudge, consider adding a topping of crushed or chopped peanuts. This optional step not only enhances the nutty flavor but also adds a delightful crunch that contrasts beautifully with the creamy fudge base.
To achieve the perfect topping, simply take a handful of unsalted roasted peanuts and roughly chop them with a knife or pulse them briefly in a food processor. Once your fudge mixture is poured into the prepared pan and smoothed out, sprinkle the chopped peanuts evenly over the surface. Gently press them down with the palm of your hand to ensure they adhere to the fudge as it sets. This small addition can make a big difference in the overall texture and enjoyment of your fudge, providing a satisfying bite that complements the creamy richness of the peanut butter.
Chilling the Fudge
One of the most crucial steps in making Peanut Butter Bliss Fudge is chilling it properly. After you’ve poured the fudge mixture into the prepared pan and topped it with peanuts, it’s essential to place it in the refrigerator to set. This chilling process allows the fudge to firm up, achieving the right consistency that makes it easy to cut into neat squares.
For optimal results, refrigerate the fudge for at least 4 hours, or overnight if you can wait! This extended cooling period ensures that the fudge is fully set and has that perfect melt-in-your-mouth texture. Avoid placing the fudge in the freezer, as this can alter the texture and make it too hard to enjoy. Once chilled, the fudge will maintain its shape when cut, making it easier to serve and share.
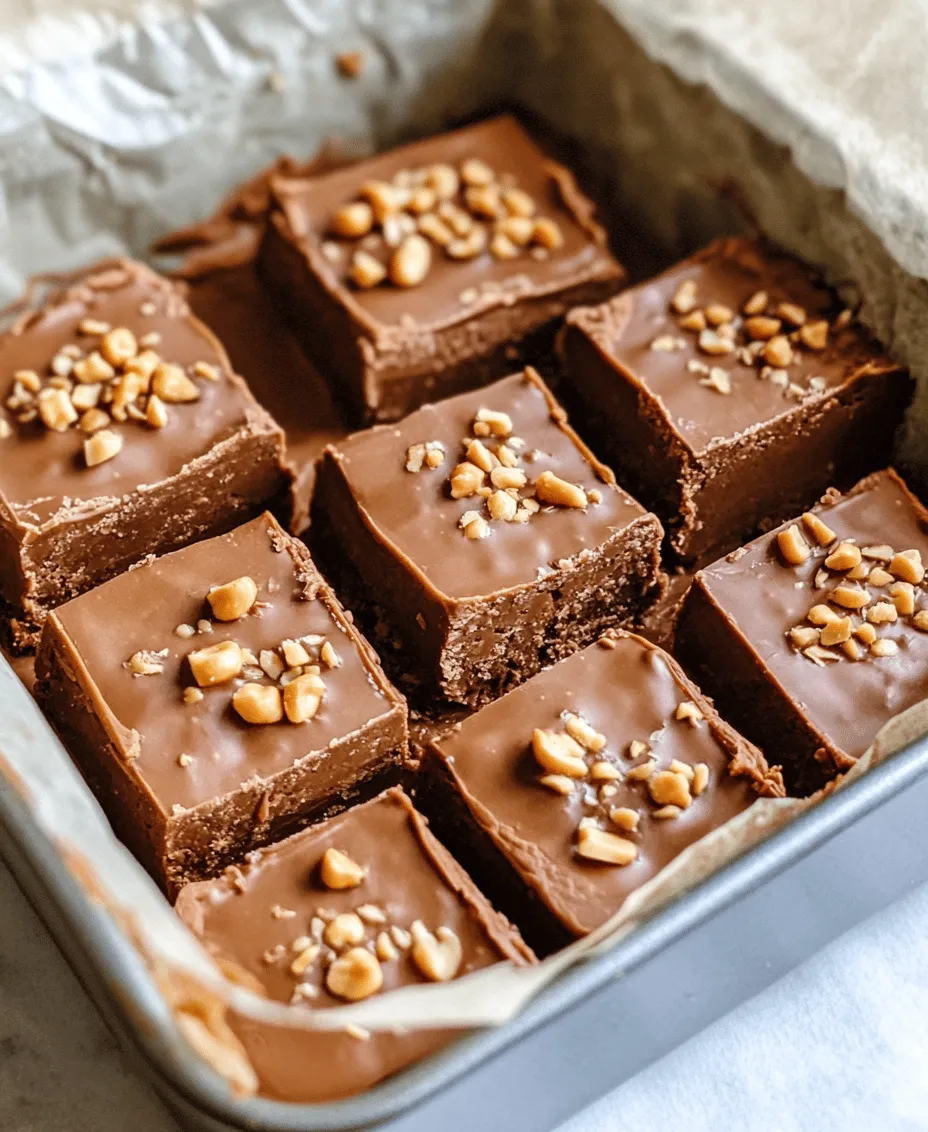
Cutting and Serving
Once your Peanut Butter Bliss Fudge has chilled adequately, it’s time to cut and serve! To achieve perfectly square pieces, follow these tips:
1. Use a Sharp Knife: A sharp knife will make clean cuts through the fudge, preventing it from crumbling or tearing. If necessary, warm the knife slightly by rinsing it under hot water and drying it off before slicing. This will help it glide through the fudge more smoothly.
2. Cut in a Grid Pattern: Start by cutting the fudge into strips, then cut across the strips to create squares. Aim for uniform sizes to ensure even serving and a pleasing presentation.
3. Dust with Cocoa Powder or Powdered Sugar: If you want to add a decorative touch, lightly dust the top of the fudge with cocoa powder or powdered sugar after cutting. This not only enhances the visual appeal but also adds a touch of sweetness.
4. Serving Options: Serve the fudge on a decorative platter or in individual cupcake liners for a more elegant presentation. This makes for an inviting dessert display, perfect for gatherings or special occasions.
The Benefits of Peanut Butter Bliss Fudge
This delicious treat is not just about indulgence; it also offers several nutritional benefits, making it a guilt-free dessert option when enjoyed in moderation.
Energy Boost
Peanut butter is a fantastic source of protein and healthy fats, making it an excellent choice for an energy boost. Whether you’re looking for a quick pick-me-up during the day or a post-workout snack, a piece of Peanut Butter Bliss Fudge can provide the necessary fuel. The combination of protein and fats helps to keep you feeling full longer, reducing the likelihood of unhealthy snacking.
Simple Ingredients
One of the best aspects of this fudge recipe is that it utilizes simple pantry staples. Ingredients like peanut butter, sweetened condensed milk, and chocolate chips are usually available in most kitchens, allowing for easy preparation without the need for elaborate grocery shopping. This simplicity is perfect for busy days when you want to whip up a quick dessert with minimal effort.
No-Bake Convenience
The no-bake nature of Peanut Butter Bliss Fudge makes it a fantastic dessert option for warm weather or when you want to avoid turning on the oven. This quick recipe can be prepared in just a few minutes, allowing you to enjoy a delicious treat without the hassle of baking. It’s also an ideal choice for those who may not be comfortable with traditional baking techniques.
Customizable
Another great advantage of this fudge recipe is its versatility. You can easily adjust the sweetness or toppings based on your personal preferences. If you prefer a less sweet fudge, reduce the amount of chocolate chips or opt for dark chocolate for a richer flavor. You can also experiment with different toppings, such as crushed pretzels, coconut flakes, or even a drizzle of caramel sauce for an added twist.
Creative Serving Ideas
Now that you have made your Peanut Butter Bliss Fudge, here are some creative ways to enjoy it:
Pairing Suggestions
Complement your fudge with ideal beverages and snacks. A glass of cold milk is a classic pairing that enhances the rich flavors of the fudge. For a more adult option, consider serving the fudge with a cup of coffee or espresso, which balances the sweetness perfectly. Additionally, pairing it with fresh fruit like strawberries or banana slices can add a refreshing contrast.
Presentation Tips
Make your fudge visually appealing for gatherings by arranging it on a beautiful serving platter. You can garnish the platter with fresh mint leaves or additional peanuts for a pop of color. If you’re serving at a party, consider cutting the fudge into bite-sized pieces and placing them in decorative cupcake liners for an elegant touch.
Gifting Ideas
Peanut Butter Bliss Fudge makes for a delightful homemade gift. To package it, cut the fudge into squares and arrange them in a decorative tin or box. You can add a personal touch by wrapping the container with a ribbon and including a handwritten note. This is a thoughtful way to share your culinary creations with friends and family, perfect for holidays, birthdays, or just because.
Storing and Preserving Your Fudge
To ensure your Peanut Butter Bliss Fudge stays fresh and delicious, it’s important to follow proper storage techniques.
Refrigeration
The best way to store your fudge is in the refrigerator. Place the cut pieces in an airtight container to prevent them from drying out or absorbing odors from other foods. Proper refrigeration can extend the fudge’s shelf life to about two weeks, allowing you to enjoy this treat over time.
Freezing Tips
If you want to store your fudge for an extended period, consider freezing it. Wrap each piece individually in plastic wrap and then place them in a freezer-safe container or bag. When stored correctly, the fudge can last for up to three months in the freezer. To enjoy, simply thaw the fudge in the refrigerator for a few hours before serving.
Signs of Spoilage
While this fudge has a relatively long shelf life, it’s essential to know when it’s no longer good to consume. Look for signs like an off smell, changes in texture (such as excessive stickiness or hardening), or visible mold growth. If any of these signs are present, it’s best to discard the fudge.
Conclusion
Peanut Butter Bliss Fudge is a delightful treat that combines the ease of preparation with rich flavors, making it a favorite among dessert lovers. With its creamy texture, crunchy bits, and satisfying sweetness, this fudge is not only a delicious indulgence but also an opportunity to explore the versatility of simple ingredients. Whether enjoyed at home or shared with friends and family, this recipe is sure to become a cherished part of your dessert repertoire. Its nutritional benefits, versatile nature, and creative serving ideas make it a truly special treat that can be enjoyed in various ways. So gather your ingredients, prepare this delicious fudge, and indulge in a sweet experience that is both satisfying and memorable.
