Introduction
Onion rings are not just a mere side dish; they are a universally loved snack that effortlessly marries a satisfying crunch with a savory flavor that can elevate any meal or social gathering. Whether enjoyed at a backyard barbecue, served alongside burgers, or simply as a standalone snack, homemade onion rings offer a delightful experience that is hard to resist. The best part? Making these crispy delights at home not only allows you to customize the flavors but also provides you with a healthier option compared to the heavily processed varieties available in stores.
In this comprehensive guide, we will walk you through the art of creating crispy homemade onion rings that will quickly become a staple in your kitchen. With a perfect blend of spices and a unique double-coating technique, these onion rings promise to deliver an irresistible crunch and flavor that will have your friends and family coming back for more.
Understanding the Appeal of Onion Rings
Exploring the History and Cultural Significance of Onion Rings
The origins of onion rings can be traced back to various culinary traditions around the world. While the exact birthplace remains debated, many attribute the creation of onion rings to the United States in the early 20th century. The dish gained popularity in diners and fast-food establishments, quickly becoming a classic American comfort food. Over the years, onion rings have transcended geographical boundaries, appearing in various forms in international cuisines. From the crispy fried onions in Indian cuisine to the tempura-style onion rings in Japanese fare, this beloved snack has made its mark globally.
The Versatility of Onion Rings in Various Cuisines
Onion rings are incredibly versatile, making them suitable for a wide array of dishes and occasions. In the United States, they are often served as a side dish alongside burgers and sandwiches, or as a sharable appetizer at parties. In some regions, onion rings are dipped in tangy sauces or served with spicy condiments, enhancing their flavor profile. In other cultures, onion rings are incorporated into salads or served with grilled meats, showcasing their adaptability. The beauty of onion rings lies in their ability to complement various flavors, making them a cherished addition to any meal.
Why Homemade Onion Rings Are a Healthier Choice
Opting for homemade onion rings presents several health benefits. Many store-bought alternatives are often laden with preservatives and unhealthy fats. By making onion rings at home, you have complete control over the ingredients, allowing you to choose healthier options. You can select fresh, high-quality onions, utilize whole-grain breadcrumbs, and adjust the seasoning to suit your dietary preferences. Furthermore, homemade onion rings can be baked instead of fried, reducing their calorie content while still retaining that satisfying crunch. By preparing this snack in your kitchen, you can enjoy the same delicious flavors without the guilt associated with processed versions.
Essential Ingredients for Perfect Onion Rings
Creating the ultimate crispy onion rings starts with selecting the right ingredients. Below, we break down the key components that will contribute to the flavor and texture of your homemade onion rings.
Sweet Onions: The Best Choice for Flavor and Sweetness
When it comes to choosing onions for your onion rings, sweet onions are the way to go. Varieties such as Vidalia, Walla Walla, or Maui onions are known for their mild and sweet flavor, which enhances the overall taste of the dish. The sweetness of these onions balances out the savory components, making each bite a delightful experience. Additionally, sweet onions tend to be less pungent than their yellow or white counterparts, resulting in a more enjoyable and approachable flavor, especially for those who may shy away from the sharpness of regular onions.
The Role of Flour and Breadcrumbs in Achieving the Desired Texture
The texture of your onion rings relies heavily on the types of flour and breadcrumbs used in the coating. All-purpose flour is typically the base for the batter, providing a light, crisp exterior. For an added crunch, consider using panko breadcrumbs, which are coarser than traditional breadcrumbs and create a delightful texture when fried or baked. The combination of flour and breadcrumbs creates a double-layered coating that encases the onions, ensuring a satisfying crunch with every bite.
Understanding the Importance of Buttermilk and Its Alternatives
Buttermilk plays a crucial role in the preparation of onion rings, primarily due to its acidity and thickness. It acts as a marinade, tenderizing the onions while adding moisture and flavor. The tangy flavor of buttermilk also enhances the overall taste of the onion rings. If you don’t have buttermilk on hand, fear not! You can easily create a substitute by mixing regular milk with a splash of vinegar or lemon juice. This will mimic the acidity of buttermilk and work just as effectively in your recipe.
Spices and Seasonings: Elevating Taste with Paprika, Garlic, and Onion Powder
To truly elevate your homemade onion rings, incorporating a blend of spices and seasonings is essential. A dash of paprika adds a subtle smokiness and depth of flavor, while garlic powder contributes a savory richness that complements the sweetness of the onions. Onion powder is another fantastic addition, intensifying the onion flavor even further. Feel free to experiment with other spices such as cayenne pepper for a bit of heat or Italian seasoning for a herby twist. The key is to find a balance of flavors that enhances the overall taste without overpowering the natural sweetness of the onions.
Preparation Steps for Crispy Onion Rings
With a solid understanding of the ingredients, we can now move on to the preparation steps that will yield perfectly crispy onion rings. Follow these detailed instructions to ensure you achieve that desired crunch and flavor.
Preparing the Onions: Choosing the Right Onions and Slicing Techniques
The first step in making crispy onion rings is selecting your onions and slicing them correctly. Begin by choosing fresh, firm sweet onions, as their flavor will significantly impact the final product. Once you have your onions, it’s time to slice them into rings.
To achieve even and uniform rings, start by peeling the onions and cutting off the ends. Slice the onion into approximately 1/4 to 1/2-inch thick rings, ensuring they are consistent in size. This uniformity is crucial for even cooking; thicker rings may require longer cooking times, while thinner ones may burn easily.
Once sliced, gently separate the onion rings and place them in a bowl. At this point, you can soak them in buttermilk for at least 30 minutes. This step not only helps to tenderize the onions but also infuses them with flavor, making the final product even tastier.
Creating the Batter: The Science Behind the Flour Mixture
While the onions soak, it’s time to prepare the batter that will coat your rings. In a separate bowl, combine all-purpose flour with your chosen spices and seasonings. The exact proportions can vary based on your taste preferences, but a good starting point is to use about one cup of flour, one teaspoon of paprika, half a teaspoon of garlic powder, and a pinch of salt.
For added texture, consider incorporating cornstarch into the flour mixture. This will create an extra-crispy crust when cooked. Mix the dry ingredients thoroughly to ensure that the flavors are evenly distributed.
Next, in another bowl, prepare a wet batter by whisking together additional flour, buttermilk (or your substitute), and a pinch of salt until smooth. The consistency should be thick enough to coat the back of a spoon but still pourable. This wet batter will adhere to the onion rings and create a deliciously crispy coating during cooking.
With your onions soaked, batter prepared, and seasoning blended, you are well on your way to creating delicious crispy homemade onion rings that will impress anyone fortunate enough to share in your culinary creation. In the following sections, we’ll discuss the frying techniques and tips for achieving the ultimate crunch, but for now, let’s focus on getting these rings ready for their hot bath.
Stay tuned as we delve deeper into the process of frying or baking these onion rings to perfection, ensuring they are golden brown and irresistibly crispy!
Making the Buttermilk Dip: Tips for Achieving Optimal Consistency
Creating the perfect buttermilk dip is essential for flavorful onion rings. The buttermilk acts not only as a tenderizer but also enhances the flavor profile of the onion rings. To achieve the ideal consistency for your buttermilk dip, start with the following ingredients:
– 1 cup buttermilk
– 1 teaspoon garlic powder
– 1 teaspoon onion powder
– 1 teaspoon smoked paprika
– Salt and pepper to taste
Begin by measuring out the buttermilk into a mixing bowl. Add the garlic powder, onion powder, smoked paprika, salt, and pepper. Whisk these ingredients together until well combined. The ideal dip should be thick enough to adhere to the onion rings without dripping excessively. If you find the consistency too thin, consider adding a tablespoon of flour or cornstarch, whisking until smooth. This slight thickening will help the batter stick to the onion rings, ensuring a delicious coating.
Coating Techniques: How to Achieve a Double Coating for Extra Crispiness
For onion rings that are irresistibly crispy, a double coating technique is essential. This method involves dipping the onion rings first in the buttermilk mixture, followed by the dry batter, and then repeating the process. Here’s how to do it effectively:
1. Initial Dip: Take your prepared onion rings and fully immerse them in the buttermilk dip. Allow them to soak for a few minutes to absorb the flavors.
2. First Coating: Remove each onion ring from the buttermilk, letting the excess drip off. Dredge the ring into your dry batter mix, ensuring it is fully coated. The dry batter can be a mix of all-purpose flour, cornstarch, and seasonings of your choice.
3. Second Dip: Dip the coated onion ring back into the buttermilk, allowing any excess to run off again.
4. Final Coating: Finally, coat the ring once more in the dry batter. This double layer of batter creates a thicker, crunchier crust once fried.
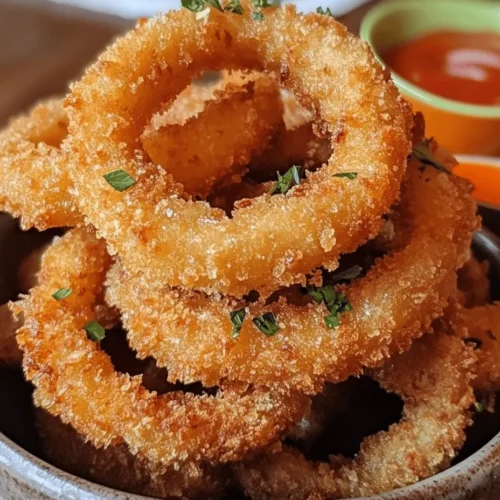
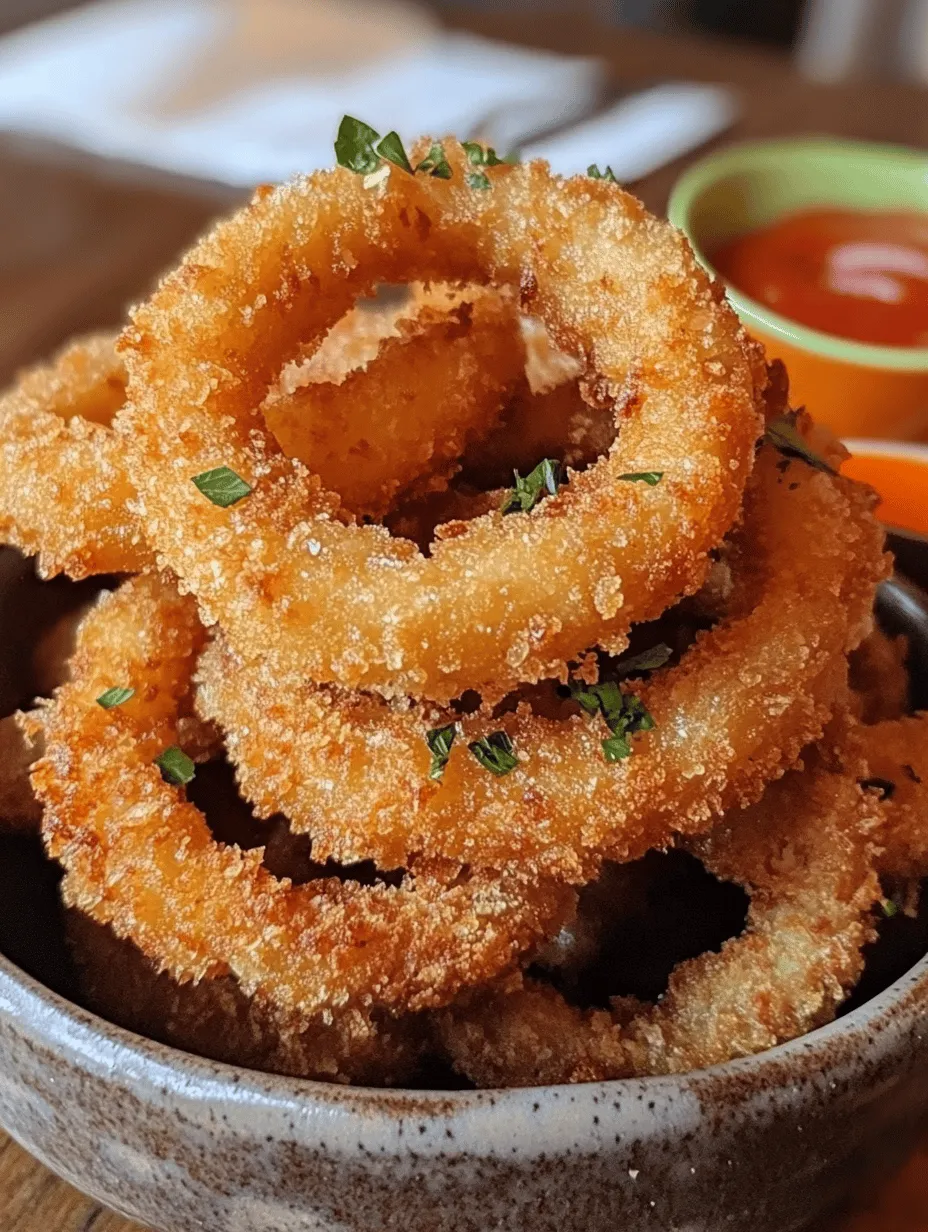
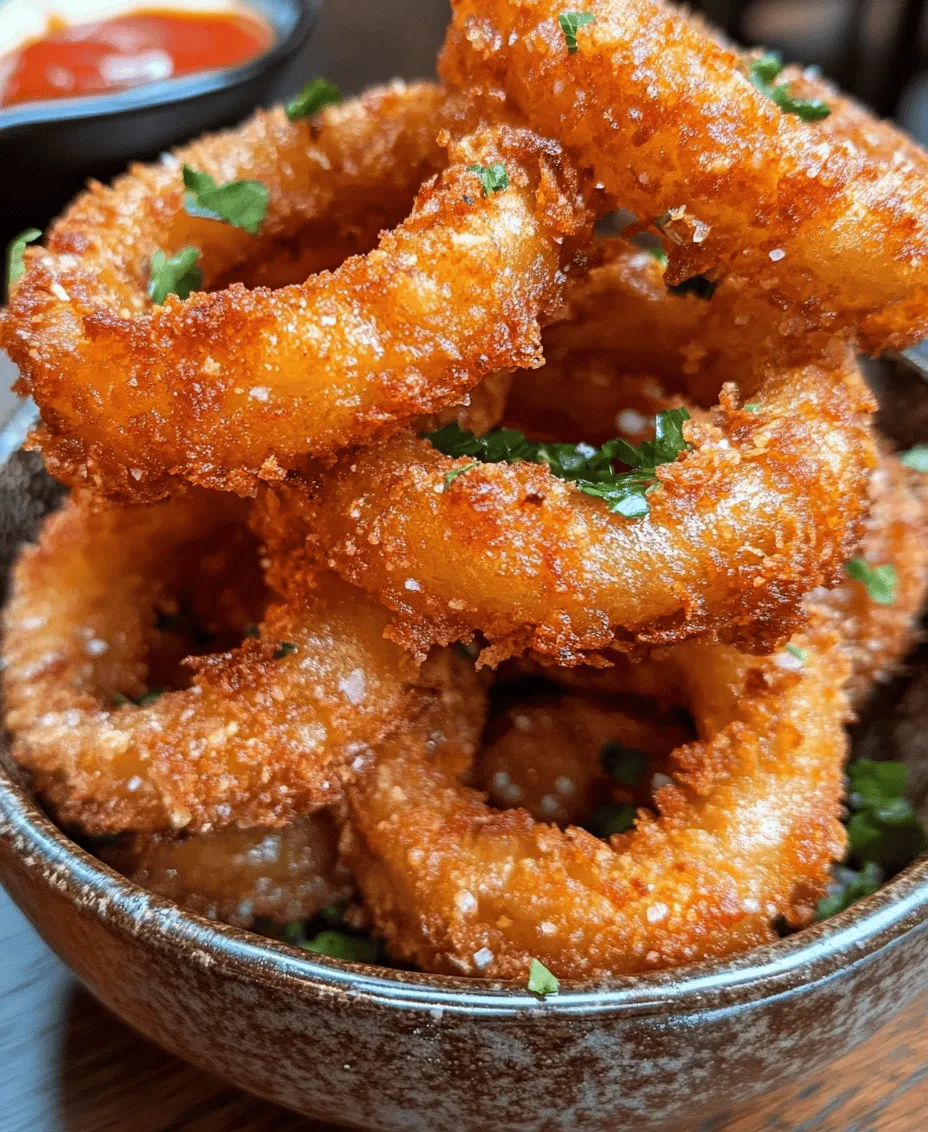
By following this double coating method, your onion rings will achieve that perfect, satisfying crunch, elevating them from ordinary to extraordinary.
Frying Techniques for the Perfect Crunch
Understanding Oil Temperature: How to Know When Your Oil is Ready
One of the critical factors in frying onion rings is maintaining the right oil temperature. Ideally, you want your oil to be between 350°F and 375°F. To check if your oil is ready, you can use a kitchen thermometer for accuracy, or simply drop a small piece of the batter into the oil. If it sizzles and rises to the surface immediately, the oil is ready for frying.
Frying Tips: Avoiding Overcrowding and Ensuring Even Cooking
When frying onion rings, it’s tempting to fill the pan to the brim. However, overcrowding can drastically lower the oil’s temperature, resulting in soggy, greasy onion rings. To ensure even cooking, fry in batches, allowing enough space for each ring to float freely. This practice not only promotes even cooking but also helps achieve that desired golden-brown color.
Timing is Key: How Long to Fry for That Golden-Brown Finish
Timing is crucial in frying onion rings to achieve a perfect crunch. Fry the onion rings for about 2 to 4 minutes, turning them halfway through to ensure even browning. Keep an eye on them, as cooking times may vary based on the thickness of the rings and the temperature of the oil. Once they reach a beautiful golden-brown hue, remove them from the oil.
Draining and Seasoning: Ensuring the Perfect Texture and Flavor
After frying, it’s essential to drain the onion rings properly to maintain their crispiness. Place them on a plate lined with paper towels to absorb excess oil. While they are still hot, season with salt immediately, allowing the salt to adhere perfectly to the crispy coating. This step is crucial, as it enhances the flavor and ensures that each bite is satisfying.
Serving Suggestions and Dipping Sauce Pairings
Creative Ideas for Serving Your Onion Rings
Once your onion rings are perfectly fried and seasoned, it’s time to serve them. Here are some creative serving ideas to elevate your dish:
– Classic Platter: Serve the onion rings on a rustic wooden board with a side of mixed dipping sauces for a visually appealing presentation.
– Burger Companion: Pair your onion rings with homemade burgers or pulled pork sandwiches for a delightful meal.
– Gourmet Touch: Sprinkle some fresh herbs like parsley or chives over the onion rings before serving for a pop of color and flavor.
– Onion Ring Stack: Create a fun tower of onion rings for a unique presentation at parties or gatherings.
Popular Dipping Sauces: Ranch, Ketchup, BBQ, and More
Onion rings are often enjoyed with a variety of dipping sauces. Here are some popular options:
– Ranch Dressing: Creamy and tangy, ranch is a classic choice that complements the crunch of onion rings.
– Ketchup: A traditional favorite, ketchup adds a sweet and tangy flavor that pairs well with fried foods.
– BBQ Sauce: Smoky and sweet, BBQ sauce adds a flavorful kick that enhances the onion rings’ taste.
– Sriracha Mayo: Mix mayonnaise with Sriracha for a spicy and creamy dipping sauce that elevates the flavor profile.
How to Make Homemade Dipping Sauces That Complement Your Onion Rings
Creating your own dipping sauces is easier than you might think. Here are quick recipes for some delicious homemade sauces to pair with your onion rings:
1. Homemade Ranch Dressing:
– Ingredients: 1 cup mayonnaise, 1/2 cup sour cream, 1 tablespoon dried dill, 1 teaspoon garlic powder, 1 teaspoon onion powder, salt and pepper to taste.
– Instructions: Mix all ingredients in a bowl until smooth. Adjust seasoning to taste.
2. Spicy Ketchup:
– Ingredients: 1 cup ketchup, 1 tablespoon hot sauce, 1 teaspoon smoked paprika.
– Instructions: Combine all ingredients in a bowl and stir well. Adjust hot sauce according to your spice preference.
3. Garlic Aioli:
– Ingredients: 1 cup mayonnaise, 2 cloves garlic (minced), 1 tablespoon lemon juice, salt to taste.
– Instructions: Mix all ingredients in a bowl until well combined. Chill for at least 30 minutes before serving to allow the flavors to meld.
The Nutritional Profile of Onion Rings
Analyzing the Nutritional Value of Homemade vs. Store-Bought Onion Rings
When it comes to enjoying onion rings, understanding the nutritional profile is essential. Homemade onion rings, while still indulgent, often have fewer preservatives and artificial ingredients compared to their store-bought counterparts.
A typical serving of homemade onion rings (about 5-6 rings) can contain roughly:
– Calories: 300-400
– Fat: 15-20g
– Carbohydrates: 40-50g
– Protein: 5-7g
Store-bought onion rings, on the other hand, can have added sodium and unhealthy fats, making homemade versions a healthier choice.
Balancing Indulgence with Nutrition: Making Mindful Choices
While onion rings are a delicious treat, it’s important to enjoy them mindfully. Consider enjoying them as an occasional snack rather than a regular part of your diet. Pairing onion rings with a side of fresh vegetables or a salad can help balance your meal, adding valuable nutrients and fiber.
Portion Control and Serving Sizes for a Healthier Snack Experience
To keep your indulgence in check, practice portion control. Instead of serving a large platter of onion rings, consider serving smaller portions. Aim for a serving size of about 5-6 onion rings per person. This way, you can enjoy the crispy goodness without overindulging.
Conclusion
Homemade crispy onion rings offer a delightful and satisfying snack that can be enjoyed in a variety of ways. With the right ingredients, preparation techniques, and frying methods, you can create a dish that rivals any restaurant’s offering. This recipe not only highlights the joy of cooking but also enables you to customize flavors and pairings to suit your taste. Whether you’re hosting a party or enjoying a quiet night in, these onion rings are sure to be a hit. Enjoy the process and the delicious results!