As autumn approaches and the air turns crisp, many of us find ourselves longing for the comforting flavors of the season. Among the most beloved fall treats is pumpkin dessert, a staple that brings warmth and nostalgia to our taste buds. From traditional pumpkin pies to spiced lattes, pumpkin has carved its niche in the culinary world, captivating dessert lovers everywhere. This year, why not elevate your pumpkin dessert game with a delightful twist? Enter the No-Bake Mini Pumpkin Cheesecakes—a deliciously creamy treat that encapsulates all the flavors of fall without the hassle of baking.
No-bake desserts have gained immense popularity for their convenience and ease of preparation. They offer a fantastic solution for those who want to whip up something sweet without spending hours in the kitchen. With minimal cooking involved, you can enjoy the delightful combination of creamy cheesecake and spiced pumpkin flavor with just a few simple steps. These mini cheesecakes are versatile, making them perfect for any occasion, whether you’re hosting a Thanksgiving gathering, a fall dinner party, or simply indulging in a cozy night at home.
The Deliciousness of No-Bake Mini Pumpkin Cheesecakes
What sets these No-Bake Mini Pumpkin Cheesecakes apart is their irresistible creaminess, combined with a crunchy graham cracker crust and a touch of warm spices. The flavors meld together beautifully, creating a dessert that is not only easy to make but also visually appealing with its charming mini size. These cheesecakes are sure to impress your guests while satisfying your own pumpkin cravings. Plus, they can be made in advance and stored in the refrigerator, allowing you to enjoy your time with family and friends without worrying about last-minute baking.
Understanding the Ingredients
To create the perfect No-Bake Mini Pumpkin Cheesecakes, it’s essential to understand the key ingredients that contribute to their flavor and texture. The main components include the crust, filling, and topping, each playing a crucial role in the overall experience of this delightful dessert.
The Crust
The foundation of any cheesecake is its crust, and for these mini treats, we will be utilizing graham cracker crumbs. The sweet and slightly nutty flavor of graham crackers complements the rich pumpkin filling, creating a harmonious balance. To bring the crust together, we will also need granulated sugar and melted butter. The sugar enhances the sweetness, while the butter acts as a binding agent, allowing the crumbs to hold their shape once pressed into the mini cheesecake molds.
The Filling
The star of the show is undoubtedly the creamy filling, which combines cream cheese, pumpkin puree, powdered sugar, vanilla extract, and a blend of warm spices, such as cinnamon and nutmeg. The cream cheese provides a rich base, while the pumpkin puree adds moisture and depth of flavor. Using high-quality ingredients is crucial in achieving the best taste and texture for your cheesecakes. Opt for pure pumpkin puree rather than pumpkin pie filling, as the latter contains added sugars and spices that can alter the final flavor of your dessert.
The Topping
To elevate these mini cheesecakes, we recommend a dollop of whipped cream on top. This light and airy addition not only enhances the presentation but also adds a delightful contrast to the rich filling. You can make your own whipped cream or use store-bought for convenience.
Incorporating seasonal ingredients, especially pumpkin puree, into your cooking is a fantastic way to celebrate fall. The vibrant orange color of pumpkin is not just visually appealing; it also provides significant health benefits, such as being high in fiber and rich in vitamins A and C. Embrace the flavors of the season by using fresh, quality ingredients that will shine in your No-Bake Mini Pumpkin Cheesecakes.
Crafting the Perfect Crust
Creating the graham cracker crust is a straightforward yet essential step in making these mini cheesecakes. Follow these detailed instructions to achieve a crust that is both flavorful and firm enough to hold the filling.
Step 1: Gather Your Ingredients
For the crust, you will need:
– 1 ½ cups graham cracker crumbs
– ¼ cup granulated sugar
– ½ cup unsalted butter, melted
Using fresh ingredients is key to a delicious crust. Ensure your graham crackers are finely crushed, as this will help create a smooth texture.
Step 2: Combine the Dry Ingredients
In a mixing bowl, combine the graham cracker crumbs and granulated sugar. Use a whisk or fork to mix them thoroughly, ensuring that the sugar is evenly distributed throughout the crumbs. This step is essential, as it will enhance the sweetness of the crust.
Step 3: Add the Melted Butter
Pour the melted butter into the dry mixture. Using a spatula or wooden spoon, stir the mixture until the crumbs are evenly coated with butter. The consistency should resemble wet sand—when pressed together, it should hold its shape without crumbling apart.
Step 4: Press the Mixture into Mini Cheesecake Molds
Next, choose your mini cheesecake molds or a muffin tin lined with paper liners. Using your fingers or the back of a measuring cup, evenly press the graham cracker mixture into the bottom of each mold. Make sure to compact the crumbs firmly to create a sturdy base that will hold up when filled with the creamy cheesecake.
Step 5: Chill the Crust
Once you’ve pressed the crust into the molds, place them in the refrigerator for at least 15-20 minutes. Chilling the crust helps it set and firm up, making it easier to add the filling later. This step is crucial for achieving the right texture; a well-chilled crust will provide a satisfying crunch against the softness of the cheesecake filling.
Creating the Creamy Cheesecake Filling
Now that your crusts are ready, it’s time to focus on the creamy pumpkin cheesecake filling. Follow these steps to create a smooth and delicious filling that will have everyone coming back for seconds.
Step 1: Prepare Your Ingredients
For the cheesecake filling, gather the following ingredients:
– 8 oz cream cheese, softened
– 1 cup pumpkin puree
– ½ cup powdered sugar
– 1 tsp vanilla extract
– 1 tsp ground cinnamon
– ½ tsp ground nutmeg
– 1 cup heavy whipping cream
Ensure your cream cheese is at room temperature; this will make it easier to beat and create a creamy consistency.
Step 2: Beat the Cream Cheese
In a mixing bowl, beat the softened cream cheese with an electric mixer until smooth and creamy. This step is important as it helps incorporate air into the cream cheese, creating a light filling. Make sure there are no lumps; a smooth texture is key to a perfect cheesecake.
Step 3: Add the Pumpkin and Other Ingredients
Once the cream cheese is ready, add the pumpkin puree, powdered sugar, vanilla extract, ground cinnamon, and nutmeg. Beat the mixture on low speed until all ingredients are well combined. Increase the speed to medium and continue mixing until the filling is smooth and evenly blended. The spices will enhance the pumpkin flavor, giving your cheesecake a warm, comforting taste.
Step 4: Fold in the Whipped Cream
In a separate bowl, whip the heavy cream until soft peaks form. This will create a light and airy texture for your filling. Gently fold the whipped cream into the pumpkin mixture using a spatula. Be careful not to overmix, as you want to maintain the lightness of the whipped cream. This step is crucial for achieving that delightful airy texture in your cheesecakes.
With the crust set and the creamy filling prepared, you are now one step away from completing your No-Bake Mini Pumpkin Cheesecakes. These simple yet delicious steps will yield a dessert that is perfect for any fall gathering. Stay tuned for the final steps and finishing touches to make your mini cheesecakes truly shine!

Assembling Your Mini Cheesecakes
Once your crusts have set, it’s time to assemble your No-Bake Mini Pumpkin Cheesecakes. This step is essential for achieving that perfect balance of flavor and texture. Begin by carefully spooning the creamy pumpkin filling into each crust. To ensure an even distribution, use a small spatula or the back of a spoon. Aim for about two tablespoons of filling for each mini cheesecake, allowing enough space for the mixture to expand slightly as it chills.
For a neat presentation, gently tap the muffin tin against the counter after filling to eliminate any air bubbles and encourage the filling to settle evenly. If you notice some of the filling has risen above the crust, simply smooth it down with your spatula for a polished look. This attention to detail not only makes your cheesecakes visually appealing but also enhances the overall experience of enjoying them.
It’s crucial to allow your cheesecakes adequate chilling time. The cooling process helps the flavors meld beautifully, creating a richer taste. Aim for at least 4 hours in the refrigerator; however, overnight chilling will yield even better results. The longer the cheesecakes sit, the more harmonious the flavors will become, making each bite a delightful experience.
Chilling for the Perfect Set
The chilling process is vital for no-bake desserts, as it allows the filling to firm up and set properly. Without sufficient chilling, your mini cheesecakes may not hold their shape, resulting in a messy serving experience. Ideally, after you’ve assembled your cheesecakes, let them chill in the refrigerator for at least 4 to 6 hours. If you have the time, leaving them overnight is even better, as this provides the perfect consistency and flavor integration.
To determine when your cheesecakes are ready to serve, look for a slight firmness to the touch. The filling should feel set without any wobble. If you gently press the surface, it should be springy but not overly soft. This firmness is a good indicator that your cheesecakes have achieved the ideal texture. Additionally, the flavors should be well-developed and balanced, making each bite a celebration of pumpkin and cream cheese goodness.
Serving Suggestions and Presentation Ideas
When it comes to serving your No-Bake Mini Pumpkin Cheesecakes, presentation plays a key role in enhancing the dining experience. Start by removing the cheesecakes from the muffin tin. If you find them difficult to release, run a small knife around the edges to loosen them, then gently lift them out.
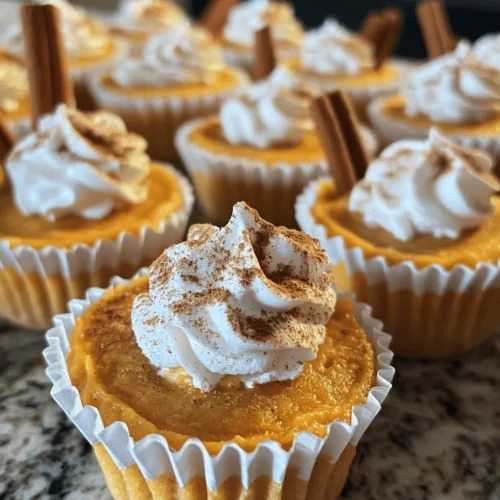
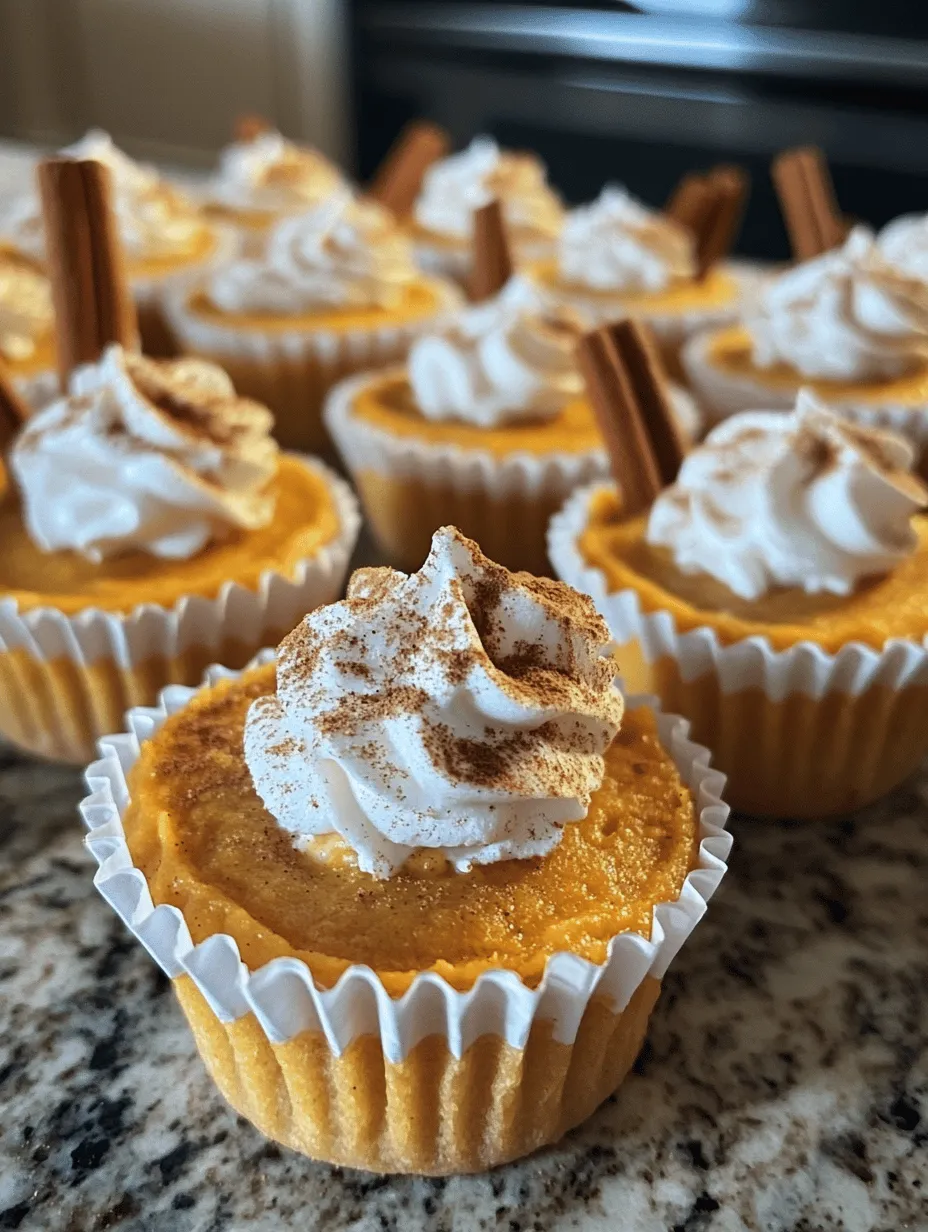
To elevate the visual appeal, consider garnishing each cheesecake with a dollop of freshly whipped cream. This not only adds a creamy texture but also provides a beautiful contrast against the vibrant orange filling. For an extra touch, sprinkle a pinch of cinnamon or nutmeg on top of the whipped cream. These spices not only complement the pumpkin flavor but also add a festive aesthetic that’s perfect for the season.
These mini cheesecakes are versatile and can be served for various occasions, including parties, holiday gatherings, or a cozy family dessert night. Their individual size makes them easy to serve and perfect for portion control, allowing guests to enjoy a sweet treat without overindulging. You can also arrange them on a decorative platter, possibly with some autumn-themed decorations like miniature pumpkins or fall leaves to enhance the seasonal vibe.
Nutritional Information
As you indulge in these delightful No-Bake Mini Pumpkin Cheesecakes, it’s helpful to consider their nutritional profile. Each cheesecake contains a balance of rich flavors and creamy textures while being relatively light compared to traditional baked cheesecakes. The pumpkin puree adds fiber and vitamins, particularly vitamin A, which is beneficial for vision and immune function.
For serving sizes, each mini cheesecake is a perfect single portion, making it easier to enjoy without excessive calorie intake. Depending on your specific recipe adjustments, you can expect each cheesecake to average around 150-200 calories. If you’re following specific dietary preferences, consider substituting the cream cheese with a vegan alternative or using a sugar substitute to lower the overall sugar content. For gluten-free options, ensure that your crust ingredients are certified gluten-free.
Conclusion
In summary, the No-Bake Mini Pumpkin Cheesecakes are a simple yet delicious dessert that can elevate any occasion. Their creamy pumpkin filling and crunchy crust create a delightful combination that is sure to impress family and friends. Whether you’re preparing for a fall celebration or looking for a sweet treat to enjoy any day, these mini cheesecakes are the perfect solution.
Their versatility allows for customization, so feel free to experiment with different toppings and presentation styles. Making and sharing these delightful treats brings joy to both the maker and the recipients. We encourage you to try this recipe and experience the delightful flavors and textures of these mini pumpkin cheesecakes. You’ll find that they not only satisfy your seasonal cravings but also become a favorite in your dessert repertoire. Happy baking!