Introduction
Cheesecakes and crème brûlée are two of the most beloved desserts in the culinary world, each offering their own unique blend of flavors and textures. Cheesecakes, with their creamy filling and buttery crust, are a classic favorite at gatherings, while crème brûlée, known for its rich custard base and signature caramelized sugar topping, is often considered a hallmark of fine dining. The combination of these two iconic desserts into a single, elegant creation results in the mini crème brûlée cheesecake—a delightful treat that captures the essence of both desserts in a charming, bite-sized form.
The growing trend of mini desserts makes these mini crème brûlée cheesecakes particularly appealing for parties, gatherings, or even personal indulgence. Their small size allows for easy serving and enjoyment without the guilt of overindulgence, and their exquisite presentation makes them a stunning centerpiece for any dessert table. With their rich flavors and creamy textures, these mini cheesecakes are not just desserts; they are an experience, sure to impress guests and spark conversations at any event.
The Allure of Mini Crème Brûlée Cheesecakes
What sets mini crème brûlée cheesecakes apart is their unique texture and flavor profile. Each bite offers the creamy richness of cheesecake balanced with the silky smoothness of crème brûlée. The graham cracker crust adds a delightful crunch, while the caramelized sugar topping provides a satisfying crack that gives way to the luscious filling beneath. This combination of textures is truly a feast for the senses.
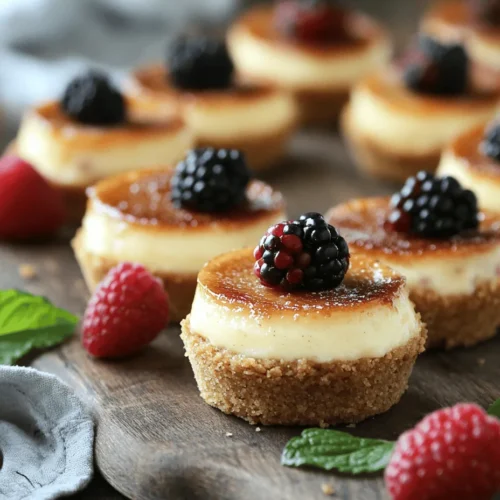
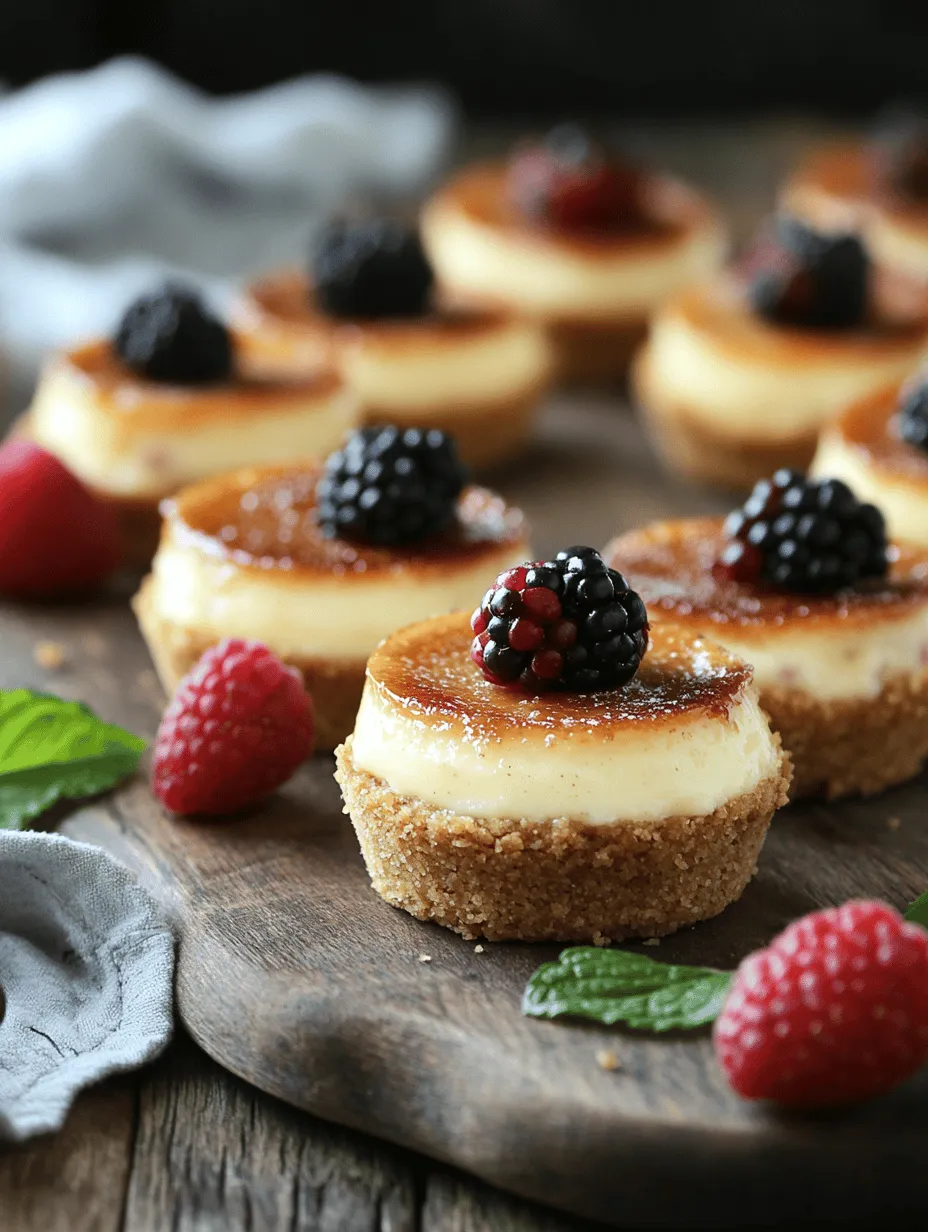
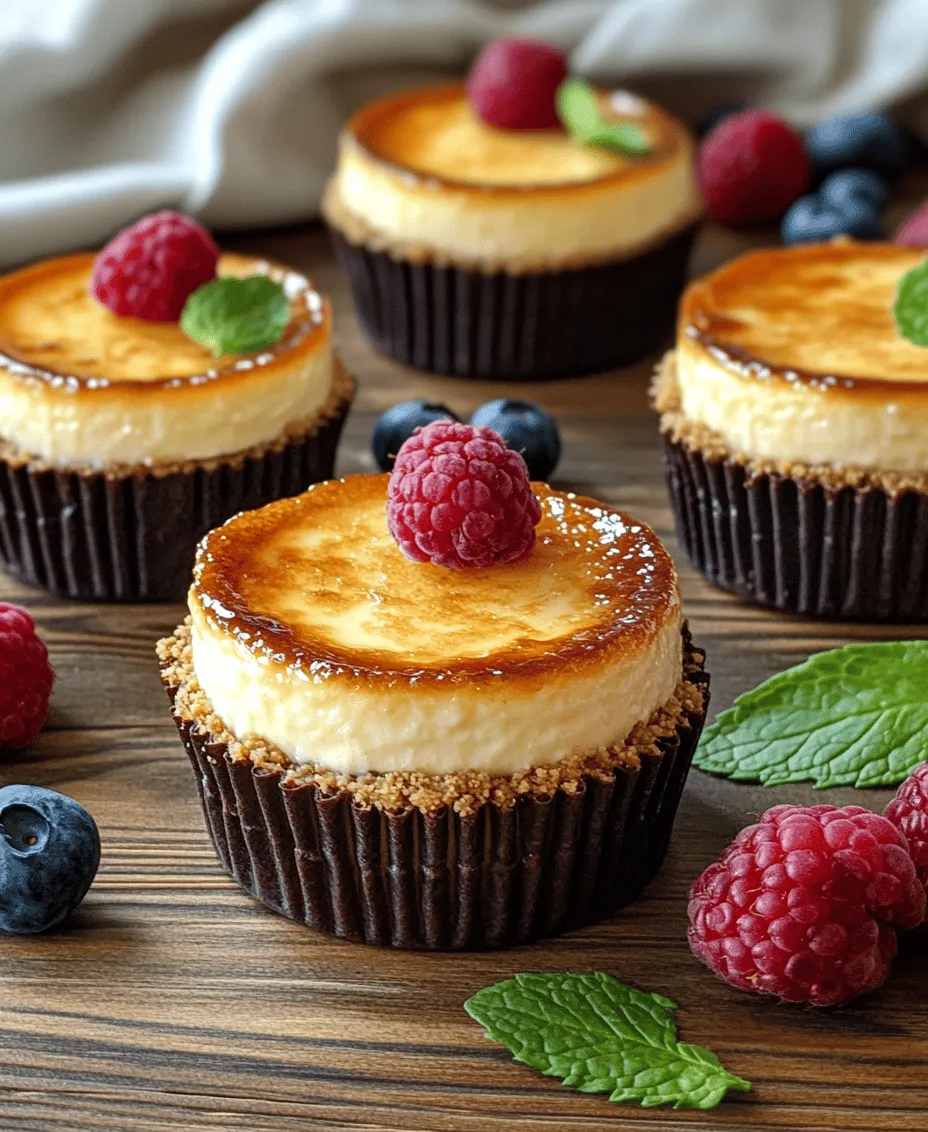
Visually, these mini cheesecakes are a showstopper. Their individual servings allow for creative presentation, making them perfect for a variety of occasions—from elegant dinner parties to casual family gatherings. The glossy, caramelized topping glistens under the light, inviting guests to dive into their delicate layers. Moreover, their petite size makes them a versatile choice, as they can easily fit into any dessert lineup, allowing for a delightful sampling of flavors without overwhelming the palate.
In addition to their aesthetic appeal, mini crème brûlée cheesecakes have the added benefit of being conversation starters. Guests are often intrigued by their unique twist on classic desserts, eager to discover the flavors and textures that lie within these charming little treats. Whether you’re serving them at a wedding, a holiday celebration, or simply for a cozy dinner at home, these cheesecakes are sure to leave a lasting impression.
Ingredients Breakdown
Creating the perfect mini crème brûlée cheesecakes requires a harmonious blend of quality ingredients that work together to achieve that signature flavor and texture.
Cheesecake Base Ingredients:
– Graham Cracker Crumbs: The foundation of any cheesecake, graham cracker crumbs provide the essential texture and flavor for the crust. When combined with melted butter and sugar, they form a rich, crumbly base that perfectly complements the creamy filling.
– Sugar and Butter: The addition of sugar not only sweetens the crust but also enhances its overall flavor. Butter is crucial for binding the crumbs together and giving the crust its rich, buttery taste. Using unsalted butter is recommended to allow for better control of the saltiness in the final dish.
Cheesecake Filling Components:
– Cream Cheese: The star of the cheesecake filling, cream cheese lends a smooth, creamy texture and a tangy flavor that is characteristic of traditional cheesecakes. It’s essential to allow the cream cheese to come to room temperature before mixing to ensure a lump-free filling.
– Heavy Cream: This rich ingredient adds a luxurious creaminess to the cheesecake filling, enhancing its overall mouthfeel. Heavy cream helps achieve a light yet indulgent texture, making each bite feel decadent.
– Cornstarch: Often overlooked, cornstarch plays a vital role in achieving the perfect consistency of the cheesecake filling. It helps stabilize the filling, ensuring it holds its shape and retains a creamy texture after baking.
Crème Brûlée Topping:
– Granulated Sugar: The key ingredient for the crème brûlée topping, granulated sugar, is sprinkled over the cooled cheesecakes before caramelization. This sugar forms the iconic crackly layer that contrasts beautifully with the creamy cheesecake beneath.
– Torch or Broiler: To achieve the signature caramelized top, you can use a kitchen torch or a broiler. Caramelizing the sugar is an art form that requires careful attention to avoid burning, as the goal is to create a golden, crispy layer that adds a satisfying crunch to the dessert.
Optional Garnishes:
To elevate your mini crème brûlée cheesecakes even further, consider adding optional garnishes such as fresh berries, mint leaves, or a drizzle of chocolate sauce. These simple touches not only enhance the visual appeal but also add layers of flavor that complement the main dessert beautifully.
Step-by-Step Instructions
Now that we have gathered our ingredients, it’s time to dive into the process of making these exquisite mini crème brûlée cheesecakes. Follow these detailed steps to ensure a perfect outcome.
Preparing the Crust
1. Preheat the Oven: Begin by preheating your oven to 325°F (163°C). A properly preheated oven is crucial for achieving the right texture for your cheesecakes.
2. Mix the Crust Ingredients: In a medium bowl, combine 1 cup of graham cracker crumbs, 1/4 cup of granulated sugar, and 1/2 cup of melted unsalted butter. Stir until the mixture resembles wet sand.
3. Press into Molds: Line a muffin tin with paper liners, or grease the tin lightly if you’re not using liners. Using a tablespoon, scoop the graham cracker mixture into each muffin cup, pressing it firmly into the bottom to create an even crust. Ensure each crust is tightly packed to prevent crumbling after baking.
4. Pre-Bake the Crusts: Place the muffin tin in the preheated oven and bake the crusts for about 8-10 minutes, or until they are golden and fragrant. This step helps to set the crust and enhances the flavor.
5. Cool the Crusts: Once baked, remove the crusts from the oven and allow them to cool slightly while you prepare the cheesecake filling.
Making the Cheesecake Filling
1. Prepare the Cream Cheese: In a large mixing bowl, add 16 ounces of softened cream cheese. Using an electric mixer, beat the cream cheese on medium speed until smooth and creamy, ensuring there are no lumps.
2. Incorporate Sugar: Gradually add 1/2 cup of granulated sugar to the cream cheese, continuing to mix until well combined and fluffy. This step is essential to achieve a sweet and creamy filling.
3. Add the Heavy Cream: Pour in 1/2 cup of heavy cream and mix on low speed until combined. This addition will enhance the richness of the cheesecake filling.
4. Add Cornstarch: Sprinkle in 2 tablespoons of cornstarch and mix well. This ingredient will help stabilize the filling, ensuring it sets properly during baking.
5. Blend Until Smooth: Increase the mixer speed to medium and beat the mixture for about 2-3 minutes, until the filling is completely smooth and creamy. Take your time here—properly blended filling is vital for a luscious cheesecake texture.
6. Fill the Crusts: Carefully spoon the cheesecake filling into each pre-baked graham cracker crust, filling them almost to the top. Use a spatula to smooth the tops if necessary.
7. Bake the Cheesecakes: Place the muffin tin back in the oven and bake the cheesecakes for 20-25 minutes, or until the edges are set and the centers still have a slight jiggle. This gentle baking ensures a creamy interior without overcooking.
8. Cool and Chill: Once baked, turn off the oven and crack the oven door slightly to allow the cheesecakes to cool gradually. This will help prevent cracking. After about 30 minutes, remove the cheesecakes from the oven and refrigerate for at least 4 hours or overnight to allow them to set completely.
By following these steps meticulously, you will create a base and filling that not only tastes divine but also has the right texture to complement the crème brûlée topping. The anticipation of the final step—a sizzling, caramelized finish—makes the effort all the more worthwhile.
Stay tuned for the next part of this article, where we’ll explore the art of caramelizing the sugar topping and adding those finishing touches that will elevate your mini crème brûlée cheesecakes to a whole new level.
Preparing Mini Crème Brûlée Cheesecakes
Importance of Adding Eggs One at a Time for Even Mixing
When making mini crème brûlée cheesecakes, the order in which you incorporate your ingredients can significantly impact the texture and flavor of your final product. Adding eggs one at a time allows for thorough mixing and ensures that each egg is fully integrated into the batter before the next one is added. This step is crucial for achieving a smooth, creamy consistency. If you add all the eggs at once, they may not blend evenly, resulting in a lumpy texture that detracts from the overall quality of your cheesecake.
Filling the Crusts with the Cheesecake Mixture
Once your crust has cooled, it’s time to fill it with the cheesecake mixture. Use a ladle or a measuring cup to carefully pour the filling into each crust, ensuring that you fill them evenly. This step is important to maintain uniformity in baking, as it helps each mini cheesecake to cook at the same rate and achieve an even texture. Be sure to leave a little room at the top of each crust, as the cheesecake may puff slightly during baking.
Tips on Preventing Overflow and Ensuring Even Distribution
To prevent overflow while baking, it’s essential to fill each crust just below the rim. A helpful tip is to use a piping bag to fill the crusts if you want more precision. This method allows for cleaner and more controlled filling, reducing the risk of spilling over the sides. Additionally, tapping the baking pan gently on the counter before placing it in the oven can help eliminate air bubbles, ensuring an even distribution of the cheesecake mixture.
Baking Techniques for Mini Cheesecakes
Baking mini cheesecakes requires careful attention to temperature and time to achieve the perfect texture. Preheat your oven to the recommended temperature, and place your filled mini cheesecake pans on a baking sheet. The baking sheet not only makes it easier to transfer the pans in and out of the oven but also helps in even heat distribution.
Explanation of the Water Bath Method and Its Benefits for Even Cooking
One of the best techniques for baking cheesecakes is the water bath method (also known as a bain-marie). By placing your mini cheesecake pan in a larger pan filled with hot water, you create a gentle and moist environment that helps prevent the tops of your cheesecakes from cracking. The water bath ensures even cooking by maintaining a consistent temperature around the cheesecakes, resulting in a creamy and smooth texture.
To set up a water bath, wrap the outside of your springform pans with aluminum foil to prevent water from leaking inside. Place the pans in a larger baking pan and fill the outer pan with hot water until it reaches halfway up the sides of the cheesecake pans.
Signs of Doneness for Perfect Cheesecakes
Determining when your mini cheesecakes are done baking is crucial. They should be set around the edges but still slightly jiggly in the center. The cheesecakes will continue to cook as they cool, so it’s important not to overbake them. If you notice that the tops have puffed up significantly or have started to turn golden brown, it’s time to remove them from the oven.
Cooling and Chilling Process
After taking your mini cheesecakes out of the oven, they need to cool gradually to prevent cracking. Place them on a wire rack at room temperature for about 30 minutes. This gradual cooling allows the cheesecakes to settle and reduces the shock from moving them from a hot oven to a cooler environment.
Once they have cooled, cover them with plastic wrap or place them in an airtight container and refrigerate for at least four hours, although overnight chilling is recommended for optimal flavor development. The longer they chill, the better the flavors meld, resulting in a richer taste.
Importance of a Gradual Cooling to Prevent Cracking
A common issue with cheesecakes is cracking, which can occur due to sudden temperature changes. Gradually cooling your cheesecakes, as previously mentioned, minimizes this risk. Additionally, when your mini cheesecakes reach room temperature, you can run a small knife around the edges of each cake to help them release from the pan, further reducing the chance of cracking.
Caramelizing the Sugar Topping
One of the most exciting steps in making mini crème brûlée cheesecakes is caramelizing the sugar topping. This step is what gives the dessert its signature crunchy crust. To achieve the perfect caramelized layer, evenly sprinkle an even layer of granulated sugar over the chilled cheesecakes.
Step-by-Step Guide on Using a Kitchen Torch Safely
Using a kitchen torch might seem intimidating, but with the right precautions, it’s quite simple. Here’s how to do it safely:
1. Prep Your Torch: Ensure your kitchen torch is filled with butane and that all safety features are engaged.
2. Even Sugar Layer: Ensure that the sugar layer is even and not too thick; a thin layer will caramelize more uniformly.
3. Ignite Carefully: Hold the torch about 2-3 inches above the sugar and ignite it, directing the flame in a sweeping motion across the surface.
4. Watch Closely: Keep the flame moving to avoid burning any one spot. The sugar will begin to melt and bubble—this is the caramelization process.
5. Cool Down: Once the sugar has turned a golden amber color, remove the torch and allow the caramelized layer to cool for a minute before serving.
Tips for Achieving the Perfect Caramelized Layer Without Burning the Sugar
– Keep the flame moving: A constant motion prevents the sugar from burning in one spot.
– Adjust the distance: If you notice the edges are caramelizing too quickly, move the torch further away.
– Practice makes perfect: If this is your first time, you might want to test the technique on a small portion before tackling the full batch.
Serving Suggestions
Ideas for Garnishing the Mini Cheesecakes
Presentation can elevate your mini crème brûlée cheesecakes from simple desserts to impressive showpieces. Here are some garnishing ideas to consider:
– Fresh Berries: Strawberries, raspberries, or blueberries add a pop of color and a refreshing contrast to the rich cheesecake.
– Mint Leaves: A sprig of fresh mint not only enhances the visual appeal but also adds a hint of freshness to each bite.
– Chocolate Shavings: Consider adding chocolate curls or shavings for a luxurious touch.
Presentation Tips for an Elegant Display
When serving your mini cheesecakes, consider using decorative plates or cake stands to enhance their visual appeal. Arrange the cheesecakes in a circle, or create height by stacking them on different levels. Drizzling a sauce, such as raspberry or chocolate, around the plate can provide a beautiful backdrop, making the dessert even more enticing.
Suggested Pairings with Beverages
Pairing your mini crème brûlée cheesecakes with the right beverage can enhance the overall experience. Some suggestions include:
– Coffee: A rich espresso or a creamy cappuccino complements the sweetness of the cheesecake beautifully.
– Dessert Wine: A sweet white wine, such as a late harvest Riesling or Sauternes, can elevate the dessert experience.
– Herbal Tea: For a lighter option, consider serving with a fragrant herbal tea, such as chamomile or mint.
Nutritional Information
Overview of the Nutritional Aspects of the Mini Cheesecakes
These mini crème brûlée cheesecakes, while decadent, can also be made with some mindful ingredient choices to cater to various dietary preferences. Each serving contains a delightful balance of creaminess and sweetness but can be adjusted based on your dietary needs.
Caloric Content and Serving Size Considerations
Typically, a mini crème brûlée cheesecake contains around 250-300 calories per serving, depending on the ingredients used. When planning for a gathering, consider serving sizes to ensure everyone can enjoy a taste without overindulging.
Discussion on Ingredients That Can Be Substituted for Healthier Options
If you’re looking for healthier alternatives, consider these substitutions:
– Low-Fat Cream Cheese: Using low-fat cream cheese can reduce the overall fat content without sacrificing flavor.
– Greek Yogurt: Substitute half of the cream cheese with Greek yogurt for added protein and a tangy flavor.
– Natural Sweeteners: Opt for honey or maple syrup instead of granulated sugar to reduce refined sugar intake.
Conclusion
Making mini crème brûlée cheesecakes at home is not only a rewarding culinary adventure but also a delightful experience that you can share with family and friends. The process may seem intricate, but the steps are manageable, and the results are undeniably impressive. The combination of the creamy cheesecake filling and the caramelized sugar topping creates a perfect balance of textures and flavors that are sure to impress.
So why not take the plunge? Gather your ingredients, follow the steps, and enjoy the process of creating this exquisite dessert. Your mini crème brûlée cheesecakes will not only be a treat for your palate but also a testament to your baking skills. Once you’ve made them, be sure to share your delicious creations and experiences with others, inspiring them to indulge in the joy of homemade desserts!