
As the leaves turn and the air becomes crisp, the flavors of fall beckon us to indulge in seasonal delights. One such treat that captures the essence of autumn is the No-Bake Mini Pumpkin Cheesecake. This delectable dessert combines the rich, creamy texture of cheesecake with the warm, spiced notes of pumpkin, making it a perfect addition to any fall gathering. With its charming presentation and delightful flavors, this recipe is not only easy to make but also a crowd-pleaser.
Understanding the Appeal of No-Bake Desserts
No-bake desserts have surged in popularity over the years, and for good reason. They offer a convenient solution for those who want to whip up a sweet treat without the hassle of turning on the oven. In today’s fast-paced world, busy lifestyles can make baking feel like a daunting task. No-bake recipes allow you to enjoy delicious desserts with minimal effort and time investment.
The appeal of mini desserts, like our No-Bake Mini Pumpkin Cheesecakes, extends beyond convenience. They are perfect for gatherings, allowing guests to indulge in a variety of flavors without overwhelming portions. Mini desserts cater to the trend of portion control, enabling everyone to enjoy a taste without feeling guilty. Plus, their charming size makes them visually appealing, adding an elegant touch to any dessert table.
Ingredients Breakdown for Mini Pumpkin Cheesecakes
Now that we understand the allure of no-bake desserts, let’s take a closer look at the key ingredients that make our No-Bake Mini Pumpkin Cheesecakes a true autumn delight.
– Graham Cracker Crumbs: The foundation of our crust, graham cracker crumbs provide a slightly sweet and crunchy texture that complements the creamy filling perfectly. This classic choice is a staple for cheesecake bases, offering a delightful contrast to the smoothness of the cheesecake.
– Unsalted Butter: A critical ingredient for richness and binding, unsalted butter helps to bring the crust together and adds a velvety mouthfeel. It’s essential to use unsalted butter for better control over the sweetness of your dessert.
– Sugar: Enhancing the sweetness of the crust, sugar balances the flavors in our mini cheesecakes. A combination of granulated sugar for the crust and powdered sugar for the filling is often used to achieve the perfect sweetness level.
– Cream Cheese: The creamy base of the cheesecake, cream cheese is what gives our mini cheesecakes their rich and luscious texture. Make sure to use full-fat cream cheese for the best results, as it creates a smoother and creamier filling.
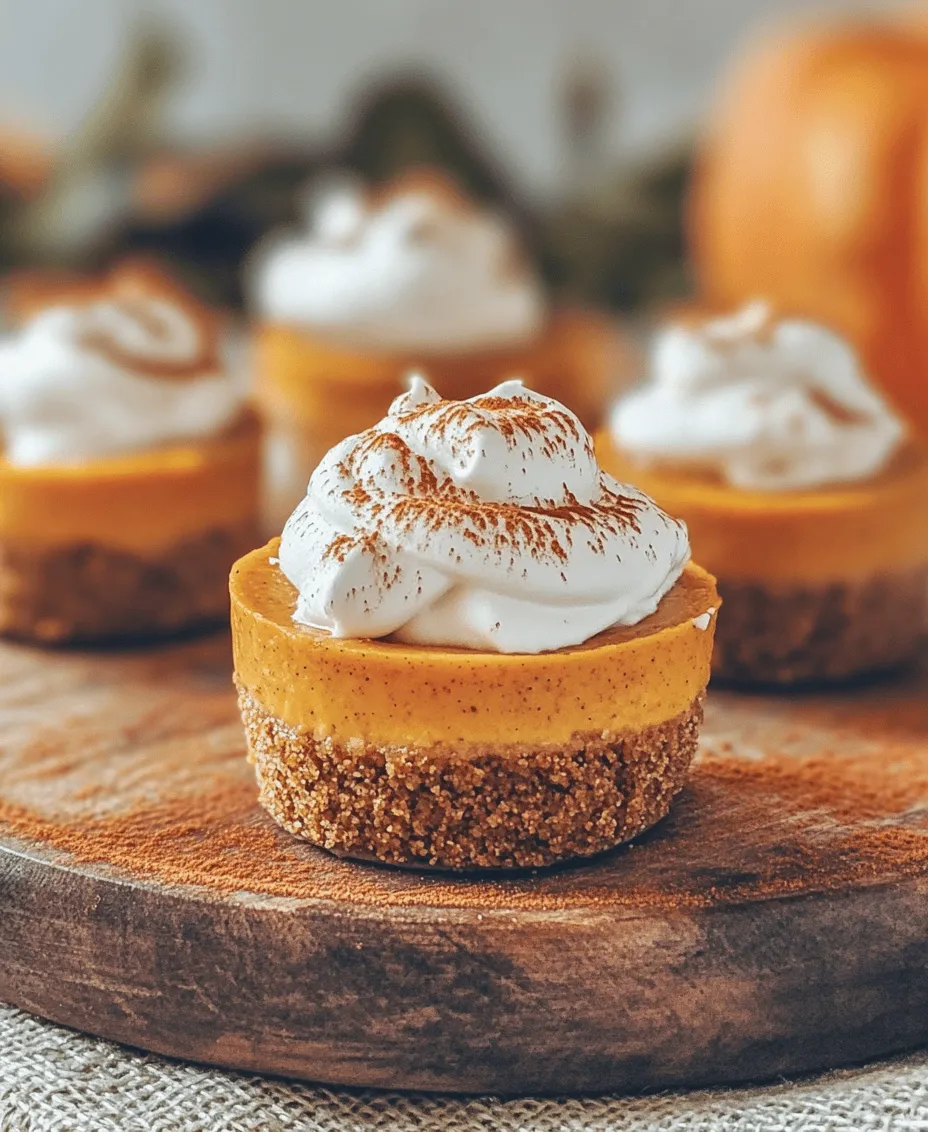
– Canned Pumpkin Puree: The star ingredient of our recipe, canned pumpkin puree adds not only flavor but also a beautiful color to our cheesecakes. It’s packed with nutrients and brings the essence of fall right into your dessert.
– Powdered Sugar: For sweetness and a smooth texture, powdered sugar is ideal in the cheesecake filling. Its fine consistency allows it to blend seamlessly into the cream cheese, ensuring a velvety finish.
– Vanilla Extract: Adding depth to the flavor, vanilla extract is a must-have in any cheesecake recipe. It enhances the overall taste, balancing the pumpkin and spices beautifully.
– Pumpkin Pie Spice: Infusing seasonal warmth, pumpkin pie spice is the perfect blend of spices for our mini cheesecakes. This typically includes cinnamon, nutmeg, ginger, and cloves, which together create that signature autumn flavor.
– Heavy Whipping Cream: For lightness and fluffiness, heavy whipping cream is whipped and folded into the cheesecake mixture. This step is crucial for achieving a light and airy texture that melts in your mouth.
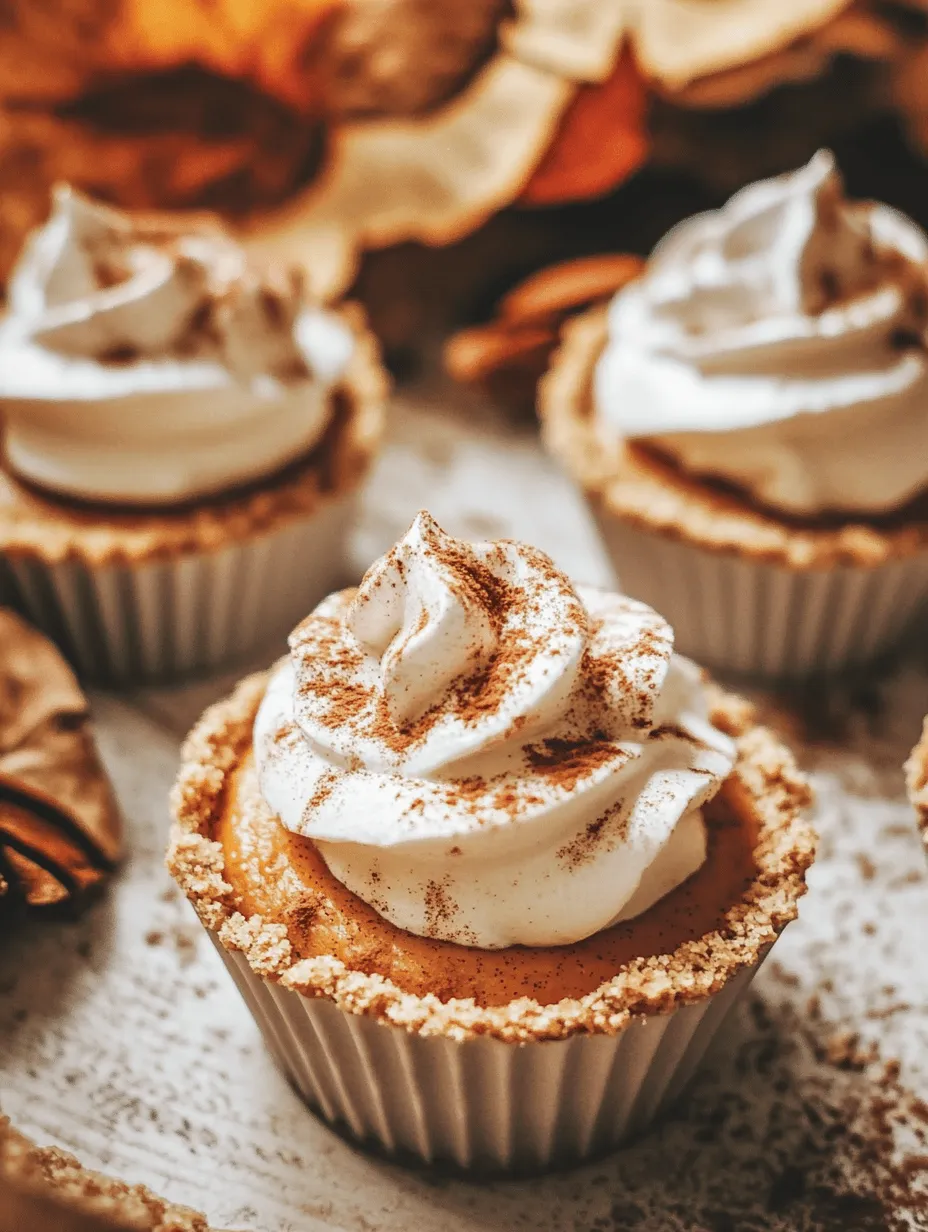
– Whipped Cream and Ground Cinnamon: As garnishes, whipped cream and a sprinkle of ground cinnamon elevate the presentation of our mini cheesecakes. They not only add a decorative touch but also enhance the overall flavor.
Step-by-Step Instructions for Crafting No-Bake Mini Pumpkin Cheesecakes
Now that we have a solid understanding of the ingredients, let’s dive into the preparation process. Crafting these delightful No-Bake Mini Pumpkin Cheesecakes is a straightforward and enjoyable experience. Follow these detailed steps to create your own mini masterpieces:
Preparing the Crust
1. Crush the Graham Crackers: Begin by crushing the graham crackers into fine crumbs. You can use a food processor for a quick and easy method, or place them in a zip-top bag and crush them with a rolling pin for a more hands-on approach. Aim for a texture similar to sand.
2. Mix the Ingredients: In a medium-sized mixing bowl, combine the crushed graham crackers, granulated sugar, and melted unsalted butter. Stir until the mixture is well combined and resembles wet sand. The butter should evenly coat the crumbs, allowing them to hold together when pressed into the molds.
3. Press into Molds: Using a tablespoon or your fingers, press the mixture firmly into the bottom of each mini cheesecake mold or cupcake liner. Ensure that the crust is even and compact, as this will provide a sturdy base for your cheesecake filling. You can use the back of a measuring spoon to help pack it down tightly.
4. Chill the Crust: Once the crusts are prepared, place the molds in the refrigerator for about 10-15 minutes to allow them to set. This will help the crust hold its shape when you add the filling.
Following these steps lays the perfect foundation for your No-Bake Mini Pumpkin Cheesecakes. The crust will provide a delicious crunch that pairs beautifully with the creamy pumpkin filling to create a delightful dessert that embodies the spirit of fall. Stay tuned as we continue with the next steps in crafting this seasonal treat!
Combining and Pressing the Crust Mixture
To create the perfect no-bake mini pumpkin cheesecakes, starting with the crust is crucial. Begin by combining your graham cracker crumbs, melted butter, and a hint of sugar in a medium-sized mixing bowl. The melted butter acts as a binding agent, ensuring that the crust holds together when pressed into the mini cheesecake cups. Mix the ingredients thoroughly until the mixture resembles wet sand. This consistency is essential for ensuring that your crust stays firm while not being too dry.
Once combined, take about one tablespoon of the crust mixture and press it firmly into the bottom of each mini cheesecake cup or muffin tin. Use the back of a tablespoon or your fingers to compress the mixture evenly. This technique not only ensures that the crust is compact but also creates a solid base for the creamy filling. Aim for an even layer, as this will help maintain the structure of the cheesecake when you serve it. After pressing the crusts, set them aside while you prepare the filling.
Creating the Creamy Pumpkin Cheesecake Filling
Now that you have the crust ready, it’s time to whip up the star of the show: the pumpkin cheesecake filling. In a large mixing bowl, combine your softened cream cheese with the granulated sugar and light brown sugar. Using an electric mixer, beat these ingredients together on medium speed until the mixture is smooth and creamy, free of lumps. This step is crucial for achieving a velvety texture in your filling.
Next, add in the pumpkin puree, vanilla extract, and pumpkin pie spice to the cream cheese mixture. The pumpkin puree lends a rich flavor and a beautiful orange hue to your cheesecakes, while the spices infuse warmth and depth. Continue mixing until all the ingredients are well incorporated and the mixture is smooth.
Once combined, it’s time to add the whipped cream. This lightens the filling, giving it that airy, fluffy texture that makes no-bake cheesecakes so delightful.
Whipping the Cream: Techniques for Achieving Perfect Peaks
For the whipped cream, start with a chilled mixing bowl and cold heavy cream. This is important because cold cream whips better and faster. Pour the heavy cream into the bowl and begin mixing at a low speed to prevent splattering. Gradually increase to high speed as the cream begins to thicken.
Whip the cream until stiff peaks form. This means that when you lift the whisk out of the bowl, the peaks hold their shape and do not droop. Be careful not to overbeat, as this can turn your cream into butter. The right consistency is key, as it will help the filling maintain its structure while remaining light and fluffy.
Folding Technique: Maintaining Airiness in the Filling
Once your whipped cream is ready, it’s time to fold it into the pumpkin mixture. Use a rubber spatula to gently incorporate the whipped cream into the pumpkin filling. Start by adding about one-third of the whipped cream to the filling and stir gently to lighten the mixture.
Then, add the remaining whipped cream and use a folding motion, which involves scraping the spatula along the sides of the bowl and lifting the mixture from the bottom. This technique helps retain the airiness of the whipped cream, ensuring that your filling stays light and fluffy.
Assembling the Cheesecakes: Tips for Even Distribution
Now that your filling is ready, it’s time to assemble the mini cheesecakes. Using a piping bag or a spoon, carefully fill each crust with the pumpkin cheesecake filling. Aim to fill each cup to the top, smoothing the surface with a spatula or the back of a spoon for an even finish.
If you’re using a piping bag, you can create decorative swirls on top, which not only looks appealing but also makes portion control easier. Ensure that the filling is evenly distributed among all cups to maintain consistency in flavor and texture across all cheesecakes.
Chilling Process: Importance of Setting and Flavor Development
Once all the cups are filled, cover them with plastic wrap or a lid and place them in the refrigerator. Allow them to chill for at least 4 hours, although overnight is preferable. Chilling is essential for the filling to set properly and for the flavors to meld together. The longer they sit, the more pronounced the pumpkin and spice flavors will become, creating a more delicious cheesecake experience.
Serving Suggestions and Presentation Ideas
When it’s time to serve your no-bake mini pumpkin cheesecakes, consider the following presentation ideas to elevate their visual appeal:
1. Ideal Occasions for Serving Mini Cheesecakes: These delightful treats are perfect for fall gatherings, Thanksgiving dinners, Halloween parties, or even cozy family dinners at home. Their individual servings make them a hit for potlucks and dessert tables.
2. Creative Plating Ideas: Serve your mini cheesecakes on a rustic wooden board, garnished with a sprinkle of cinnamon or a drizzle of caramel sauce for added flavor. You can also add a dollop of whipped cream on top of each cheesecake and garnish with a sprinkle of crushed graham crackers or a few pumpkin seeds for added texture.
3. Pairing Suggestions: Complement your mini cheesecakes with a warm beverage like spiced apple cider, chai tea, or a classic pumpkin spice latte. For dessert pairings, consider serving with a side of pecan pie or spiced cookies to enhance the fall flavors.
Storing and Preserving No-Bake Mini Pumpkin Cheesecakes
To keep your mini cheesecakes fresh and delicious, follow these storage tips:
1. Optimal Storage Methods for Freshness: Store the cheesecakes in an airtight container in the refrigerator. This will help maintain their creamy texture and prevent them from absorbing other odors in the fridge.
2. Shelf Life of Mini Cheesecakes in the Refrigerator: Properly stored, these mini cheesecakes will last up to 5 days in the refrigerator. However, they are best enjoyed within the first 2-3 days for optimal flavor and texture.
3. Freezing Options and Tips for Enjoying Later: If you want to make your cheesecakes ahead of time, you can freeze them. Place the cheesecakes in a single layer in an airtight container and freeze for up to 3 months. To thaw, simply transfer them to the refrigerator for several hours or overnight before serving.
Nutritional Insights of Mini Pumpkin Cheesecakes
Understanding the nutritional aspects of your desserts can help you enjoy them more mindfully:
1. Caloric Breakdown and Portion Sizes: Each mini cheesecake typically contains around 150-200 calories, depending on the specific ingredients used. Portion control is easier with these individual servings, allowing you to indulge without overdoing it.
2. Healthier Ingredient Alternatives for Dietary Restrictions: For a lighter version, consider using low-fat cream cheese or Greek yogurt as a base. You can also substitute sugar with natural sweeteners like maple syrup or agave nectar to reduce refined sugar content.
3. Balancing Indulgence with Nutritional Awareness: While these cheesecakes are a sweet treat, incorporating pumpkin adds fiber and vitamins A and C, making them a more nutritious option compared to many other desserts.
Conclusion: Embracing the Flavors of Fall with No-Bake Mini Pumpkin Cheesecakes
No-Bake Mini Pumpkin Cheesecakes are a delightful way to celebrate the flavors of fall without the fuss of traditional baking. With their creamy texture, spiced pumpkin flavor, and ease of preparation, these mini desserts are sure to impress your friends and family alike. Whether served at a festive gathering or enjoyed as a special treat at home, this recipe embodies the warmth and joy of the autumn season.
By following these detailed steps and tips, you can create a batch of these scrumptious cheesecakes that will become a seasonal favorite. They are not only delicious but also versatile and easy to make ahead of time, allowing you to focus on enjoying the company of your loved ones. Embrace the season and treat yourself to these irresistible no-bake mini pumpkin cheesecakes!
