Introduction
As the leaves begin to turn and the air crispens, the culinary world welcomes the much-anticipated pumpkin season. Pumpkin desserts have become synonymous with fall, evoking feelings of warmth and nostalgia. Whether it be pumpkin pies, lattes, or muffins, the rich, earthy flavor of pumpkin captivates taste buds and brings a sense of comfort. Among these seasonal delights, No-Bake Mini Pumpkin Cheesecakes are an exceptional treat that combines the creamy decadence of cheesecake with the seasonal charm of pumpkin.
These delightful mini cheesecakes are perfect for any fall gathering, from Thanksgiving dinners to casual autumn get-togethers. They offer an elegant presentation while being incredibly easy to make, making them an ideal choice for home cooks of all skill levels. Unlike traditional baked cheesecakes that require careful monitoring and time in the oven, these no-bake beauties come together swiftly, allowing you to enjoy all the flavors of fall without the fuss.
Understanding the Appeal of No-Bake Cheesecakes
No-bake cheesecakes have gained popularity for their simplicity and the ease with which they can be prepared. The concept is straightforward: a creamy filling made from cream cheese, sugar, and various flavorings is set using cold temperatures rather than the traditional baking method. This results in a cheesecake that is light and airy, with a texture that melts in your mouth.
One of the most significant differences between baked and no-bake cheesecakes lies in their textures. Baked cheesecakes tend to be denser and richer, thanks to the cooking process that creates a firmer consistency. In contrast, no-bake cheesecakes are often fluffier and creamier, making them a refreshing alternative, particularly in warmer months or for those who prefer a lighter dessert.
Additionally, the benefits of making no-bake cheesecakes extend beyond their texture and taste. They are a time-saving option for busy bakers. Without the need for an oven, you can whip up a batch in no time, making them a fantastic choice for last-minute gatherings or weeknight desserts. Moreover, especially during the hot summer and early fall months, avoiding the oven helps keep your kitchen cool.
Ingredients Breakdown
To create the perfect No-Bake Mini Pumpkin Cheesecakes, it’s essential to understand each ingredient’s role in the recipe. Here’s a breakdown of what you’ll need and why each component is crucial for achieving that delightful pumpkin flavor and creamy texture:
Graham Cracker Crumbs
Graham cracker crumbs serve as the base for the cheesecake crust, providing a sweet and slightly nutty flavor that pairs beautifully with pumpkin. The texture is key; crushed graham crackers offer a crumbly and slightly crunchy foundation that contrasts nicely with the creamy filling. If you’re looking to mix things up, consider alternatives like crushed vanilla wafers or digestive biscuits for a twist on the classic crust.
Unsalted Butter
Unsalted butter is vital in binding the graham cracker crumbs together, forming a cohesive crust that holds its shape. It also adds richness and enhances the overall flavor of the crust. Be sure to melt the butter before combining it with the crumbs to ensure even distribution and a firm, satisfying texture.
Granulated Sugar
Granulated sugar is essential for sweetness in both the crust and the filling. It balances the richness of the cream cheese and the earthiness of the pumpkin, creating a harmonious flavor profile. The amount can be adjusted to suit your taste; feel free to experiment with less sugar if you prefer a less sweet dessert.
Cream Cheese
Cream cheese is the star of any cheesecake, providing that signature creamy texture and tangy flavor. It’s crucial to use softened cream cheese for this recipe; it allows for easy blending with the other ingredients, resulting in a smooth and luscious filling. For the best results, leave the cream cheese out at room temperature for about 30 minutes before starting.
Pumpkin Puree
When it comes to pumpkin desserts, using the right type of pumpkin is vital. Opt for canned pumpkin puree rather than pumpkin pie filling, which is pre-sweetened and spiced. Pure pumpkin puree gives you complete control over the sweetness and spice levels, allowing the natural flavors of the pumpkin to shine through in your cheesecakes.
Powdered Sugar
Powdered sugar is another key ingredient in achieving a velvety filling. Its fine texture allows it to dissolve easily into the cream cheese mixture, preventing any gritty texture and ensuring a smooth, creamy consistency. It also adds sweetness without overpowering the other flavors.
Vanilla Extract
Vanilla extract enhances the flavors of the other ingredients, adding depth and complexity to the cheesecake. A splash of quality vanilla extract can elevate your dessert, making it taste more homemade and gourmet.
Pumpkin Pie Spice
Pumpkin pie spice is a quintessential fall ingredient, combining warm spices like cinnamon, nutmeg, and ginger. It brings a comforting warmth to the mini cheesecakes, making them perfect for the season. If you don’t have pumpkin pie spice on hand, you can create your blend using individual spices.
Heavy Whipping Cream
Heavy whipping cream is the secret to achieving that light and airy texture in no-bake cheesecakes. Whipping the cream until stiff peaks form and folding it into the cream cheese mixture lightens the filling, making it feel indulgent yet not overly heavy. This step is crucial for creating that melt-in-your-mouth experience.
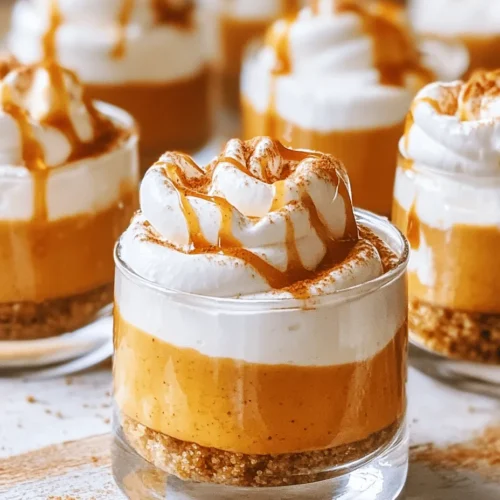
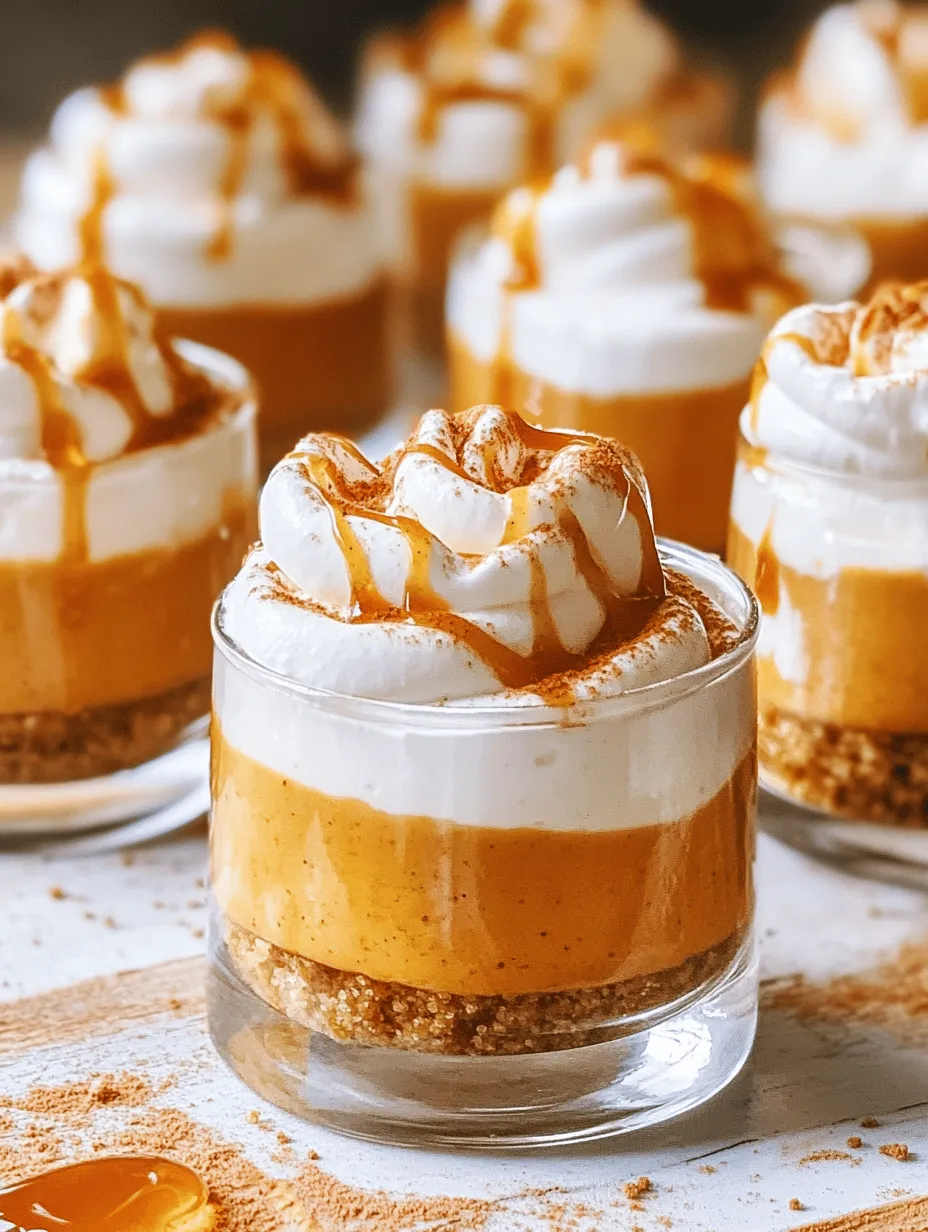
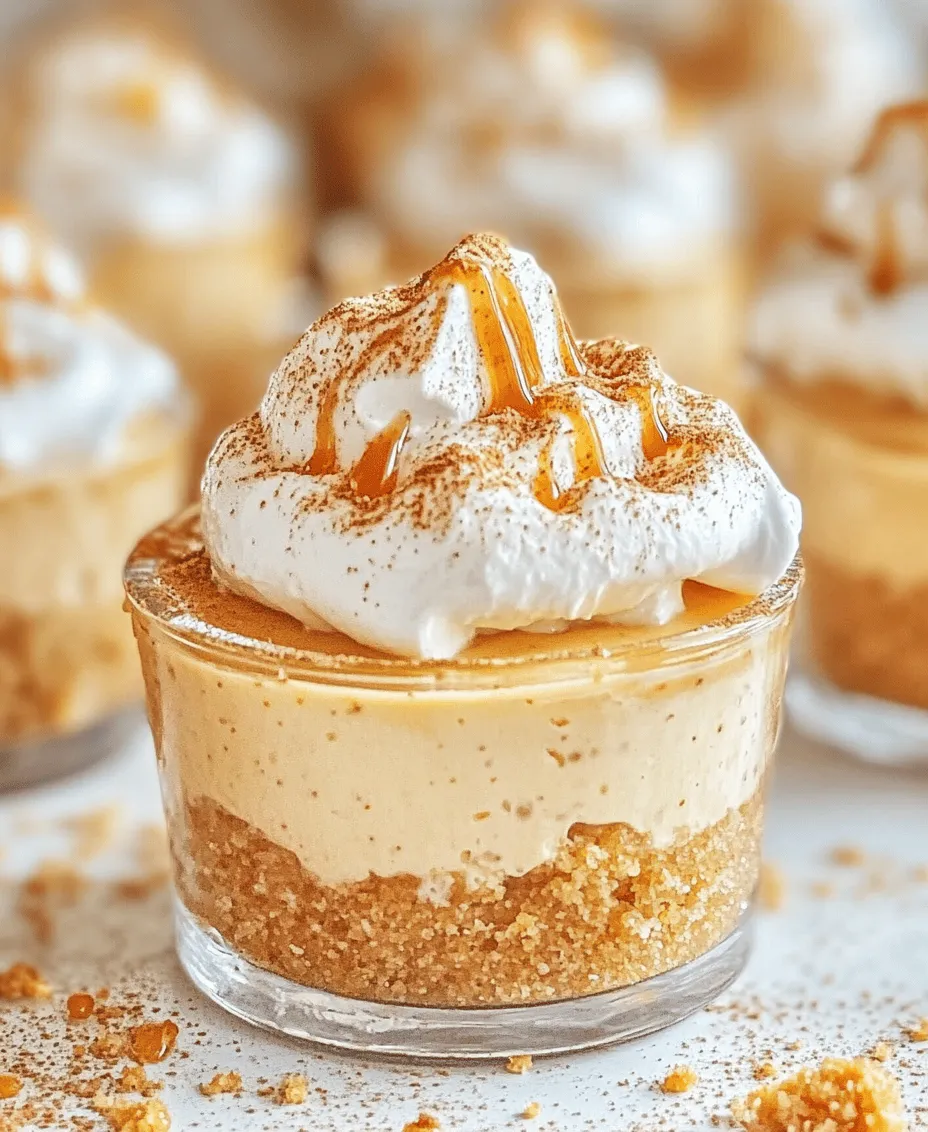
Whipped Cream and Garnishes
To finish these mini cheesecakes, a dollop of whipped cream on top is not only visually appealing but also adds an extra layer of creaminess. You can use store-bought whipped cream or make your own with heavy cream and a bit of sugar and vanilla. Feel free to get creative with garnishes, such as a sprinkle of cinnamon, a drizzle of caramel sauce, or even crushed graham crackers for added texture and flavor.
Step-by-Step Instructions for Making Mini Pumpkin Cheesecakes
Now that we’ve covered the ingredients, let’s dive into the step-by-step instructions for making your Delightful No-Bake Mini Pumpkin Cheesecakes. This process is simple and straightforward, making it a fun activity for bakers of all ages.
Step 1: Prepare the Crust
1. Begin by preheating your oven to 350°F (if you choose to toast your crumbs for extra flavor, though this is optional).
2. In a mixing bowl, combine the graham cracker crumbs and granulated sugar.
3. Melt the unsalted butter in a microwave or stovetop, then pour it into the crumb mixture. Mix until the crumbs are evenly coated and the mixture resembles wet sand.
4. If you opted to toast your crumbs, spread the mixture evenly into a 9-inch pie dish or individual mini cheesecake cups. Use the back of a measuring cup to firmly press the crumbs down to create a solid base.
5. Bake in the preheated oven for about 5-7 minutes, then remove and allow to cool completely before adding the filling.
Step 2: Prepare the Filling
1. In a large mixing bowl, beat the softened cream cheese with an electric mixer until it is smooth and creamy.
2. Gradually add in the powdered sugar and continue to mix until fully combined.
3. Next, incorporate the pumpkin puree and vanilla extract, mixing until the mixture is well blended and smooth.
4. Sprinkle in the pumpkin pie spice and mix until evenly distributed throughout the filling.
5. In a separate bowl, whip the heavy cream until stiff peaks form. Gently fold the whipped cream into the cream cheese mixture, being careful not to deflate the whipped cream.
Step 3: Assemble the Mini Cheesecakes
1. Once the crusts have cooled, evenly distribute the pumpkin cream cheese filling over the crusts in your prepared dishes.
2. Smooth the tops with a spatula or the back of a spoon for an even finish.
3. Cover the mini cheesecakes with plastic wrap or foil and refrigerate for at least 4 hours, or overnight for the best flavor and texture.
Step 4: Serve and Garnish
1. When ready to serve, remove the cheesecakes from the refrigerator.
2. Top each mini cheesecake with a generous dollop of whipped cream and any additional garnishes you desire.
3. Enjoy your delightful no-bake mini pumpkin cheesecakes and watch as they become a favorite for everyone who tries them!
Stay tuned for the next part of this article, where we’ll cover tips for achieving the best results and answer some common questions about making these delightful treats!
Detailed Preparation of the Crust
To create a delightful base for your No-Bake Mini Pumpkin Cheesecakes, we will start by preparing a simple yet flavorful crust. The crust typically consists of crushed graham crackers, which provide a sweet and crunchy texture that complements the creamy pumpkin filling beautifully.
1. Gather Your Ingredients:
– 1 ½ cups of graham cracker crumbs
– ½ cup granulated sugar
– ½ cup unsalted butter, melted
– A pinch of salt (optional)
2. Crush the Graham Crackers: If you haven’t purchased pre-made graham cracker crumbs, you can crush whole graham crackers in a food processor or place them in a zip-top bag and crush them with a rolling pin until they reach a fine consistency.
3. Combine Ingredients: In a mixing bowl, combine the graham cracker crumbs, granulated sugar, and a pinch of salt. Mix well to ensure that the sugar is evenly distributed.
4. Add Melted Butter: Pour the melted butter into the crumb mixture and stir until all crumbs are coated and the mixture resembles wet sand. This binding agent is crucial for maintaining the structure of the crust.
Mixing Ingredients and Achieving the Right Consistency
Once your crust mixture is ready, the next step is to prepare the creamy pumpkin filling. This part requires careful mixing to ensure a smooth and luscious consistency.
1. Gather Your Filling Ingredients:
– 8 oz cream cheese, softened
– 1 cup pumpkin puree (not pumpkin pie filling)
– 1 cup powdered sugar
– 1 teaspoon vanilla extract
– 1 teaspoon pumpkin pie spice (or a mixture of cinnamon, nutmeg, and ginger)
– 1 cup heavy whipping cream
2. Mix Cream Cheese: In a large mixing bowl, start by beating the softened cream cheese with an electric mixer on medium speed until it is smooth and creamy. This step is crucial, as it helps eliminate lumps. Scrape down the sides of the bowl to ensure all cream cheese is mixed evenly.
3. Add Pumpkin Puree: Gradually add the pumpkin puree to the cream cheese, mixing until fully incorporated.
4. Incorporate Sugar and Spices: Next, add the powdered sugar, vanilla extract, and pumpkin pie spice. Mix until the filling is smooth and well combined. The gradual addition of these ingredients helps avoid lumps and ensures a velvety texture.
Proper Technique for Pressing Crust into Cups
With your crust and filling prepared, it’s time to assemble the mini cheesecakes. Proper technique in pressing the crust into the cups is essential for ensuring they hold their shape.
1. Prepare Your Cups: Depending on your preference, you can use mini cupcake liners, small mason jars, or individual serving cups.
2. Press the Crust Mixture: Take about 1-2 tablespoons of the crust mixture and place it at the bottom of each cup. Using the back of a small spoon or a shot glass, firmly press the mixture down to create an even layer. Ensure the crust is tightly packed to prevent it from crumbling later.
Crafting the Creamy Pumpkin Filling
Now that the crust is in place, it’s time to whip up the creamy pumpkin filling.
1. Whip the Whipping Cream: In a separate mixing bowl, beat the heavy whipping cream with an electric mixer on high speed until stiff peaks form. This process typically takes 3-4 minutes. Be careful not to overwhip, as it can turn into butter.
2. Fold in the Whipped Cream: Gently fold the whipped cream into the pumpkin mixture in two additions. Use a spatula to lift and fold the mixture from the bottom of the bowl, ensuring you maintain the light and airy texture of the whipped cream.
Filling the Cups with Filling: Best Practices for Presentation
When filling the cups with the pumpkin mixture, presentation can greatly enhance the appeal of your No-Bake Mini Pumpkin Cheesecakes.
1. Use a Piping Bag: For a clean and professional look, transfer the pumpkin filling into a piping bag fitted with a large round tip. If you don’t have a piping bag, you can use a zip-top bag with a corner snipped off.
2. Fill the Cups: Pipe the filling into each cup, starting from the outer edge and working your way to the center. This technique helps create a beautiful swirl and ensures an even distribution of filling.
3. Smooth the Top: If desired, use a spatula or the back of a spoon to lightly smooth the tops of the filled cups for a neat finish.
Chilling Process
The chilling process is vital for developing the flavors and achieving the right texture for your cheesecakes.
1. Refrigerate: Once your cups are filled, place them in the refrigerator for at least 4 hours, or preferably overnight. This chilling time allows the flavors to meld and ensures that the filling sets properly.
2. Importance of Refrigeration: Chilling not only firms up the filling but also enhances the overall taste, making each bite a delightful experience.
Serving Suggestions
When it comes to serving your No-Bake Mini Pumpkin Cheesecakes, creativity is key. Here are some ideas to elevate your presentation:
1. Classic Toppings: A dollop of freshly whipped cream on top of each cheesecake is a classic choice. Dust with a sprinkle of cinnamon to add a touch of warmth.
2. Caramel Drizzle: For a sweet twist, drizzle caramel sauce over the cheesecakes. The contrast of flavors between the pumpkin and caramel will be a hit.
3. Chocolate Shavings: Adding chocolate shavings or mini chocolate chips can provide a delightful texture and flavor contrast.
4. Presentation Tips: If you’re serving these at a gathering, consider placing them on a decorative platter or stand. Garnishing with a sprinkle of crushed graham crackers or a cinnamon stick can add an attractive touch.
5. Pairing Suggestions: These mini cheesecakes pair wonderfully with beverages such as coffee, tea, or festive drinks like apple cider or mulled wine. The warm spices in the pumpkin filling complement these drinks beautifully.
Nutritional Information
For those who are health-conscious, here is an overview of the nutritional content per serving:
– Calories: Approximately 250-300 calories (depending on the size of the cup and toppings)
– Fat: 18g
– Carbohydrates: 27g
– Protein: 3g
– Fiber: 1g
– Sugar: 15g
Dietary Modifications
For those looking to modify the recipe to fit dietary restrictions, consider these options:
– Gluten-Free Crust: Substitute regular graham crackers with gluten-free cookies or almond flour for a delicious gluten-free version.
– Lower Sugar Options: Replace granulated and powdered sugar with suitable alternatives like maple syrup, honey, or a sugar substitute to cut down on sugar content.
Conclusion
These No-Bake Mini Pumpkin Cheesecakes are a delightful way to celebrate the flavors of fall. Their creamy texture, combined with the spiced pumpkin filling and crunchy crust, makes them an irresistible dessert that will leave your guests wanting more. Whether you enjoy them at a holiday gathering, a cozy family dinner, or just as a sweet treat for yourself, they are sure to impress.
Don’t hesitate to make these mini cheesecakes a staple in your recipe collection throughout the fall season and beyond. Remember the joy of sharing homemade treats with loved ones; there’s something special about creating and enjoying food together. So gather your ingredients, follow these steps, and indulge in the delightful experience of making and sharing these charming No-Bake Mini Pumpkin Cheesecakes.